Opter 2025.12.00
Last updated: 20 May 2026
In this article
Opter in a new design
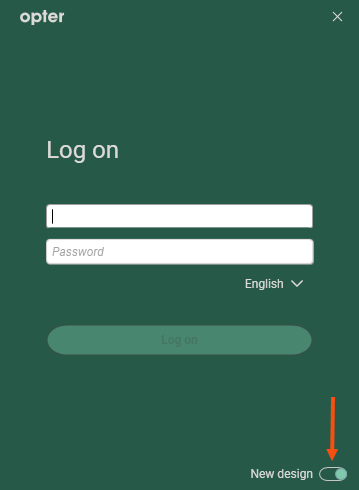
Opter has been given a new look, and some features have been improved as part of the redesign.
When you log in, you can choose between the new or classic design by clicking the toggle at the bottom right. Opter saves your last selection.
We recommend that you use the new design. The classic design will eventually be phased out.
Read about the new design in New design.
More information:
Quick search in the order reception department
The search function in the order reception section is one of the features that has been improved as part of the new design.
Select Automatic and enter the order number, invoice number, consignment note number, parcel number, sender reference, recipient reference or extra ID 1–extra ID 5 in the search field. Press Search or Enter. Opter then searches through orders with order dates from the last three months.
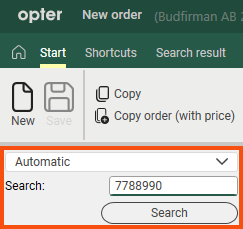
If you enter a customer code in the search field, Opter will display the most recent orders in the dispatch system where the customer code matches. If you leave the search field blank and click Search, Opter will display the 50 most recent orders from dispatch that have not yet been dispatched.
Further details on the quick search function can be found in Order reception.
More information:
Size adjustments for groups in order reception
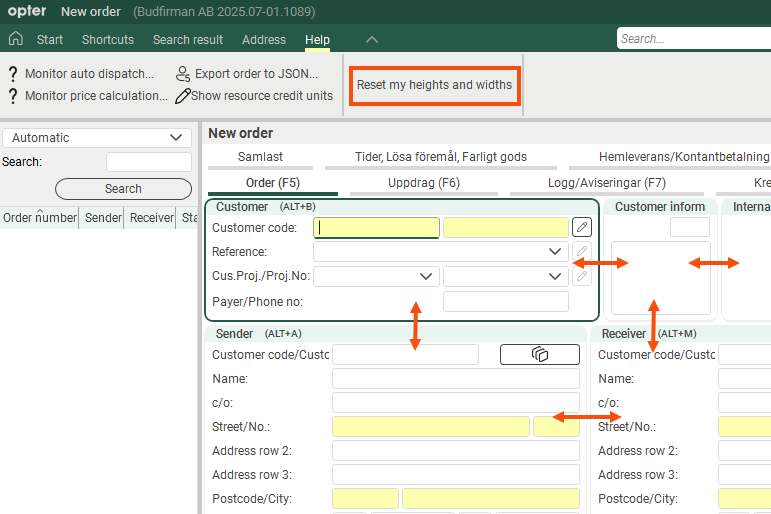
In the order reception section, each individual user can adjust the size (height/width) of the groups by dragging the group borders.
-
The following applies to classic design:
The height and width of the groups in the order reception area are saved globally in your Opter for each order configuration. This means that if a user changes the width of a group, it affects all users. This can lead to undesirable effects, particularly when several users are working on different computers with different resolutions or screen sizes.
-
The following applies to the new design:
Opter saves group sizes by order settings, user and computer.
If you adjust the group sizes in the order reception screen, Opter will automatically save your changes (for the current order settings), so that the order reception screen will look the same the next time you open it. If you work on different computers (with, for example, different resolutions or screen sizes), Opter will save your settings for each computer.
If you have adjusted the group sizes and later wish to revert to the default setting, click Reset my heights and widths (in the Help menu in the order reception area). The size of the groups in your order reception will then be reset to the default values saved for the current order settings. If you want to save new default dimensions for an order configuration, click Make my settings the default on the Tab settings tab in the window Order entry settings.
If you click on Make my settings the default, the following will happen to the order setting highlighted in the list on the left:
-
The height and width of the groups in the order reception that you currently have are set for all users who have not made their own size adjustments.
-
Users who have customised their own settings will retain them, but if they click Reset my heights and widths, your current settings will be set as the default. If they then make their own adjustments, those settings are saved for each order, user and computer.
-
More information:
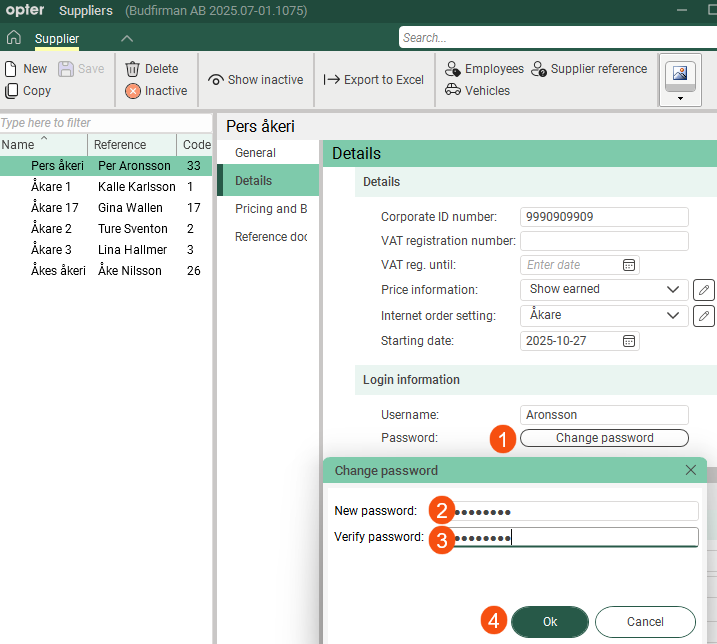
Passwords for staff and vehicles
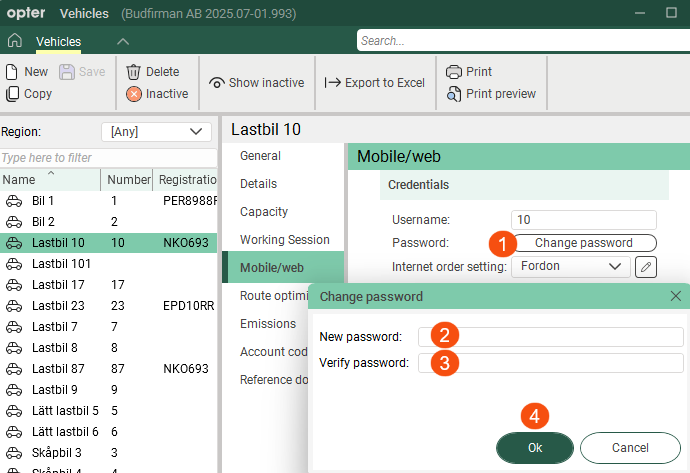
Employee and vehicle passwords are no longer displayed in the registers. If someone has forgotten their password, you can easily create a new one by clicking on Change password on the tab Mobile/web. Enter the new password in fields New password and Verify password, then click Ok.
More information:
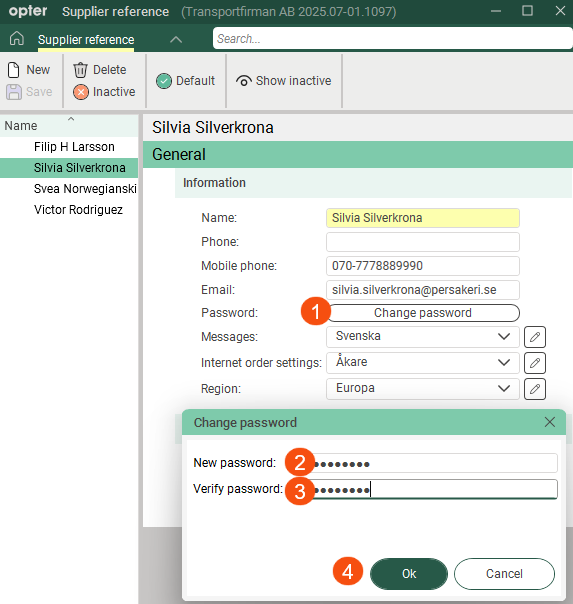
Passwords for subcontractors, hauliers and supplier references
Passwords for subcontractors, hauliers and supplier references are no longer displayed in the registers. If someone has forgotten their password, you can easily create a new one by clicking on Change password on the tab Details. Enter the new password in fields New password and Verify password, then click Ok.
Passwords are case-sensitive; in other words, Opter distinguishes between upper and lower case letters. “PASSWORD&!999” and “Password&!999” are two different passwords.
To open the Supplier reference window, click Supplier Reference in the rider register menu.
More information:
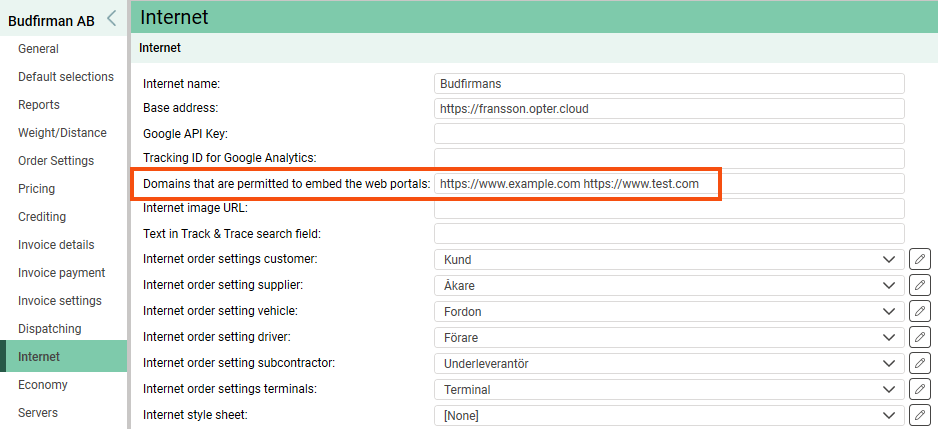
Web portals in iframes
It is now possible to embed the web portals on another website. Specify which domains are permitted to do so by entering the full URL in the Domains that are permitted to embed the web portals field on the Internet tab in the office settings.
More information:
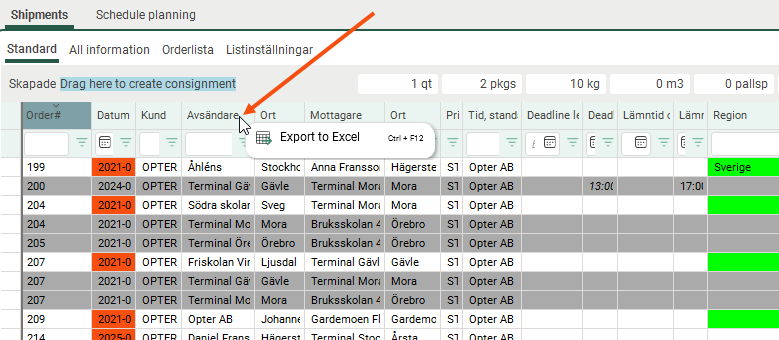
Export to Excel
Most registers and lists can now be exported to Excel, such as dispatch shipments and tariffs. In the registers, the option is available on the menu as before. In lists, right-click and select Export to Excel.
In dispatch, you must right-click on a column header to export.
Other news
New columns in dispatch:
-
Distance (order): Shows the estimated distance of the order.
-
Distance (shipment): Displays the estimated distance of the shipment.
-
Distance (auto): Primarily displays the estimated distance of the shipment. If the shipment has no distance, the order’s estimated distance is displayed.
Distances are shown in kilometres. These columns can be useful, for example, if you want to see the distances between consignments in dispatch.
If you want the columns to appear in the dispatch view, add them in the window Dispatch settings.
More information:
If you work with consignments, it may be useful to know which consignment order number a shipment or an order belongs to. Add the column Consignment order no..
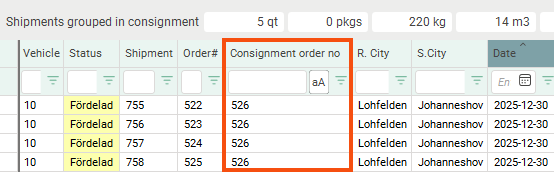
More information:
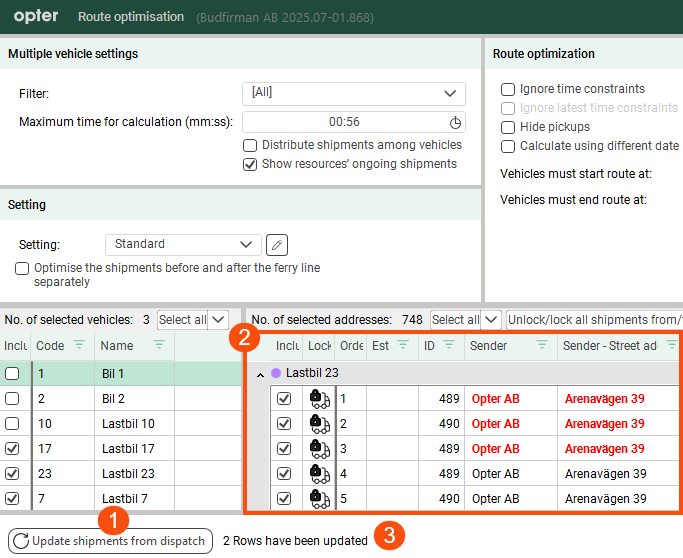
Previously, updates were sent automatically and continuously from dispatch to the display Route optimisation. This feature was removed in Opter 2025.06.00 because it was causing other issues.
You can now update the address list manually by clicking Update shipments from dispatch or pressing F5 in the route optimisation window. All information about the shipments is updated, but no new shipments are added or removed. The new button is useful if you are working in the dispatch and route optimisation windows at the same time.
Don’t forget to recalculate the route sequence if the address list has been updated.
More information:
Applies only to multiple vehicle optimization.
In window Route optimisation (F9), the tick box Lock shipments to existing resource has been removed and replaced with the new button Unlock/lock all shipments from/to the resources (above the address list) and the option Unlock/lock selected shipments from/to the resource that appears in the menu when you right-click on selected shipments in the address list.

More information:
The contribution margin is shown in per cent and is calculated as follows:
Result/Income
Tip You can also add the field Contribution margin to the order reception. Click Settings > Order reception > Order settings > the More settings tab and select Show contribution margin. Save.
More information:
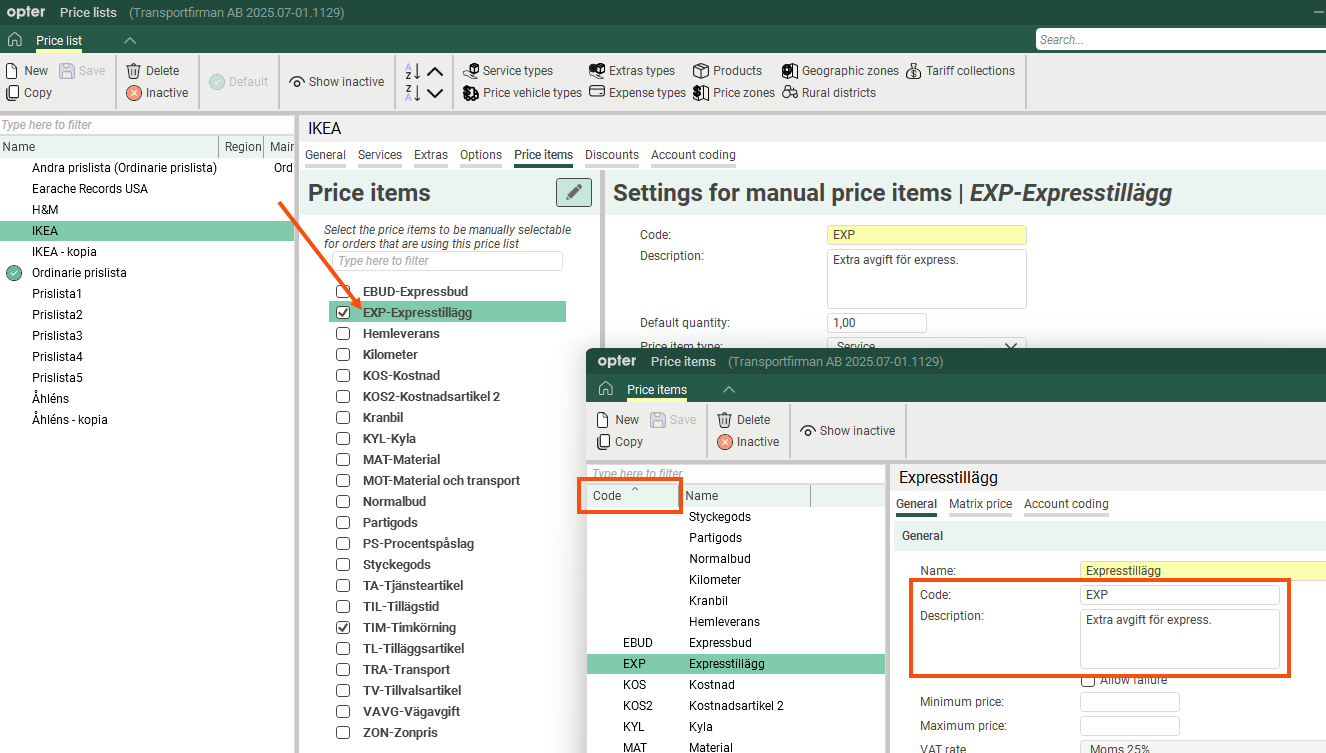
You can now enter the code and description for price items directly in the item register, where you can also sort by item code. The Price items tab in the price list now also displays the code in the name of the price item.
More information:
It is now possible to base new price generations on prices applicable on a specific date, whether past or future, rather than just on prices applicable today. This means you can create several price tiers that build on one another without having to calculate the percentage change between the second and third tiers, and so on.
More information:
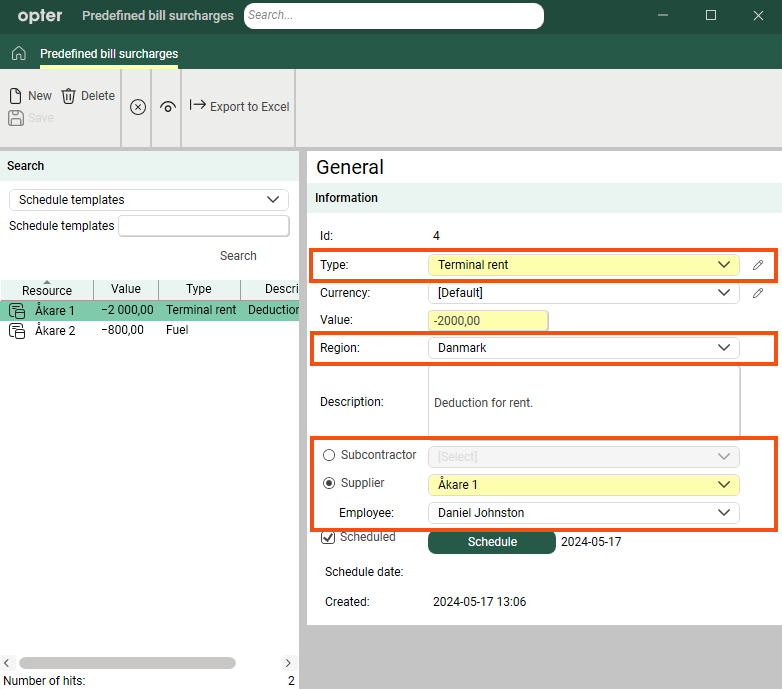
The account coding for supplier bill adjustments now also takes into account the subcontractor or employee/vehicle specified on the bill surcharge. Previously, the account coding was determined solely by the type of supplier bill adjustments.
The region specified in the bill surcharge is now also used for account coding. Previously, the adjustment was always posted according to the region of the supplier bill, regardless of what was stated on the bill surcharge.
More information:
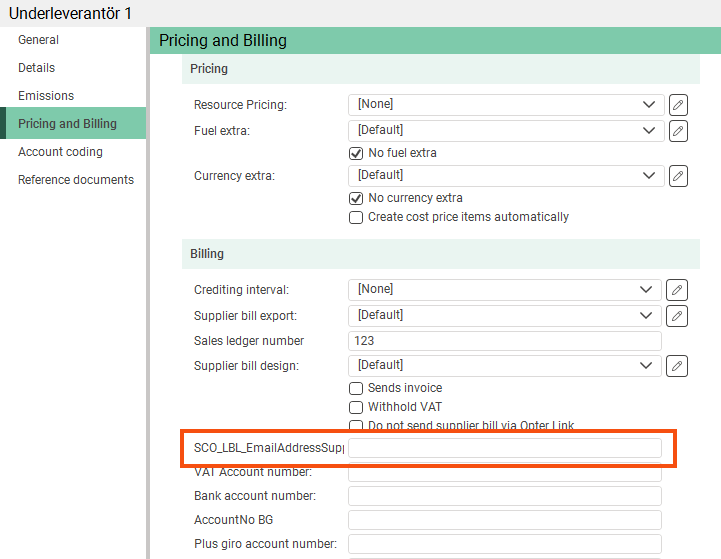
It is now possible to send supplier bills to an email address other than the one to which notifications are sent. Enter the address in the Email supplier bill export field on the Pricing and Billing tab in the subcontractor register. Notifications are still sent to the address listed under Contact Information on the tab General.
If you do not specify a specific address for supplier bills, they will be sent to the same address as the notifications.
Applies only to settlement exports of types PDF, XmlSerializer and Fortnox.
Further information:
Swedish bank account numbers consist of a clearing code (four to five digits) and an account number.
Fortnox has one field for the clearing number and one for the account number, whereas Opter has one field (Bank account number) that can contain either the clearing number and the account number, or just the account number. Opter can now distinguish between the clearing number and the account number if you enter them in the correct format in the field Bank account number.
Before you export supplier bills to Fortnox, please check that (for Swedish bank account numbers) both the clearing number and the account number are entered in the correct format in field Bank account number on tab Pricing and Billing in the driver register/subcontractor register. The correct format is, for example, the clearing code, a space, and then the account number. If it is not a Swedish bank account number, enter all the digits in sequence in the field.
Further information:
The new column Options can be added to the customer web and resource web portals.
The Consignment ID column (which shows the order number of the consignment) can now also be added on the customer web. Previously, this column could only be added to the resource webs.
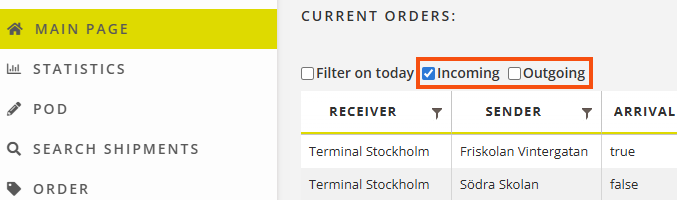
On the terminal website, you can now filter the list on the home page by Incoming and Outgoing orders.
Further information:
The settings have been configured so that the Internal message column can be displayed on the driver and subcontractor web without users being able to edit or add messages.
To view internal messages, add the column as usual on the tab Columns in the lists and fields in the detail view.
If you also want the carrier/subcontractor to be able to edit and add internal messages, tick Add and change internal message on the order under The resource webs on the tab Menu alternatives and functions.

Further information:
It is now possible to display the currency code for the customer’s currency and the default currency on account statements using the report tags CUR_Code_Customer and CUR_Code_Standard, respectively.
It is now possible to display the sender’s and recipient’s telephone numbers on invoices using the report tags ADR_Phone_From and ADR_Phone_To.
More information:
It is now possible to reduce the file size of PDF files for freight bills and parcel labels by removing all text formatting when they are attached to notifications, for example. Select Reduce the size of the PDF file in the window Reports.
The function for compressing PDF attachments in invoice exports has not changed. It is still set for each invoice export.
More information:
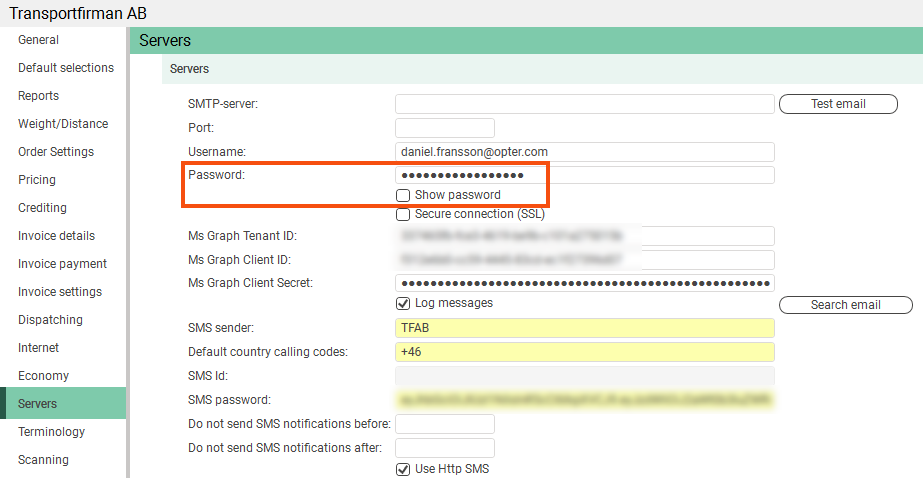
The password for the SMTP server on the Servers tab in the Office settings is now hidden, but it can be displayed by ticking a box. The same applies to passwords for EDI transactions.
More information:
The methods PATCH and PUT can now be used to create orders in the TextEdi resource in the EDI API. Previously, orders could only be created using POST.
More information:
Swagger if you have a cloud:
https://transportfirmanse.opter.cloud/api/index.html?urls.primaryName=Opter+EDI+API+v1
Replace “transportfirmanse” with your cloud name (company name + country code).
Swagger if you have an on-premise setup:
https://transportfirman.se/api/index.html?urls.primaryName=Opter+EDI+API+v1
Replace “transportfirman.se” with your web address or IP address.
You can now set how long the Postrack unit can remain offline before Opter Driver takes over positioning. Enter the number of minutes in the mobile data settings PosTrack.IdleTimeout (the default is 30 minutes).
More information:
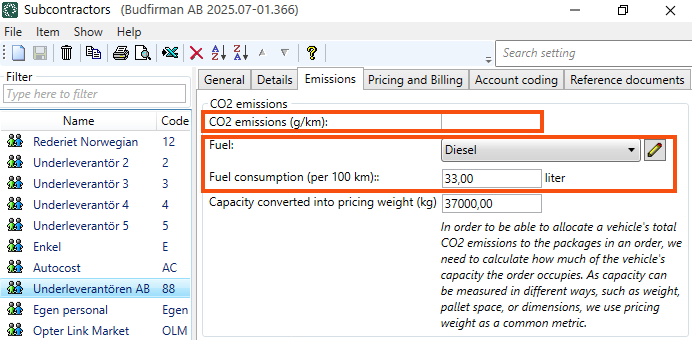
Previously, CO₂ emissions were calculated based on the price vehicle type if the shipment was subcontracted to a contractor. You can now enter details regarding CO2 emissions (e.g. fuel and fuel consumption) in the subcontractor register. CO2 emissions for shipments that are subcontracted are based primarily on the settings in the subcontractor register and secondarily on the price vehicle type.
Further information:
In Opter 2025.06.00 and earlier versions, the CO2 emissions for the shipment are calculated based on the distance provided by Opter/PTV, even if the distance has been entered manually on the order and the order contains only one shipment.
From 00:00 on 25 December 2025, the shipment will automatically be assigned the same distance as you have specified manually on the order, provided that the order contains only one shipment and that shipment does not have a manually specified distance. This means, therefore, that the calculated CO2 emissions for the shipment are based on the distance entered manually on the order.
Further information:
The statistics report Total is now called By office, and Overview is a bonus.
In the statistics reports, you can see, among other things, the fuel consumption for the shipment on the row (in the column Consumption).
In the statistics report Overview, you can see, amongst other things, whether any shipments are missing fuel consumption data in column Shipments without consumption (in the table Shipments).
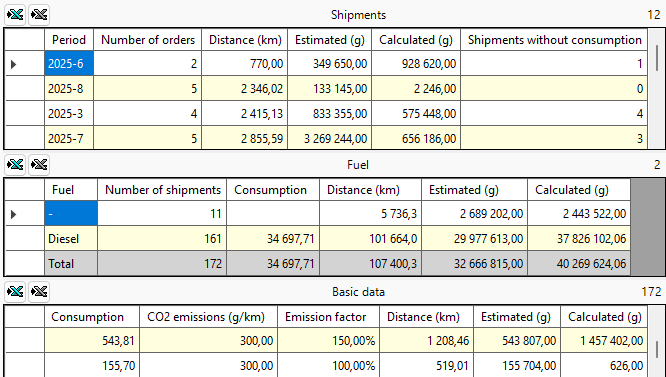
Further information:
The statistical report Load factor provides an overview of how well vehicle capacity has been utilised over a selected period. It shows the occupancy rate per vehicle and day, as well as the average occupancy rate for the selected period. The aim is to provide the organisation with a simple framework for monitoring capacity utilisation and identifying patterns in line haul services and similar flows.
Load factor is a complex concept, particularly when consignments and goods that are loaded and unloaded during the journey are taken into account. The statistical report is therefore not intended to be exhaustive, but should be viewed as a tool for general analysis suitable for certain purposes. One useful application could be, for example, when you want to see the load factor for vehicles in line haul where goods are loaded and unloaded within the same 24-hour period.
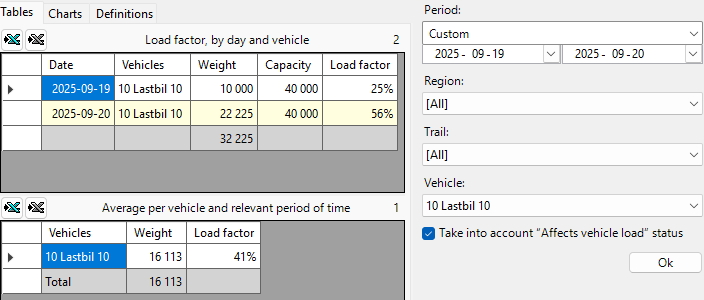
Further information:
Columns Extra ID 1–Extra ID 8 have been added to the statistics report Pricing > Cost price item list. This may be useful if you want to compile a list of price items and their custom fields.
Further information:
Responsible sales person from the customer register = responsibleSalesPersonId in the resource Customers.
Stackable in the package line = stackable in the resource Statistics.Package (includePackages).
Target cost from the vehicle register = cost in the resource Statistics.Vehicle (includeVehicles).
Further information:
Swagger if you have a cloud:
https://transportfirmanse.opter.cloud/api/index.html?urls.primaryName=Opter+EDI+API+v1
Replace “transportfirmanse” with your cloud name (company name + country code).
Swagger if you have an on-premise setup:
https://transportfirman.se/api/index.html?urls.primaryName=Opter+EDI+API+v1
Replace “transportfirman.se” with your web address or IP address.
You can now hide the shortcuts for the most recent scan settings in Opter Driver by setting the mobile data settings ShowLastScanPickupPermission and ShowLastScanDeliveryPermission to “false”. Requires Opter Driver 2.4.24.
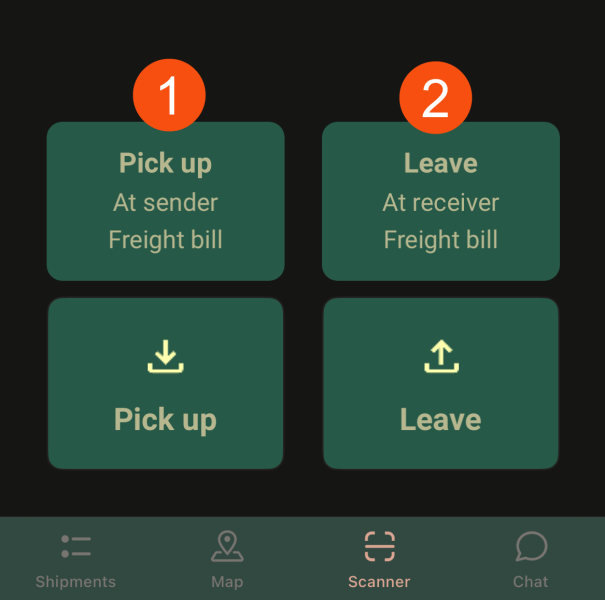
Further information:
There is now a new complete code example for App.OpterDriver.Design that you can copy if you want the app to use the default layout, or if you want to start with the default layout and then make your own changes.
New features in the code example for App.OpterDriver.Design for version 2025.12.00 and later:
The following items were already present but have been added to the <summary> section (the task list) in the standard layout:
EARLIESTPICKUPDATE.
EARLIESTDELIVERYDATE.
The following has been added and is displayed in the default layout:
INDICATOR_DELIVERY_NOT_HOME
 and $Design_DeliveryNotHome (The receiver does not need to be present).
Under POD in the detail view, you can now scroll sideways to view all the information.
The following has been added, but is commented out:
PACKAGE.AREA and $Design_PackageArea_Short (PSP)
DELEXTERNALID and $Design_ExternalOrderNo (External order no.)
EMAILFROM, EMAILTO, DELIVERYEMAILFROM and DELIVERYEMAILTO
ADDRESSHUBNAMEFROM, ADDRESSHUBNAMETO, DELIVERYADDRESSHUBNAMEFROM and DELIVERYADDRESSHUBNAMETO
ADDRESSHUBTEXTFROM, ADDRESSHUBTEXTTO, DELIVERYADDRESSHUBTEXTFROM and DELIVERYADDRESSHUBTEXTTO
CUSTOMERPHONE1 and CUSTOMERPHONE2
The following has been added as of version 2025.12.48 (and 2026.01.88), but is currently commented out:
COUNTRYFROM (Country of the collection address.)
COUNTRYTO (Country of the delivery address.)
DELIVERYADDRESSCOUNTRYFROM (Senders country. (Applies to this order.)
DELIVERYADDRESSCOUNTRYTO (Recipient's country. (Applies to this order.)
DELIVERYADDRESSCOUNTRYFROMDIF and DELIVERYADDRESSCOUNTRYTODIF (Used as conditions in the XML file.)
COUNTRYCONSIGNMENT (Country of the consignment.) This might be of interest if you handle consignments.)
COUNTRYCONSIGNED (Country of the original consignment.) This might be of interest if you handle consignments.)
(COUNTRY has been available for some time and is only relevant if you work with consignments.)
Further information: