Route optimisation (window)
Last updated: 9 December 2025
![]() In dispatch: right-click on a resource > Route optimise.
In dispatch: right-click on a resource > Route optimise.
![]() In dispatch: select shipments in one of the lists > F9.
In dispatch: select shipments in one of the lists > F9.
![]() In dispatch: select shipments in one of the lists > Other > Route optimise shipments (F9).
In dispatch: select shipments in one of the lists > Other > Route optimise shipments (F9).
![]() On the map in dispatch: select the shipment and click on
On the map in dispatch: select the shipment and click on ![]() in the upper right corner (for more information, see Assigning shipments to resources in dispatch).
in the upper right corner (for more information, see Assigning shipments to resources in dispatch).
In this article
In this window, the route sequence can be calculated for one or more vehicles, or the shipments can be sorted manually. The window looks slightly different depending on how it opens and on your settings.
Multiple vehicle settings
This section only appears if route optimisation is being carried out on several vehicles.
|
Function |
Description |
|---|---|
|
Filter |
Filter the vehicles and shipments that are displayed in the vehicle list and shipment list via a dispatch filter. |
|
Maximum time for calculation (mm:ss) |
Enter the maximum time in minutes and seconds that multi-vehicle optimisation should take. A default value can be entered for this field in the Calculation time (seconds) multiple vehicle optimisation field in the route optimisation settings. |
|
Distribute shipments among vehicles |
A default value can be specified for this checkbox in the route optimisation settings (Distribute shipments among vehicles checkbox). |
|
Lock the shipment to the existing resource |
The checkbox is removed as of Opter version 2025.12.00. Instead, there is a button Unlock/lock all shipments from/to the resources (above the address list) and you can also select shipments in the address list, right-click and then select Unlock/lock selected shipments from/to the resource. For more information, see Address book below.
|
|
Show resources’ ongoing shipments |
You can set a default value for this checkbox in the route optimisation settings (under Multi-vehicle optimisation). |

Setting
|
Function |
Description |
|---|---|
|
Setting |
Select the route optimisation configuration to be used in the calculation. It is possible to have different configurations for different types of route optimisation. Click on |
Route optimisation
For instructions, see Manual route optimisation and Multi-vehicle optimisation.
|
Function |
Description |
|---|---|
|
Ignore time constraints |
Select the checkbox if route optimisation is to be carried out without taking into account the earliest and latest pickup and delivery times for the orders. The proposed route is based only on the optimum route sequence between the addresses. |
|
Ignore latest time constraints |
Dimmed if Ignore time constraints is deselected. Route optimisation only takes into account the earliest, not the latest, pickup and delivery time for the orders. This can be useful if you have a lot of deliveries with the same latest delivery time. Deselecting Ignore time constraints will also deselect this checkbox (if it was selected). |
|
Hide pickups |
Only shown when route optimisation is being carried out on one vehicle at a time. Hides the pickup addresses (red) in the shipment list, and they are not taken into account when calculating the route sequence. Mainly used if all goods are picked up at the same address, such as a terminal. |
|
Calculate using different date |
Calculate pickup and delivery times for a day other than today. |
|
Vehicles must start route at |
All vehicles must start from this address. The driving time to the starting address is included in the route optimisation and the delivery time for the first shipment takes this driving time into account. If you select [None], the route starts at the vehicle’s current position. If [Home location] is selected, the route starts at the resource’s home location, if one has been entered in the vehicle or driver registry. For more information, see Selecting first and last stops for vehicles. |
|
Vehicles must end route at |
All vehicles must end their working session at this address. The driving time to the final address is included in the route optimisation and the end time of the working session is taken into account. If you select [None], the route will end at the delivery address of the last shipment. If [Home location] is selected, the route will end at the resource’s home location. For more information, see Selecting first and last stops for vehicles. |
|
Calculate route sequence |
The route sequence is optimised according to the settings. The arrival times for the pickup and delivery addresses are calculated, and the route is displayed on the map. |
|
Calculate times (retain route sequence) |
Only shown when route optimisation is being carried out on one vehicle at a time. Select this option if the route sequence has been manually adjusted and is to be retained, but calculate the times. The route sequence can be changed manually by dragging and dropping the stops in the address list. The driver can also change the route sequence in Opter Driver if it is set up for this. For more information, see Manual route optimisation and in Synchronising the route sequence in Opter Driver and dispatch. |
|
Flip route sequence |
Only enabled when one vehicle at a time is being route optimised and when all the shipments have the same sender address. Changes the direction of the route so that it is driven in the opposite direction. This can be useful for ending the route as close to the sender's address as possible. |
Vehicle list
The vehicle list is only displayed if route optimisation is carried out for several vehicles at the same time. The list shows the vehicles available for route optimisation.
Vehicles with a pink background in the list have no position. A fallback position should be set for vehicles without a position. For more information, see Vehicle position.
|
Function |
Description |
|---|---|
|
No. of selected vehicles |
The number of vehicles currently selected in the vehicle list that will be used for route optimisation. |
|
Select all |
Selects all vehicles in the list. By clicking on Advanced setting. We recommend leaving this criterion as
Selecting Default: |
|
Columns |
Address book
The address list looks slightly different depending on whether or not multi-vehicle optimisation is enabled. The columns to be displayed can be set on the Column Settings - Shipments tab in the route optimisation settings (see Route optimisation settings (window)).
The route sequence sent to the dispatch and Opter Driver is the route sequence visually displayed in the list, not the route sequence calculated by the route optimiser in the column Order.
The columns in the table below are displayed automatically, you do not need to add them yourself.
|
Function |
Description |
|---|---|
|
Include in optimisation |
If one of the address rows of a shipment is selected/deselected (red/blue), the other is automatically selected/deselected. |
|
Lock to resource |
Only displayed if you have multiple vehicle optimization enabled. For more information, see Route optimisation: preparation and configuration and Multi-vehicle optimisation.
When one of the address rows of a shipment is locked/unlocked (red/blue), the other is automatically locked/unlocked. If you want to unlock or lock a shipment to the resource, you can, for example, click on the icon |
|
Sequence number for which stop on the route the address is, according to the optimal route sequence calculated by PTV. If Edit route sequence has been selected in the route optimisation settings, the route sequence can be changed by typing a new number in this column, and then reordering the column so that the numbers are in order. In other words, it is not sufficient to enter "9" in the fourth address in the list and click on Ok. If the address is still fourth in the list, it will be the fourth stop in dispatch and Opter Driver regardless of the number entered there. To restore the optimal route sequence, click on Calculate route sequence. The numbers that are entered manually will be overwritten and the list will be sorted in numerical order based on this column. It is always the route sequence shown in the address list that is sent to dispatch and Opter Driver. If you first calculate the route sequence and then manually change the route sequence, or sort using a column other than Order, then that is the route sequence used for the shipments. Not the numbering in the Order column. The Order column only shows the optimal route sequence based on the route optimisation calculation. If you have changed the sequence manually, or sort using a different column and want to revert to the optimal route sequence, you can sort on the Order column, or click on Calculate route sequence again. Clicking on Calculate route sequence always removes the manual sorting, and the list is automatically sorted based on the Order column. |
Each shipment in the address list has two lines, a red one for the pickup address (1) and a blue one for the delivery address (2). This is because the optimal route sequence is not always to pick up and deliver the shipments one by one, but perhaps to first pick up five shipments, (red addresses) then deliver one (blue address), pick up two more, deliver two and so on.
In multiple vehicle optimization, the address list is grouped by the vehicles that have shipments already allocated to them. A vehicle can be expanded to display the shipments assigned to that vehicle (3). The shipments that have not yet been assigned are located under No resource (4). If there is capacity and time, those shipments are assigned to resources when calculating the route sequence.
You can exclude a shipment from the route optimisation by unchecking the checkbox (in the column Include in optimisation) for that address. If one of the addresses for a shipment is deselected, the other is automatically deselected (5). Individual shipments cannot be removed from the list. To do so, close the Route optimisation window and select only the shipments that are to be included in dispatch before pressing F9.
By default, shipments that have already been allocated to resources are locked to the resource when you open the Route optimisation window. In the address list (in the column Lock to resource), when you expand the list for a vehicle, the icon ![]() or
or ![]() (6) appears.
(6) appears.
You can choose whether already allocated shipments should be locked to the resource or not:
-
If you want the resources to keep the shipments already allocated to them when the route sequence is calculated, leave all shipments locked.
(The icon
 or
or  indicates that the shipment is locked to the resource.)
 If a resource has time for more shipments within the working session, more shipments may be added, but no assigned shipments are deleted from any resource.
-
If you want the route sequence to be optimised for all shipments, unlock all shipments.
(The icon
 or
or  indicates that the shipment is not locked to the resource).
This does not take into account that shipments have already been allocated. The shipments may then be assigned to other resources.
You can unlock or lock the shipments of resources by doing one of the following
-
If you want to unlock or lock all shipments, press the Unlock/lock all shipments from/to the resources button above the address list.
(The button is available from Opter 2025.12.00. In previous versions of Opter, the Lock shipment to existing resource checkbox is available instead).
-
To unlock or lock several (but not all) shipments, select the shipments in the address list, right-click, and then select Unlock/lock selected shipments from/to the resource.
(Menu option available as of Opter 2025.12.00.)
-
To unlock or lock one or more shipments, click on the icon
or (6) in the column Lock to resource.
When one of the address rows of a shipment is locked/unlocked (red/blue), the other is automatically locked/unlocked.
Shipments can be assigned by selecting them in the list, pressing Ctrl + M and then selecting the new resource in the dialogue box that opens (7). The shipments are then locked to the new resource so that they are not moved to any other resource when calculating the route sequence.

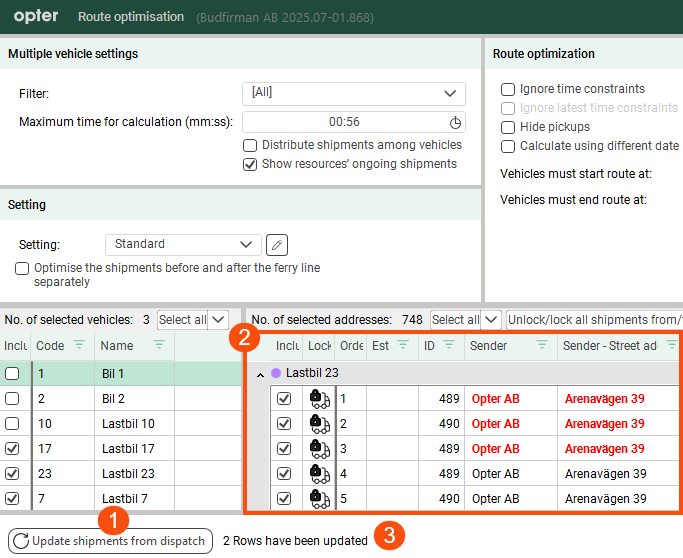
Update the address list from dispatch
If you are working in dispatch at the same time as working in the Route optimisation window, the button Update shipments from dispatch (1) may be useful. When you press the button (or F5), the entire list of addresses (2) in the Route optimisation window is updated by the dispatch centre. (All information on the shipments is updated, but no new shipments are added or removed). Next to the button you can see how many rows have been updated (3). Don't forget to recalculate the route sequence if the address list has been updated.
-
In versions before 2025.06.00:
Updates are automatically and continuously sent from the dispatch centre to the Route optimisation window.
-
In version 2025.06.00-2025.06.315:
The function to update the window Route optimisation automatically and continuously from the dispatch is removed (because that function created other problems). To update the shipments in the Route optimisation window from the dispatch, you must close the Route optimisation window and open it again.
-
In version 2025.12.00 and later, and also in 2025.06.316 and later:
Press F5 or the button Update shipments from dispatch (at the bottom of the window Route optimisation).
The function in the Update shipments from dispatch button only updates the information on the shipments already in the address list in the Route optimisation window.
If new shipments have been dispatched, you must close the Route optimisation window and open it again. The added shipments will then also appear on the resource in the address list in the Route optimisation window. Don't forget to click on Calculate route sequence again.
Map
The routes of all resources are shown on the map, the resources are round and the addresses are squares. Hover over a resource or address to view more information. For more information, see Explanation of symbols – map.
Addresses can be selected on the map by holding down shift and then dragging the mouse over the addresses. When the mouse button is released, they are highlighted in the address list and can be dragged and dropped as usual. This can be useful for selecting addresses that are geographically close to each other, instead of having to look them up in the address list.
Press Ctrl + M to assign the selected tasks to a resource.