Last updated: 2025-12-10
Manual route optimisation
In this article
When carrying out manual route optimisation on a vehicle, shipments must be preplanned or assigned to the vehicle. If you select shipments in dispatch that are not assigned or preplanned and press F9, the Route optimisation window opens, but no resource is selected for route optimisation. You cannot select a resource in the Route optimisation window if you have not enabled the multi-vehicle optimisation service.
If route optimisation is carried out for preplanned shipments, they are not automatically assigned to the resource, but this can be useful if, for example, you want to calculate the route sequence for the next day’s shipments, but not assign them yet.
For more information on the conditions and the factors and settings that affect route optimisation, see Route optimisation: preparation and configuration.
Step 1: Choose the vehicle on which route optimisation is to be carried out
You can carry out route optimisation on resources for which shipments have been assigned or preplanned. This can be done in different ways depending on your workflow.
-
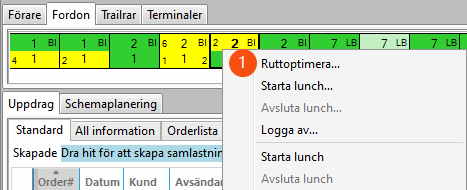
Right-click on a resource box in dispatch and select Route optimise (1). All shipments assigned to and loaded on the resource are displayed in the Route optimisation window. If the resource has no shipments assigned to it, Route optimise is dimmed.

-
Select the shipments that are preplanned or assigned to the resource you want to route optimise and press F9 (or click on the Other > Route optimise shipments (F9) menu tab).
If you have preplanned shipments, you can filter or sort the Created list on the resource you want to route optimise to make sure you do not fail to select any of the preplanned shipments.
The Route optimisation window opens with the vehicle’s stops listed and the current route plotted on the map. The route sequence can be changed manually by selecting the addresses to move and then dragging and dropping them into a new place in the list, or clicking Up (-)/Down (+) at the bottom of the window, or pressing + (down)/- (up) on the numeric keypad.
The routes of all resources are shown on the map, the resources are round and the addresses are squares. Hover over a resource or address to view more information. For more information, see Explanation of symbols – map.
Addresses can be selected on the map by holding down shift and then dragging the mouse over the addresses. When the mouse button is released, they are highlighted in the address list and can be dragged and dropped as usual. This can be useful for selecting addresses that are geographically close to each other, instead of having to look them up in the address list.
Press Ctrl + M to assign the selected tasks to a resource.
All the shipments assigned to the resource are displayed in the Route optimisation window, even if you select only some of the shipments in dispatch. To exclude certain shipments from the route, deselect them there (see below).
If you select shipments that are assigned to or preplanned for different resources, the Route optimisation window will open for the vehicle you clicked on first in dispatch when selecting the shipments. If the shipment you clicked on first is not assigned to any resource, the Route optimisation window will be displayed without a resource and therefore no route sequence can be calculated.
Step 2: Calculate the route sequence and arrival times
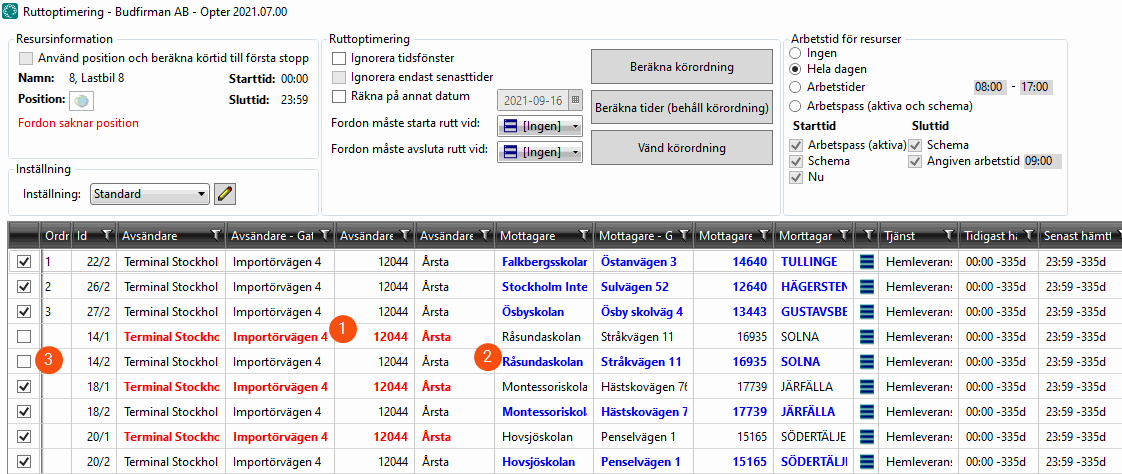
In the Route optimisation window there is a list of shipments. Each shipment in the address list has two lines, a red one for the pickup address (1) and a blue one for the delivery address (2). This is because the optimal route sequence is not always to pick up and deliver the shipments one by one, but perhaps to first pick up five shipments, (red addresses) then deliver one (blue address), pick up two more, deliver two and so on.
A shipment can be excluded from the route optimisation by deselecting its checkbox (3). If one of the addresses for a shipment is deselected (red or blue), the other is automatically deselected.

If route optimisation is only to be carried out on deliveries, select the Hide pickups checkbox. For more information, see Route optimisation (window).
Click on Calculate route sequence. The pick-up/delivery order is optimised, the arrival times for the pick-up and delivery addresses are calculated, and the updated route is displayed on the map.
If you are working in dispatch at the same time as you are working in the Route optimisation window, the Update shipments from dispatch button may be useful. When you press the button (or F5), the entire list of addresses in the Route optimisation window is updated by the dispatch centre. (All information on the shipments is updated, but no new shipments are added or removed). Next to the button you can see how many rows have been updated. Don't forget to recalculate the route sequence if the address list has been updated.
-
In versions before 2025.06.00:
Updates are automatically and continuously sent from the dispatch centre to the Route optimisation window.
-
In version 2025.06.00-2025.06.315:
The function to update the window Route optimisation automatically and continuously from the dispatch is removed (because that function created other problems). To update the shipments in the Route optimisation window from the dispatch, you must close the Route optimisation window and open it again.
-
In version 2025.12.00 and later, and also in 2025.06.316 and later:
Press F5 or the button Update shipments from dispatch (at the bottom of the window Route optimisation).
For more information, see Route optimisation (window).
You can add more shipments by assigning them to the same resource in dispatch. Close the Route optimisation window and open it again (as above). The added shipments will then also appear on the resource in the address list in the Route optimisation window. Don't forget to click on Calculate route sequence again.
If all pickup addresses (red) are before all delivery addresses (blue) in the route sequence, you have the option of changing the direction of the route so that it runs in the other direction. To do this, click on Flip route sequence.
Once the calculation is complete, the route is displayed on the map and the shipments have an estimated arrival time, which is shown in the Estimated column in the address list. Hovering the cursor over the symbols on the map results in a tooltip box appearing with information about the sender, receiver or resource, depending on which symbol is hovered over. For more information, see Explanation of symbols – map.
Sometimes a warning is displayed that there is no capacity for a vehicle, and that the vehicle will not undergo route optimisation. The capacity can be adjusted on the vehicle registry (or via the vehicle type). It is also possible to choose not to take capacity into account, by deselecting the current dimension on the Limitations tab in the route optimisation settings (see Route optimisation settings (window)).
A warning that certain address or vehicle positions are poor is sometimes displayed when calculating the route sequence. The address positions can be adjusted by clicking on Register > Adjust address positions. The vehicle positions cannot be adjusted.
If a vehicle has no position at all, it is assumed to be at the first stop when arrival times are calculated.
Step 3: Check omitted shipments
Check whether any shipments did not fit into the time frame and were therefore omitted from the route sequence. You will not get a warning about shipments being omitted, but you will see that this is the case because the shipments have not been given a number in the Order column in the shipment list, i.e. they have not been given a route sequence. The prioritisation of shipments is done by the PTV.

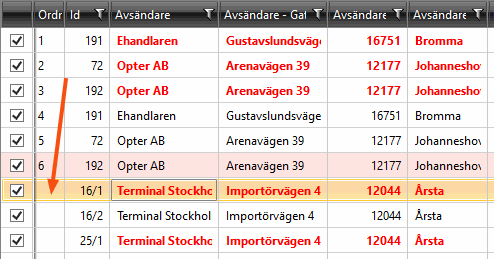
If you want to include the omitted shipments in the route, you can drag them to the place you want them to have in the route sequence. Then click on Calculate times (retain route sequence) to calculate the arrival times for the new route.
Step 4: Save the route sequence and synchronise it with the driver’s Opter Driver
If you are satisfied with the route sequence that has been calculated, select Save route sequence and estimated times in the bottom right-hand corner. Then click on Ok. The changes are saved and displayed in the driver’s Opter Driver. If you do not want to save any changes, click on Close instead.
In Opter Driver, the shipments are not split into pickup and delivery addresses. Instead, they are displayed in the correct order based on status. If a shipment has the Assigned status, it is displayed at the position in the route sequence of the pickup address (the Route sequence - from column in dispatch). When the status is changed to Picked up, the shipment is moved to the position in the route sequence of the delivery address (the Route sequence - to column in dispatch).
If you have carried out route optimisation on preplanned shipments, they are not assigned to the resource. You need to go to dispatch and assign them to the vehicle by right-clicking on the shipments and selecting Set status > Assigned to notify the driver.