Dispatch settings (window)
Last updated: 26 January 2026
![]() Settings > Dispatch settings
Settings > Dispatch settings
In this article
Views for dispatch can be customised and created in this window. The different views are shown in the list on the left. Select the view on which you want to change the settings. To create a new view, click on New and give it a name on the General tab. Once you have made changes to one of the tabs in this window, click on Save to save them.
You select the view you want to use from the Setting drop-down menu on the General menu tab in the dispatch itself.
It is not possible to delete a view that someone is using in the dispatch. However, it is possible to disable a view that someone is using, and then delete the disabled view. If there is only one view in the system, it is not possible to delete that view.
It is possible to reset the dispatch window settings. This can be useful, for example, if you have lost panels, or if some elements are displayed in the wrong language. Proceed as follows:
-
Close the window with dispatch.
-
Click on Help > Remove dispatch window dock settings. The following then occurs:
-
The size and position of the panels in dispatch are restored to their default values.
-
Panel names are reset. The next time dispatch is opened, the names of the panels will be in the language chosen by the user at the last login.
-
If certain panels (for example Ferries, Routes and Subcontractors) have been closed, displayed or attached (
 ), these settings will also be reset.
-
-
When dispatch is opened again, the view is restored.
General
Upper part
|
Function |
Description |
|---|---|
|
Name |
The name of the view. |
|
Description |
Free text field for internal notes. The description is not displayed anywhere else but here. |
|
Confirm change of status or resource if <x> or more are selected |
It is possible to set how many shipments should be selected for the question to be displayed. This is to avoid multiple shipments being changed by mistake if several shipments have inadvertently been selected in dispatch and then have their status changed, for example. If all changes should require confirmation, type “1” in the text field.
|
|
Display the “Failed delivery” option in the context menu |
Shows/hides Failed delivery in the menu that appears when right-clicking on shipments in dispatch. |
|
Filter on order region if region is missing for shipment |
|
|
Filter on order trail if trail is missing for shipment |
The filter for trails in dispatch applies to trails on shipments. If there are no trails on shipments, the filter can be applied to trails on orders by selecting this option. |
Tabs
The Lists tab
Layout
|
Function |
Description |
|---|---|
|
Distance from left |
The distance of the window from the left edge of the area allocated to the mission lists. |
|
Distance from top |
The distance of the window from the top edge of the area allocated to the mission lists. |
|
Font size |
Default: 8 |
|
Row height |
Default: 18 |
Try setting a high value for the field you want to change – for example, a row height of 50 – so you can clearly see which element is affected by the different settings
Lists
These settings control how shipments are displayed in the lists in dispatch. They can be combined in different ways to create custom views.
|
Function |
Description |
|---|---|
|
An area appears in the header line above the lists where you can drop selected shipments to create a consignment. The consignment obtains the settings from the consignment type selected by default in the Consignment types window. |
|
|
Delay start Delay full |
Jobs that start to approach the estimated pickup or delivery time according to the route optimisation can be tinted red and eventually turn completely red. In these two fields it is possible to control when the tinting should start and when it should be completed. Delay start (default "60"): Number of minutes before the estimated pickup/delivery time that tinting starts. Delay full (default "20"): Number of minutes before the estimated pickup/delivery time that the field becomes completely red.
The colouring applies to the columns that show the pickup and delivery times calculated in the route optimisation:
Add the Estimated pickup time column to the Assigned list and Estimated delivery time to the Picked up list. Together with the colour tinting, these provide a clear overview of tasks that should soon be given a new status.
|
|
Show normal shipments (not consignment shipments) |
Displays all shipments except consignment shipments. If an order is split into several shipments, one row is displayed for each shipment on that order. |
|
Shows original shipments included in consignments |
Shows all shipments included in consignments. |
|
Group shipments in same order |
Combines all shipments on an order into an expandable row. Must be combined with at least one of the Show normal shipments (not consignment shipments) and Shows original shipments included in consignments checkboxes above.
This checkbox cannot be combined with one of the Show consignment shipments (cannot be grouped) and Show shipments that are only on consignment orders (cannot be grouped) checkboxes. If you want to group consignment shipments, use the options under Group the consignments (see below). |
|
Show consignment shipments (cannot be grouped) |
Shows all consignment shipments. If a consignment order is split into several orders, one row is displayed for each consignment shipment on that order. |
|
Show shipments that are only on consignment orders (cannot be grouped) |
Displays shipments created on consignment orders, and that are not on one of the original shipments, e.g. if the consignment order has been split up. |
|
Expand to show shipments in the consignment |
Groups the consignment shipments. Expand to show the consignment shipments that are on the consignment order (not the original orders). |
|
Expand to show original shipments |
Groups the consignment shipments. All shipments on the original orders are displayed when the consignment shipment is expanded, including those not included in the consignment. |
|
Also show extra shipments for consignments |
Used if you have selected Create new addresses if no matching addresses when consigning on the consignment type, and if Shows original shipments included in consignments is selected above. Groups the consignment shipments. When the consignment order is expanded, shipments that have been created on the consignment orders and that are not on one of the original shipments are displayed, e.g. if the consignment order has been split up. If this checkbox is combined with Expand to show original shipments, all shipments on the consignment order will be displayed when it is expanded. |
|
Only show shipments with the following consignment type |
Filter which consignments are displayed in dispatch based on the consignment type. |
|
Grouped shipments bold |
Grouped shipments are shown in bold.
|
The Columns tab
On this tab, it is possible to choose which columns to display in the different lists. Certain columns can also be given different colours to make them stand out, and formats for how times and dates are displayed can be set.
The columns can be organised by dragging and dropping them up and down the list. The higher up the list, the further to the left in dispatch. To delete a column, click on it and then press Delete on the keyboard. To add a column, click on Click here to add a new item. at the bottom of the list.
You can sort on multiple columns in the dispatch by holding down shift and clicking on them. Click several times to switch between ascending/descending sorting.
|
Column |
Description |
||||||||||||
|---|---|---|---|---|---|---|---|---|---|---|---|---|---|
|
Name |
Double-click in the field and type the name of the column as it should appear in dispatch. If the field is left blank, the column will not be named and it may be difficult to know what information it contains. |
||||||||||||
|
Column |
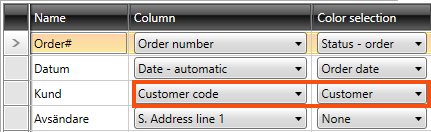
The Opter system’s name for the column. This is where you choose which columns to display, and it is this column name that we refer to in the help in the instructions on how to display information in dispatch. Columns that apply to senders and receivers:
Columns related to shipments or orders, or which automatically select whether the field should be taken from shipments or orders:
|
||||||||||||
|
The list contains a number of registries and other places where colours can be set. Select the registry from which the colour settings for the column should be taken. For example, if you have set the colour for a customer (Dispatching tab in the customer registry), you can select, for example, Customer for columns with customer information, such as Customer name and Customer code.
For those customers for whom you have not made any colour settings, the fallback colour is used, see Fallback color below. (If you do not see the column Fallback color, please scroll to the right.) If you want to set the colour for a customer, see Customers (window). |
|||||||||||||
|
Format |
The format in which the time and date are displayed can be changed here. If no format is specified, the following default format is used:
The separator for date columns is always a hyphen (-). If you enter the date format "dd/MM/yyyy", it will be displayed as "18-07-2024". For the time, however, you can use other characters as separators, such as a point, "15.47". There are no columns in dispatch that contain both date and time. "MM" means month and "mm" means minutes. If "mm" is used in a date column, "00" is displayed as the month. If "MM" is used in a time column, the month is shown as minutes (i.e. 01-12 only).
|
||||||||||||
| Filter
|
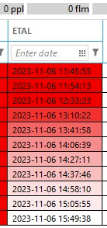
If you want the column to be filtered by default in dispatch, set the filter here. Click twice on the row to set the filter. Select one of the options in the drop-down list and enter what you want to filter on in the text field on the right. The text field can be very narrow if there are no other filters in the column. If that is the case, it is possible to make it wider to make it easier to write. The filter settings are not personalised, but apply to everyone who uses the system. For more information, see Predefined column filters in the dispatch. The different filters produce the following results in terms of what is displayed in the column in dispatch:
|
||||||||||||
|
Fallback color |
Set the colour of the fallback column in dispatch. For example, if Customerhas been selected under Color selection (see above), but the colour has not been set for all customers in the customer registry, the fallback colour set here will be used for those customers. Click on |
Summaries
Select which totals to display at the top of each table/window in the dispatch. For example, if the sum of all packages (2) in the table is to be displayed, tick the checkbox Include package count.
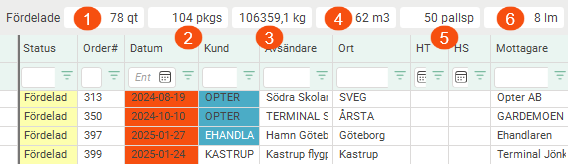
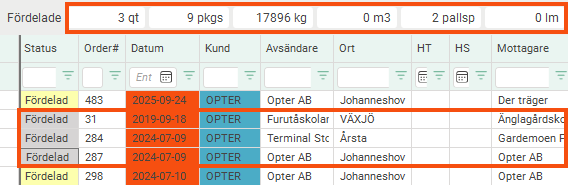
If you mark orders/shipments in the dispatch, only the marked orders/shipments are totalled. In the image below we have highlighted three orders/shipments.
|
Function |
Description |
|---|---|
|
Include quantity (1) |
|
|
Include package count (2) |
|
|
Include weight (3) |
|
|
Include volume (4) |
|
|
Include pallet spaces (5) |
|
|
Include load metres (6) |
|
|
Include pricing weight |
|
|
Include income |
|
|
Include cost |
|
|
Include result |
|
|
Extra dimension 1-Extra dimension 5 (Displayed if you use extra dimensions.) |
If you use extra dimensions, you can choose for each extra dimension whether it should be totalled:
|
Color settings
Here you can set colours for the dispatch, such as text colour and background colour for locked shipments.
Opter is available in classic design and in new design (as of 2025.12.00). The new design allows you to freely enter your own colour codes or choose colours from an advanced palette.
Choose colours like this:
-
If you use Opter in classic design:
To select a colour, click on the down arrow and then on a colour in the colour picker.
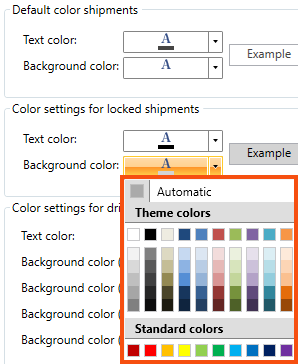
If you want to go back to Opter's default colour, click on the down arrow and then on Automatic.
-
If you use Opter in a new design:
To select a colour, click on the down arrow and then on a colour in the colour picker.
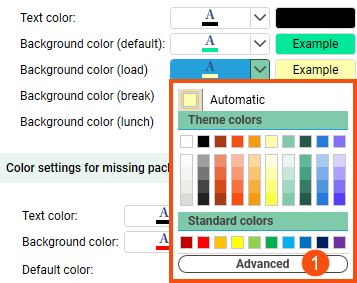
If you want more colours to choose from, click on Advanced (1). The advanced colour picker will then open (2) and you can freely choose the colour. For example, you can enter a colour code as an RGB value (3) or hexadecimal value (4).
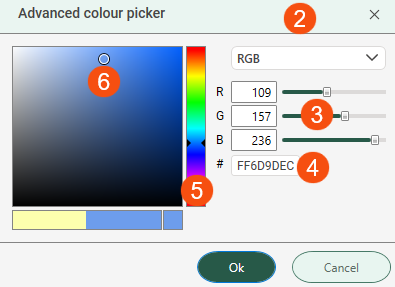
In the hexadecimal value field (4), the first two digits indicate the transparency and the following six digits indicate the colour. If you don't want anything in the background to show through the colour, write "FF" as the first two digits. If you only enter the six digits representing the colour, Opter will automatically add "FF" in front of the colour digits (when you save).
You can also choose the colour by dragging the slider (5) up or down, and dragging and releasing the circle (6) on the colour you want.
If you want to go back to Opter's default colour, click on the down arrow and then on Automatic.
Default color shipments
|
Function |
Description |
|---|---|
|
Text color |
Select the default colour for the text on the shipments. |
|
Background color |
Select the default colour for the background of the shipments. |
Color settings for locked shipments
Locked shipments are also called "grey legs" because Opter's standard colour for locked shipments in dispatch is grey. However, you can choose the colour of locked shipments.
For more information, see Locked shipments.
|
Function |
Description |
|---|---|
|
Text color |
Choose the colour for the text on locked shipments. |
|
Background color |
Choose the colour for the background of locked shipments. |
Color settings for drivers
The resource boxes are the boxes displayed for the different resources in dispatch.

The colour of the resource boxes varies depending on whether the resource is logged in to the app or not, how many shipments the resource has and the status of the shipments. For more information, see Explanation of symbols – the resource boxes.
Choose the colour of the resource boxes if, for example, a logged-in resource is on a lunch break (C) or if the resource has both allocated and loaded, perhaps also unloaded, shipments (B).
|
Function |
Description |
|---|---|
|
Text color |
Select the text colour for the text on the resource boxes. Default: Black. |
|
Background color (default) |
Select the background colour of resource boxes where the logged-in resource has, for example, only unloaded shipments or no shipments. (See A in the picture above.) Default: Green. |
|
Background color (load) |
Select the background colour of resource boxes where the logged-in resource has, for example, both allocated and loaded, perhaps also unloaded, shipments. (See B in the picture above.) Default: Gul. |
|
Background color (break) |
Select the background colour of resource boxes where the logged-in resource is on break. Default: Red. |
|
Background color (lunch) |
Select the background colour of resource boxes where the logged-in resource is on lunch break. (See C in the picture above.) Default: Blue. |
Color settings for missing package
|
Function |
Description |
|---|---|
|
Text color |
Select text colour for unknown packages. |
|
Background color |
Select background colour for unknown packages. |
|
Default color |
Select for which column Text color and Background color apply. |
Problem color
|
Function |
Description |
|---|---|
|
Set background for shipments marked as problem |
|
|
Background color |
Select the background colour for shipments that are marked as problematic. The checkbox above must be ticked. |
You can set shipments with options to be highlighted with a text colour or background colour in the dispatch lists. For more information, see Options and Options (window).
Content settings
This tab can be used to specify which summaries are to be displayed on the Subcontractors and Routes panels in dispatch. They can be used to obtain an overview of the load and profitability of individual subcontractors and routes.
There is one set of checkboxes for Subcontractors and one for Routes, so you can specify which totals should be displayed on the different panels independently.
|
Function |
Description |
|---|---|
|
Total count |
Total number of shipments, regardless of status. |
|
Affects vehicle load |
Number of shipments with a status that affects the vehicle load according to the life cycle settings. Usually Assigned to even Picked up. Answers the question "What is the resource working on right now?". |
|
Number of not assigned |
Number of shipments with a status earlier than Assigned, whether or not they have a resource. |
|
Weight Pallet spaces Load meters |
Total weight/total number of Pallet spaces/total number of load metres for the shipments that, according to the life cycle settings, affect the vehicle load. If an order has several shipments, the weight/pallet spaces/load metres are counted once for each shipment on the order. |
|
Result |
Income minus cost for all shipments, regardless of status. The purpose is to be able to see if the route/subcontractor is profitable over the whole day. "Will it be profitable if I do this?" |