Last updated: 2026-01-28
Order check (window)
Order > Order check
In this article
In this window, it is possible to search for orders based on a wide range of criteria.
In the order list, it is possible to select a row by clicking on the left end of the row. Multiple rows can also be selected by holding down the Ctrl key and clicking on the left end of the rows in the order list.
The menu tabs
General
Shortcuts that can be used are shown in the button names, for example Open order (Ctrl+O).
|
Function |
Description |
|---|---|
|
Open order (Ctrl+O) |
To open an order, select the row of the order in the order list below (by clicking on the left end of the row) and then click on Open order (Ctrl+O). |
|
Save (Ctrl+S) |
Click on |
|
Delete (Del) |
To delete an order, click on the left end of the row so that it is selected. Then press Delete or Delete (Del). The row will then have the |
|
Undo (Ctrl+Z) |
To undo the most recent action. For example, if you accidentally selected the wrong order and then clicked on Delete (Del) (the row for the order was marked with the symbol It is only possible to undo the most recently performed action. It is therefore not possible to undo several steps backwards. To undo several steps backwards, close the order control without saving, then open it again and make the desired changes and save them. |
|
Copy (Ctrl+C) |
To copy a row or a cell in the order list. However, some information cannot be copied, such as the information in the columns Order number, First loaded status, Most recent unloaded status, Status and Invoice OCR number. To copy the order list to Excel, the Export to Excel (Ctrl+E) button is located on the Options tab, see below. |
|
Paste (Ctrl+V) |
If a row or cell has been copied in the order list and this information is to be pasted, select the row or cell where the information is to be inserted and click on Paste (Ctrl+V). If you change your mind, you can click on Undo (Ctrl+Z). The changes are saved when you click on |
|
Setting |
It is possible to have several different views for the order control. In the drop-down menu, select the required view. To make changes to a view or create a new view, click on |
|
Saved searches (drop-down list) |
Common searches can be saved so that they can quickly be used again when needed. For instructions, see Saving searches in order check. The default search [Default] does not change any search parameters, but always uses the same search settings as the most recent search, regardless of whether it was a manually defined search or a saved search. It cannot be deleted. The symbols next to the drop-down list are used like this:
|
|
Search |
Configure the search settings and then click on Search. The results are shown in the order list underneath. What is shown in the columns is described in the Order List below. |
|
Clear search options |
Click on Clear search options to delete all the settings made under Search settings. Customer code and Customer name in the Search options box are also deleted, but the selected period remains. |
|
Period |
Select the time period in which to search, for example This week or This year. To select From and To dates yourself, select Custom in the Period drop-down list, then select the dates in the From and To fields below. |
|
From |
Select the date from which the search is to be done by entering the date or clicking on the calendar symbol and selecting the date. |
|
To |
Select the date to which the search is to be done by entering the date or clicking on the calendar symbol and selecting the date. |
|
Customer code |
To search for a specific customer, enter the customer code here or the customer's name in the Customer name field below. |
|
Customer name |
To search for a specific customer, enter the customer name here or the customer code in the Customer code field above. |
|
Selected customer |
If the search for a specific customer is being done using the fields above, the customer code and name will be displayed here. |
Options
In this menu you can edit the orders you have searched for.
|
Function |
Description |
|---|---|
|
Export to Excel (Ctrl+E) |
Exports the order list to Excel. To import orders from Excel, see Importing orders from Excel to order check. |
|
Export to Logix |
Exporting a CSV file from Opter. |
|
Import from Logix |
Importing a CSV file into Opter. |
|
Ready for invoicing/crediting (Ctrl+9) |
To select the checkbox in the Ready for invoicing/crediting column for all orders in the order list, click on Ready for invoicing/crediting (Ctrl+9) and then click on the General tab and click on Save (Ctrl+S). To select the checkbox in the Ready for invoicing/crediting column for one or more orders, select the rows of the orders (by holding down the Ctrl key and clicking on the left end of the rows in the order list) and then click on Ready for invoicing/crediting (Ctrl+9). |
|
Not ready for invoicing/crediting (Ctrl+0) |
To deselect the checkbox in the Ready for invoicing/crediting column for all orders in the order list, click on Ready for invoicing/crediting (Ctrl+9) and then click on the General tab and click on Save (Ctrl+S). To deselect the checkbox in the Ready for invoicing/crediting column for one or more orders, select the rows of the orders (by holding down the Ctrl key and clicking on the left end of the rows in the order list) and then click on Not ready for invoicing/crediting (Ctrl+0). |
|
Notifications for selected shipments (F10) |
To send a manual notification for one or more orders, select the rows of the orders in the order list and then click on Notifications for selected shipments (F10). The Notification Sender window opens. For instructions, see Sending notifications manually from dispatch and order check. |
|
Recalculate... (Ctrl+R) |
If, for example, prices, weights, distances and/or service times are to be recalculated for one, several or all orders in the order list. For instructions, see Recalculate data on orders in order check. |
This menu allows you to preview and print Freight bills, parcel labels and order lists for the orders you have searched for.
| Function | Description |
|---|---|
|
|
Preview or print the Freight bills for the orders you have selected in the order list. |
|
|
Preview or print the parcel labels for the orders you have marked in the order list. |
|
|
Preview or print a list of the orders you have marked in the order list. Clicking on |
|
Choose printer when printing |
Click on the button to activate it if you want to have the chance to select the printer before printing. If it is not activated, the Freight bills, parcel labels and order lists are printed directly on your standard printer.
|
The order list
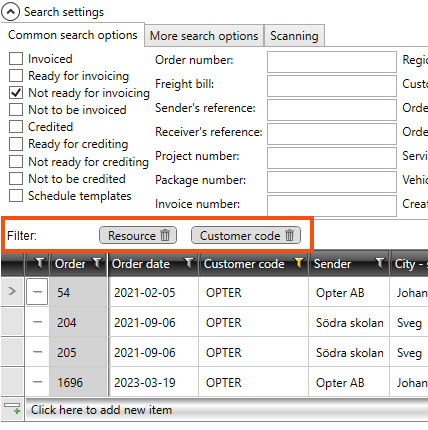
It is possible to define the columns displayed in the list of orders, see Columns in the order check. If filtering is done on some of the columns, they appear as buttons just above the order list. These buttons can also be used to disable the filters.

The sum of the values in the columns for the orders currently displayed in the list is shown at the bottom of the window.

If you have used column filters and sorted the search results, the list will not be updated if you change a value on an order, for example the number of packages. This also applies when you have saved the order with the new number of parcels. The search result will not be updated until you filter or re-sort the list.
The above only applies to columns that contain free text values, not to columns that retrieve values from a register (for example Resource), or when using the special filters under Filter show rows with value that.

|
Column |
Description |
|---|---|
|
Acceptable delay |
If the order is overdue and the checkbox is selected, then the reason indicated for the order being overdue is acceptable, i.e. this order is not considered to be overdue in Opter. They will then, for example, not appear in the search results if a search for delayed orders is carried out. For more information, see and Delay reasons (window). Default setting: |
| Responsible salesperson | Sales rep. responsible for the order. |
| Price item name | Price item name on the order. The column shows the name of the price item. |
| Price items | Price items on the order. The column shows the description of the price item if there is one, otherwise the name of the price item is shown. |
| Not to be credited |
|
| Supplier bill no. | Displays the credit number if there is a credit on the order. |
| Distance |
The order’s driving distance in kilometres, i.e. the sum of the distances of all the shipments making up the consignment. If the distance has been entered manually, it is displayed in normal black text. If the distance has not been entered manually, the calculated distance is displayed in grey text in italics. In order check, the Distance column shows the distance on the order. In the shipment check, the Distance column shows the distance on the shipment. In shipment check, the distance on the order can be shown with the Distance (order) column. |
| Sender | Sender’s name. |
| Sender reference | The order’s sender reference. |
| Deviation events |
Deviation events can be a more detailed specification of what has happened to the goods. If there is more than one deviation registered on the order, the deviation events are listed with commas between them. |
|
Deviation comments |
If there are comments on registered deviations, they are displayed in this column. If there is more than one deviation registered on the order, the deviation comments are listed with commas between them. |
| Deviation reasons |
A reason for a deviation can be an explanation of the deviation. If there is more than one deviation registered on the order, the deviation reasons are listed with commas between them. |
|
Deviations |
The column shows the number of deviations registered on the order. If an order contains several packages and if the same deviation is registered on several packages at the same time, it is shown as a deviation in this column. |
| Deviation types |
The deviation type can be used to categorise the deviations. If there is more than one deviation registered on the order, the deviation types are listed with commas between them. |
| Calculated driving time |
Driving time is the time it takes to drive between two addresses. The driving time is displayed in the “hours:minutes” format, so for example if “9:16” is indicated, it means 9 hours and 16 minutes. This shows the estimated driving time based on the order or on the individual shipments. How driving time is calculated depends on the distance calculation service set in the office settings on the Weight/Distance tab of the Distance drop-down list. For example, if PTV v2 has been selected, an advanced analysis is carried out, taking into account speed limits, among other things. If a different distance calculation service has been chosen, such as Finnish postcode distances, a locked table based on postcodes is used. The table lists the distances between different postcodes and the estimated driving time for the different routes, for example from postcode “00170” (in Helsinki) to postcode “65100” (in Vaasa), it is always exactly 422 km and takes 4:49 to drive. |
|
CO2 emissions, calculated (g) |
Show the order’s calculated CO2 emissions in grams. The calculated CO2 emissions of an order are a summation of the calculated CO2 emissions of the shipments in the order. For more information, see CO2 emissions in grams, overview. |
| CO2 emissions, estimated (g) |
Show the order’s estimated CO2 emissions in grams. The estimated CO2 emissions are an initial calculation of the CO2 emissions of the order and the calculation is based on the information available at the time the customer places the order. For more information, see CO2 emissions in grams, overview. |
| Date selected | Shows whether the receiver has selected the delivery date in Track & Trace. |
| Email/telephone number (notifications) |
Email addresses/telephone numbers of those who receive notifications about the order. If there are several addresses/numbers, they are separated by commas. |
| External credit - amount |
The total amount of all external credits on the order or a manually specified amount is displayed as follows:
The total amount of all external credits on the order or a manually specified amount is displayed as follows:
|
| External credit - done |
The checkbox can be selected automatically or manually in accordance with the following scenarios:
The checkbox can be deselected automatically or manually in accordance with the following scenarios:
Default setting: |
| External credit - date |
If the external credit is imported, the crediting date specified by your partner is displayed. If the external credit has been added manually in order reception, the date entered is displayed. If the order has more than one external credit, the date of the last registered external credit is displayed. |
| External credit - number |
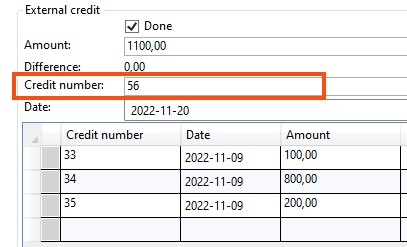
If the external credit is imported, the credit number used by your partner is displayed. If the external credit has been added manually in order reception, the credit number that was entered will be displayed, if a number was entered. The supplier bill number shown in this column is the one in the Credit number field underExternal credit in order reception.
To display in order check the supplier bill numbers listed in the column Credit number under External credit in order reception, see the Imported supplier bill number column below. For more information, see Checking external credits and External credit, order reception. |
| External credit - difference |
The difference between External credit - amount and the calculated amount (i.e. the expected income on the order). |
|
Invoice OCR number |
Displays the OCR number of the invoice for the order. If an order has several invoices, the OCR numbers of all invoices are displayed with commas between them. |
| Vehicle type | The type of vehicle for the vehicle specified on the order. |
| First loaded status |
Shows which driver and/or vehicle first set the status of the order to Picked up and when. The information displayed is the status the order was set to (Picked up), the driver’s call number, the driver’s name, the vehicle number, the vehicle name, and the date and time the status was set. The time is shown in hours, minutes, seconds and milliseconds. Details of the driver and vehicle are displayed if available. If the status of the order has not yet reached Picked up in the life cycle, nothing is displayed in the column. |
|
Imported supplier bill number |
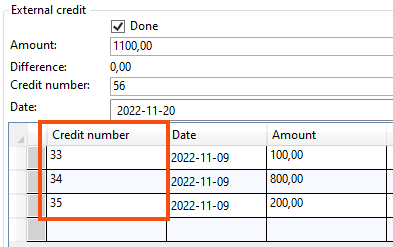
If the external credit is imported, the credit number used by your partner is displayed. If the external credit has been added manually in order reception, the credit number that was entered will be displayed, if a number was entered. The supplier bill numbers shown in this column are those shown in the Credit number column under External credit in order reception.
To display in order check the supplier bill number shown in the field Credit number in the External credit section of order reception, see the External credit - number column above. For more information, see Checking external credits and External credit, order reception. |
| Customer code |
The customer code from the customer registry. To find out which customer it is, click on Register > Customers and search for the customer code. |
|
Receipt number |
The receipt number is displayed if a direct payment is registered on the order in Opter. For more information, see Direct payment (order reception). |
| Driving time |
Driving time is the time it takes to drive between two addresses. The driving time is displayed in the “hours:minutes” format, so for example if “9:16” is indicated, it means 9 hours and 16 minutes. The estimated driving time or a manually entered driving time is displayed here as follows:
The Calculated driving time and Driving time columns will show the same time if no user has manually changed the driving time in the Driving time column. |
|
Load carrier |
Shows the load carrier ID If the order has packages in a load carrier, the load carrier ID is displayed in the column. If the order has packages in more than one load carrier, the IDs of the load carriers are listed with comma delimiters. For more information on load carriers, see Load carrier. |
| Loose items |
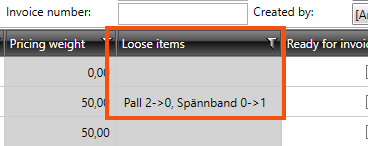
The number of loose items is shown by the numbers before and after, for example "5->3" and "7->7".
|
| Receiver | Receiver’s name. |
| Order date | The date on which it is planned to start transport. |
| Order number | The order number. |
| Corporate ID number | The customer’s corporate ID number. |
| Price vehicle type | The price vehicle type on the order. |
| Most recent unloaded status |
Shows which driver and/or vehicle last set the status of the order to Delivered and when. The information displayed is the status the order was set to (Delivered), the driver’s call number, the driver’s name, the vehicle number, the vehicle name, and the date and time the status was set. The time is shown in hours, minutes, seconds and milliseconds. Details of the driver and vehicle are displayed if available. If the status of the order has not yet reached Delivered in the life cycle, nothing is displayed in the column. |
|
Service |
The type of service for which the order is placed. |
|
Total invoiced cost for all cost price items |
Shows the total cost of all the cost price items in the order. The Cont. invoice done checkbox must be marked on the price item row in order reception for the cost to be displayed, otherwise this column will show "0". |
|
Total expected cost for all cost price items |
Shows the total estimated cost of all the cost price items in the order. |
|
Contribution margin % |
Shows the order coverage rate in per cent. The coverage ratio is calculated as Result (total profit of the order) divided by Income (total revenue of the order. |


