Last updated: 20.11.2023
Sending notifications manually from dispatch and order check
In this article
Notifications to the receiver can be sent manually from dispatch and order check. Notifications to customers, customer references, senders, receivers and others can be sent manually from order reception, see Sending notifications manually from order reception.
-
Select the orders whose deliveries you want to notify in dispatch or order check and press F10, or do one of the following:
-
Dispatch: Click on Other and select Notifications for selected shipments (F10).
-
Order check: Click on Options and select Notifications for selected shipments (F10).
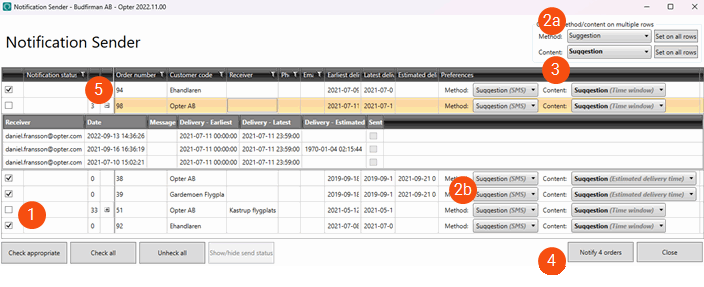
The Notification Sender window opens. Individual orders for which notifications are not to be sent can be deselected there.
-
-
Select whether the notifications should be sent via SMS or email in the Method drop-down list at the top of the window (2a).
-
Suggestion: The notification method specified as the default for the orders in the list is used (2b). Opter looks for the receiver’s telephone number and email address. If both are found, SMS is suggested. The method used for individual orders can be changed in the list.
-
SMS: to send notifications via SMS, a Pixie account has to be created. See Activating the Pixie SMS service.
-
Email: the notifications are sent by email.
-
-
Select the report you want to send from the Content drop-down list.
-
Suggestion: the report specified as the suggested default for the orders is used. The report used for individual orders can be changed in the list.
-
Estimated delivery time: the delivery time calculated by Opter is based on the driving time and other settings. You can see the estimated delivery time in the Estimated delivery time column. For more information about how the delivery time is calculated and how different settings affect it, see Route optimisation, overview. One of the messages, Advance notification estimated time (email) or Advance notification estimated time (SMS), will be used, depending on the method you have chosen.
-
Time window: A time interval, e.g. "We will get to you tomorrow sometime between 5 pm and 10 pm". For example, you can send this kind of notification when the order has been received and then get back to the receiver with more precise information when the delivery route has been scheduled. One of the messages, Advance notification delivery slot (email) or Advance notification time slot (SMS), will be used, depending on the method you have chosen.
-
Change date: a message prompting the receiver to go to the tracking website and select a delivery date. In the Home delivery settings (window) window, you can set the number of days ahead, and whether weekdays, weekends and public holidays can be selected. You can also create a route group that controls which days can be selected. One of the messages, Advance notification change date (email) or Advance notification change date (SMS), will be used, depending on the method you have chosen.
The list may contain more options if you have chosen to have more reports available for advance notifications in the Reports window.
-
-
Click on Notify x orders. Notifications are sent in accordance with the settings you have chosen. A log containing confirmations is displayed at the bottom of the window.

If notifications have previously been sent out for the orders, the number of notifications sent and ![]() are displayed in two columns (5). Click on
are displayed in two columns (5). Click on ![]() to view details of the notifications.
to view details of the notifications.
When you send out manual notifications, they are sent even if the orders do not meet the conditions set for any automatic notifications (e.g. for status).