Last updated: 14.05.2025
Sending emails from Opter using Microsoft 365
Valid from Opter 2025.06.00.
In this article
If you are using Microsoft 365 as your email service, Opter needs to be authenticated by registering it as an app in Azure.
The app registration in Azure can be done with a PowerShell script; a code example for this is available below. The reason why the script cannot be run in conjunction with an update is that the person running it must have write permissions for Azure AD and be the Microsoft 365 administrator for the organisation, which Opter is not. The script makes the required settings in Azure and Exchange. Once the script has been run, a few details needs to be entered in the Servers tab of the office settings.
Step 1: Find out your Microsoft 365 details
When the script is run, the following four pieces of information will need to be entered. Start by finding them out so that they are easily available, and preferably put them in a text file so that they can be copied and pasted in when appropriate.
You must be an administrator of Azure and Microsoft 365 in your organisation to access the information and run the script.
-
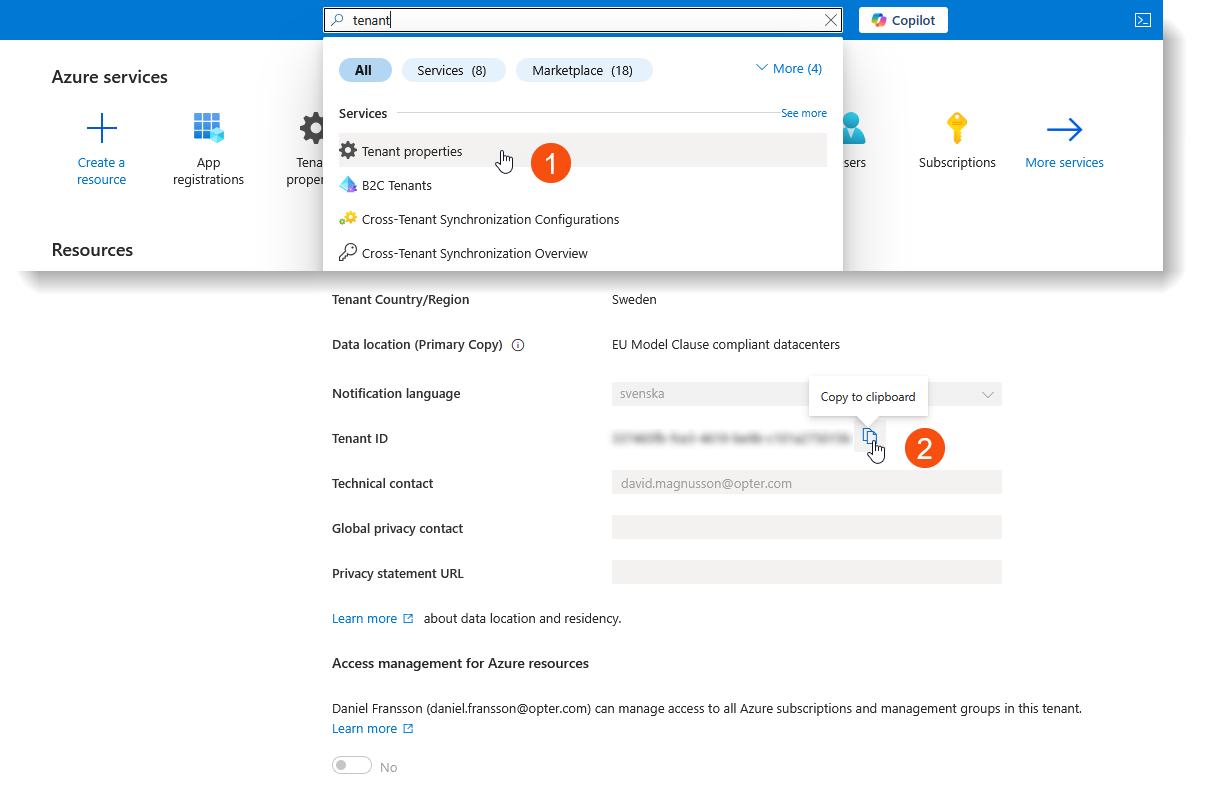
Azure Tenant ID
Log on to portal.azure.com and search for “client organisation” or “tenant properties”. Then copy the value for Tenant ID.
-
Username for a Microsoft 365 admin account
Usually an email address. As you are an administrator, you can probably use your own address.
-
Microsoft 365 domain
Usually the same domain as for the email address of the admin account.
-
Email address to be used as sender
This is the address used to send emails from Opter, i.e. the email account you have created for Opter in Microsoft 365. If you already have an existing address from which you send emails, it is shown in the Username field on the Servers tab in the office settings.
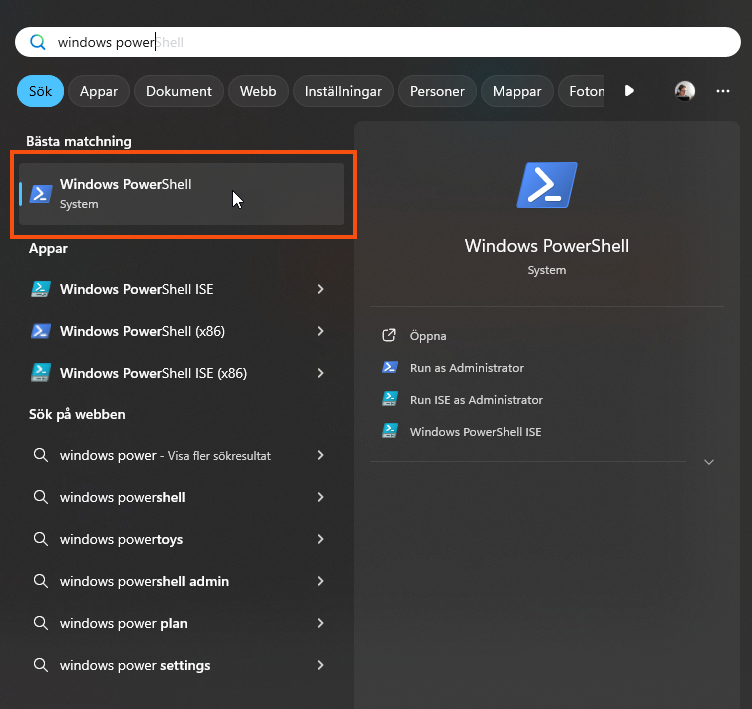
Step 2: Öppna Windows Powershell
Search for "windows powershell" in the Windows Start menu and open Windows PowerShell, not Windows PowerShell ISE.
A command prompt opens. Set the RemoteSigned right by pasting the following into the command line and pressing Enter. More information about rights is available on the Microsoft website.
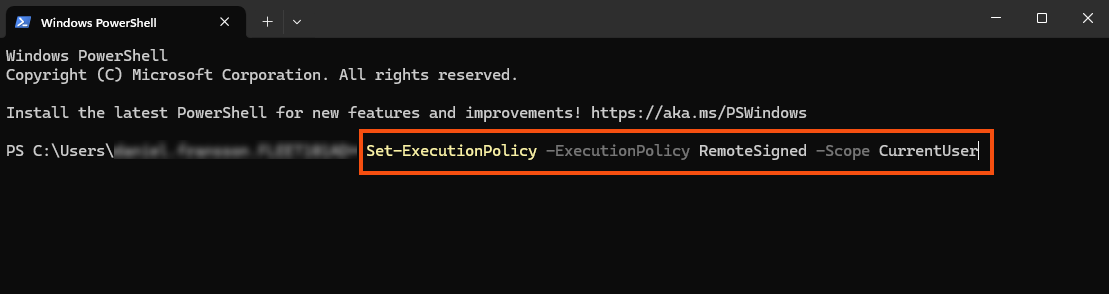
Once the script has been run, the rights can be reset using the Set-ExecutionPolicy Restricted -Scope CurrentUser command.
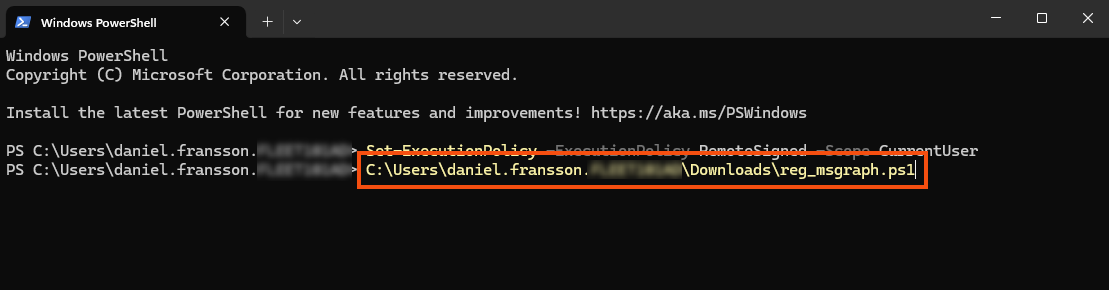
Step 3: Run the script
Copy and save the following script as a PS1 file on your computer. Then run it from Windows PowerShell by pasting the path to the file on the command line and pressing Enter.
The script uses specific versions of certain components. It may be necessary to first uninstall components that are already installed (help code is available in the script).
As the script involves the use of specific versions of the components, this may “disrupt” the existing environment in PowerShell, which may then need to be restored manually. If you have a PowerShell environment that is used in production and must not therefore be disrupted, the script can be run on a virtual machine.
#Run the following command manually in Windows PowerShell before running the script below: Set-ExecutionPolicy -ExecutionPolicy RemoteSigned -Scope CurrentUser
#Script to create app registration in Azure with Mail.Send rights for e-mail addresses in Mail-Enabled secutity group created.
#Application secret is set to expire after 999 years. This can be changed to the desired value by modifying $AppYears value
#Please note that tenant wide admin consent must be granted manually after this script has been executed.
#For Opter AB, 2025-04-24, David Magnusson Rosén
#
#Change log
#------------------------------------------------------------------------------------------------------------------------------
#202
#
#
#Code to uninstall entire module with sub-modules if needed
#foreach ($module in (get-module -listavailable ModuleName*).name |get-unique) {write-host "removing module $module" uninstall-module $module }
#Install/import required modules
echo "Installing/importing required modules (can take several minutes)"
echo "Installing prerequisites..."
#PowerShellGet
if (Get-Module -ListAvailable -Name PowerShellGet)
{
echo "Updating module PowerShellGet..."
Update-Module -Name PowerShellGet -Force
}
else
{
echo "Installing module PowerShellGet..."
Install-Module -Name PowerShellGet -Scope CurrentUser -Force
}
echo "Installing module Az.Accounts..."
Install-Module -Name Az.Accounts -Scope CurrentUser -RequiredVersion 2.12.1 -AllowClobber -Repository PSGallery -Force
echo "Importing relevant functions from module Az.Accounts..."
Import-Module Az.Accounts -RequiredVersion 2.12.1
echo "Installing module Az.Resources..."
Install-Module -Name Az.Resources -Scope CurrentUser -RequiredVersion 6.6.0 -AllowClobber -Repository PSGallery -Force
echo "Importing relevant functions from module Az.Resources..."
Import-Module Az.Resources -RequiredVersion 6.6.0
echo "Installing module AzureAD..."
Install-Module AzureAD
echo "Importing relevant functions from module AzureAD..."
Import-Module AzureAD -Function Connect-AzureAD, Get-AzureADApplication, New-AzureADApplication, New-AzureADServicePrincipal, Add-AzADAppPermission, Get-AzADServicePrincipal, Get-AzADServicePrincipal_List
echo "Installing module Microsoft.Graph.Authentication..."
Install-Module Microsoft.Graph.Authentication -Scope CurrentUser -Repository PSGallery -AllowClobber -Force -requiredversion 1.27
echo "Importing relevant functions from module Microsoft.Graph.Authentication..."
Import-Module Microsoft.Graph.Authentication -Function Connect-MgGraph
echo ""
echo "Installing module Microsoft.Graph.Applications..."
Install-Module Microsoft.Graph.Applications -Scope CurrentUser -Repository PSGallery -AllowClobber -Force
echo "Importing relevant functions from module Microsoft.Graph.Applications..."
Import-Module Microsoft.Graph.Applications -Function Add-MgApplicationPassword
echo ""
echo "Installing module ExchangeOnlineManagement..."
Install-Module -Name ExchangeOnlineManagement -Scope CurrentUser -RequiredVersion 3.6.0 -Repository PSGallery -AllowClobber -Force
echo "Importing module ExchangeOnlineManagement..."
Import-Module ExchangeOnlineManagement -RequiredVersion 3.6.0 -Function Connect-ExchangeOnline, New-DistributionGroup, New-ApplicationAccessPolicy, Add-DistributionGroupMember
echo ""
echo "Necessary modules/functions installed/imported!"
echo ""
#Query for tenant Id
$TenantId = Read-Host "Please provide your Azure Tenant Id"
#Connect to AzureAD
Connect-AzureAD -TenantId $TenantId
Connect-AzAccount
#Create app registration and service principal
$appName = "OpterMessageProxy"
if(!($myApp = Get-AzureADApplication -Filter "DisplayName eq '$($appName)'" -ErrorAction SilentlyContinue))
{
$myApp = New-AzureADApplication -DisplayName $appName
$myServicePrincipal = New-AzureADServicePrincipal -AccountEnabled $true -AppId $myApp.AppId -AppRoleAssignmentRequired $true -DisplayName $myApp.DisplayName
$AppId = $myApp.AppId
}
#Wait for app registration to complete
echo "Wait for app registration to complete..."
Start-Sleep -Seconds 15
#Get service principal for Ms Graph
$graphApiId = '00000003-0000-0000-c000-000000000000'
$mailSendId = 'b633e1c5-b582-4048-a93e-9f11b44c7e96'
$graphSp = Get-AzADServicePrincipal -Filter "appId eq '$graphApiId'"
#Connect to MsGraph
Connect-MgGraph -Scopes "Application.ReadWrite.All", "DelegatedPermissionGrant.ReadWrite.All"
#Add Mail.Send rights to app registration
Add-AzADAppPermission -ObjectId $myApp.ObjectId -ApiId $graphApiId -PermissionId $mailSendId -Type Role
#Wait for rights assignment to complete
Start-Sleep -Seconds 15
#Create a secret for the app registration
$AppYears = "999"
$PasswordCred = @{
displayName = "Secret_${appName}_unlimited"
endDateTime = (Get-Date).AddYears($AppYears)
}
# Add App Client Secret - Valid for 999 years
$Secret = Add-MgApplicationPassword -ApplicationId $myApp.ObjectId -PasswordCredential $PasswordCred
$SecretText = $Secret.SecretText
# Write Client Secret value
echo "Secret: ${SecretText}"
#For future use
#Grant tenant-wide consent for app registration
# Get-MgServicePrincipal -Filter "displayName eq 'Microsoft Graph'" -Property AppRoles | Select -ExpandProperty appRoles |fl
# $params = @{
# "PrincipalId" ="aaaaaaaa-bbbb-cccc-1111-222222222222"
# "ResourceId" = "a0a0a0a0-bbbb-cccc-dddd-e1e1e1e1e1e1"
# "AppRoleId" = "df021288-bdef-4463-88db-98f22de89214"
# }
# New-MgServicePrincipalAppRoleAssignment -ServicePrincipalId 'aaaaaaaa-bbbb-cccc-1111-222222222222' -BodyParameter $params |
# Format-List Id, AppRoleId, CreatedDateTime, PrincipalDisplayName, PrincipalId, PrincipalType, ResourceDisplayName
#Connect to Exchange Online
$UserPrincipleName = Read-Host "Please provide your Microsoft365 admin user (usually yourname@yourdomain.com)"
Connect-ExchangeOnline -UserPrincipalName $UserPrincipleName
#Set up mail sending restrictions
$UserDomain = Read-Host "Please provide your Microsoft365 domain(usually yourdomain.com)"
$SenderAddress = Read-Host "Please provide an existing e-mail address to be used as sender"
$GroupName = "${appName}_group"
$mesGroup = New-DistributionGroup -Name $GroupName -PrimarySmtpAddress "${appName}@${UserDomain}" -Alias $GroupName.ToLower() -Type security
$accessPolicy = New-ApplicationAccessPolicy -AppId $myApp.AppId -PolicyScopeGroupId "${appName}@${UserDomain}" -AccessRight RestrictAccess -Description "Restrict this app to members of distribution group ${GroupName}."
$dgMember = Add-DistributionGroupMember -Identity $GroupName -Member $SenderAddress -Confirm:$false
#Show settings to use in Opter office settings and copy them to clipboard
#$ButtonType = [System.Windows.Forms.MessageBoxButtons]::OK
$MessageIcon = [System.Windows.Forms.MessageBoxIcon]::Information
$MessageBody = "Ms Graph Tenant Id: ${TenantId} `n"
$MessageBody += "Ms Graph Client Id: ${AppId} `n"
$MessageBody += "Ms Graph Client Secret: ${SecretText} `n"
$MessageInfo = "`n`n"
$MessageInfo += "NB!`nThe client secret disappears when you close this message and cannot be retreived or restored.`n"
$MessageInfo += "If you don't make a note of it, you have to create a new one manually in the Azure portal!`n`n"
$MessageInfo += "The above settings have been copied to the clipboard. Enter them in the office settings in Opter."
$MessageTitle = "Info to be used in Opter office settings"
Set-Clipboard -Value $MessageBody
#[System.Windows.Forms.MessageBox]::Show("${MessageBody} ${MessageInfo}",$MessageTitle,$ButtonType,$MessageIcon)
#Custom result form
$color = [System.Drawing.Color]::White
$form = New-Object System.Windows.Forms.Form
$form.Text = $MessageTitle
$form.BackColor = $color
$form.Width = 800
$form.Height = 275
$lblTenantId = New-Object System.Windows.Forms.Label
$lblTenantId.Text = "Ms Graph Tenant Id:"
$lblTenantId.AutoSize = $true
$lblTenantId.Font = New-Object System.Drawing.Font("Courier", 10)
$lblTenantId.Location = New-Object System.Drawing.Point(10,20)
$txtTenantId = New-Object System.Windows.Forms.TextBox
$txtTenantId.Height = 20
$txtTenantId.Width = 375
$txtTenantId.Multiline = $true
$txtTenantId.Text = $TenantId
$txtTenantId.Font = New-Object System.Drawing.Font("Courier New", 10)
$txtTenantId.Location = New-Object System.Drawing.Point(200,20)
$lblClientId = New-Object System.Windows.Forms.Label
$lblClientId.Text = "Ms Graph Client Id:"
$lblClientId.AutoSize = $true
$lblClientId.Font = New-Object System.Drawing.Font("Courier", 10)
$lblClientId.Location = New-Object System.Drawing.Point(10,50)
$txtClientId = New-Object System.Windows.Forms.TextBox
$txtClientId.Height = 20
$txtClientId.Width = 375
$txtClientId.Multiline = $true
$txtClientId.Text = $AppId
$txtClientId.Font = New-Object System.Drawing.Font("Courier New", 10)
$txtClientId.Location = New-Object System.Drawing.Point(200,50)
$lblClientSecret = New-Object System.Windows.Forms.Label
$lblClientSecret.Text = "Ms Graph Client Secret:"
$lblClientSecret.AutoSize = $true
$lblClientSecret.Font = New-Object System.Drawing.Font("Courier", 10)
$lblClientSecret.Location = New-Object System.Drawing.Point(10,80)
$txtClientSecret = New-Object System.Windows.Forms.TextBox
$txtClientSecret.Height = 20
$txtClientSecret.Width = 375
$txtClientSecret.Multiline = $true
$txtClientSecret.Text = $SecretText
$txtClientSecret.Font = New-Object System.Drawing.Font("Courier New", 10)
$txtClientSecret.Location = New-Object System.Drawing.Point(200,80)
$lblMessage = New-Object System.Windows.Forms.Label
$lblMessage.Text = $MessageInfo
$lblMessage.AutoSize = $true
$lblMessage.Font = New-Object System.Drawing.Font("Courier", 10)
$lblMessage.Location = New-Object System.Drawing.Point(10,90)
$form.Controls.Add($lblTenantId)
$form.Controls.Add($txtTenantId)
$form.Controls.Add($lblClientId)
$form.Controls.Add($txtClientId)
$form.Controls.Add($lblClientSecret)
$form.Controls.Add($txtClientSecret)
$form.Controls.Add($lblMessage)
$form.ShowDialog()You will be asked if you want to install the modules, to which you need to answer yes.

When the prompts appear to enter the details obtained in step 1, such as the Azure Tenant ID, paste in the relevant information and press Enter and the script will continue to run.
What does the script do?
Let’s break it down into blocks.
-
Lines 20–70 install the MS Graph modules for PowerShell. They are needed to allow the rest of the script to work. The modules are placed in C:\Program Files\WindowsPowerShell\Modules\.
-
Lines 72–77 performs the Azure AD login.
-
Lines 80–119 register Opter as an app in Azure with the name “OpterMessageProxy”, and give that app the right to send emails. The name "OpterMessageProxy" can be changed to something else on line 81, but it is easier to keep the default name in case support has to be contacted regarding any issues.
-
Lines 132–142 add OpterMessageProxy to a permission group in Exchange with limited rights.
-
Lines 144–224 show the information that needs to be entered in the office settings in Opter (Servers tab). The information is copied to the clipboard, but can also be copied from the dialogue box that opens. Do not close the dialogue box until the information has been entered in the office settings. Or the information can be pasted into a text file, or elsewhere, from which it can then be copied and pasted.
The client secret cannot be retrieved or restored. If it is not pasted in anywhere, you will have to create a new one in the Azure portal. The other information can be retrieved from the Azure portal afterwards if needed.
Step 4: Enable the Azure connection in Opter
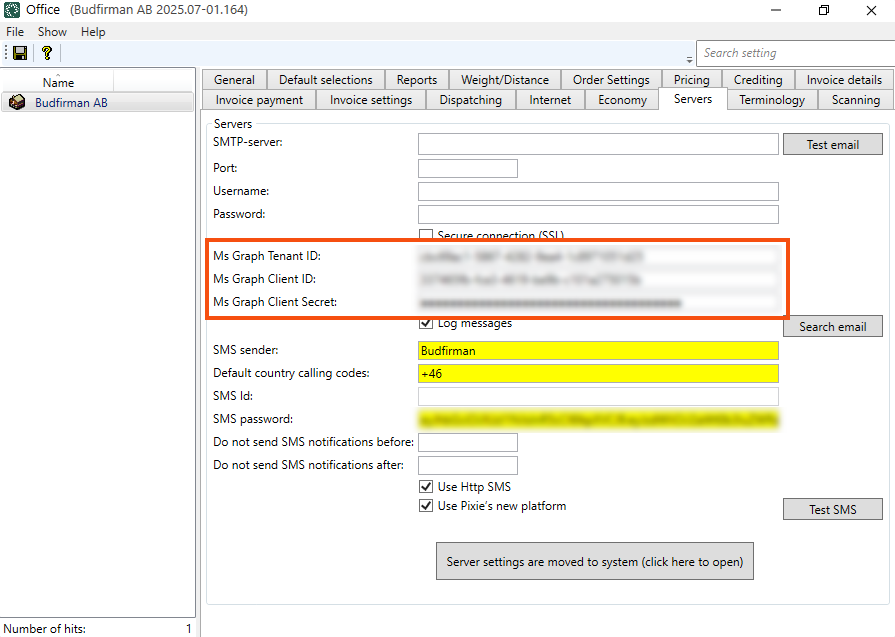
Click on Settings > Offices > Servers tab and fill in the following fields with the information you pasted in the text file:
-
Ms Graph Tenant ID
-
Ms Graph Client ID
-
Ms Graph Client Secret
Then click on Test email, enter yourself as the recipient and check that you receive a message.
If there is a value in the Ms Graph Tenant ID field, it does not matter whether or not the fields above on this tab are filled in (SMTP-server, Port, Username, Password and Secure connection (SSL)). This information is not used, as the authentication is done through the app registration in Azure. It can be a good idea to remove the information in them, so that there is no risk of misunderstanding.
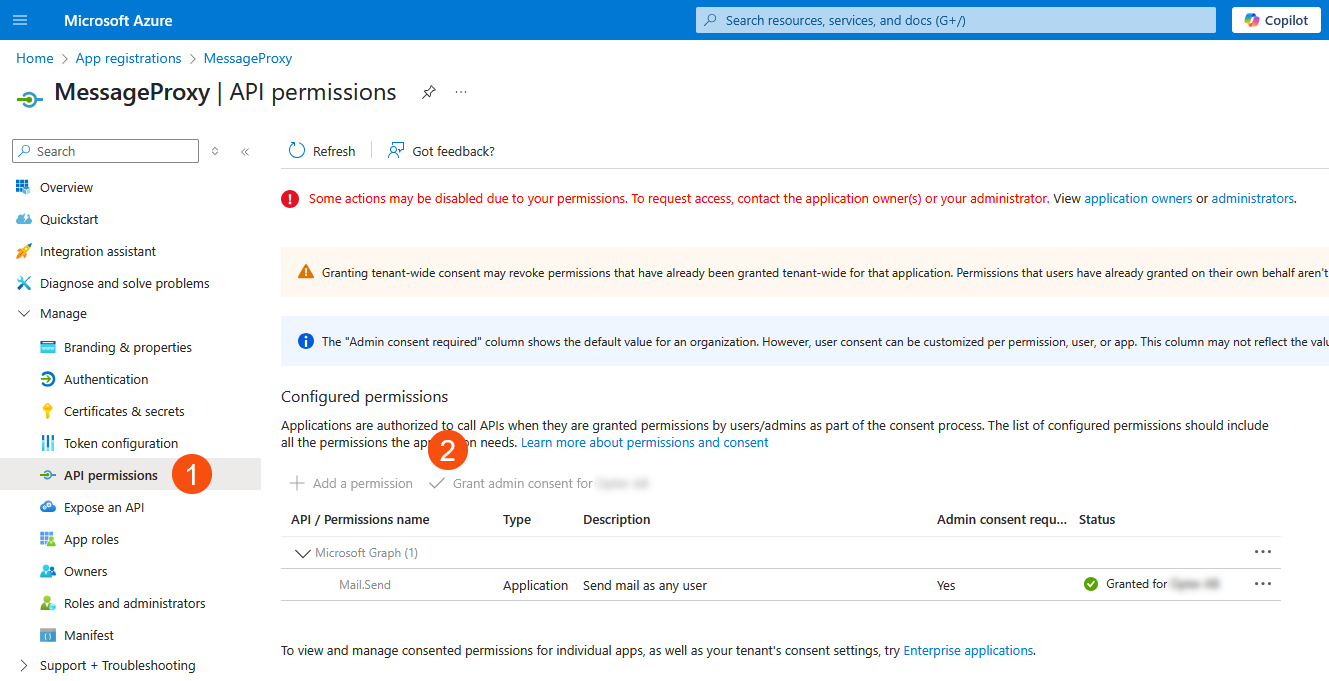
Step 5: Give the OpterMessageProxy app administrator rights
Log in to portal.azure.com and search for “OpterMessageProxy”. Go to API permissions in the menu on the left and click on Grant admin consent for {0}
Registration of the app in Azure
The app registration can be found on portal.azure.com by searching for “optermessageproxy” and selecting the search result labelled Application. You can also go to the app registrations and look in the list of registered applications.
Under OpterMessageProxy, you can see and copy Ms Graph Tenant ID = Directory (tenant) ID (2) and Ms Graph Client ID = Application (client) ID (1).
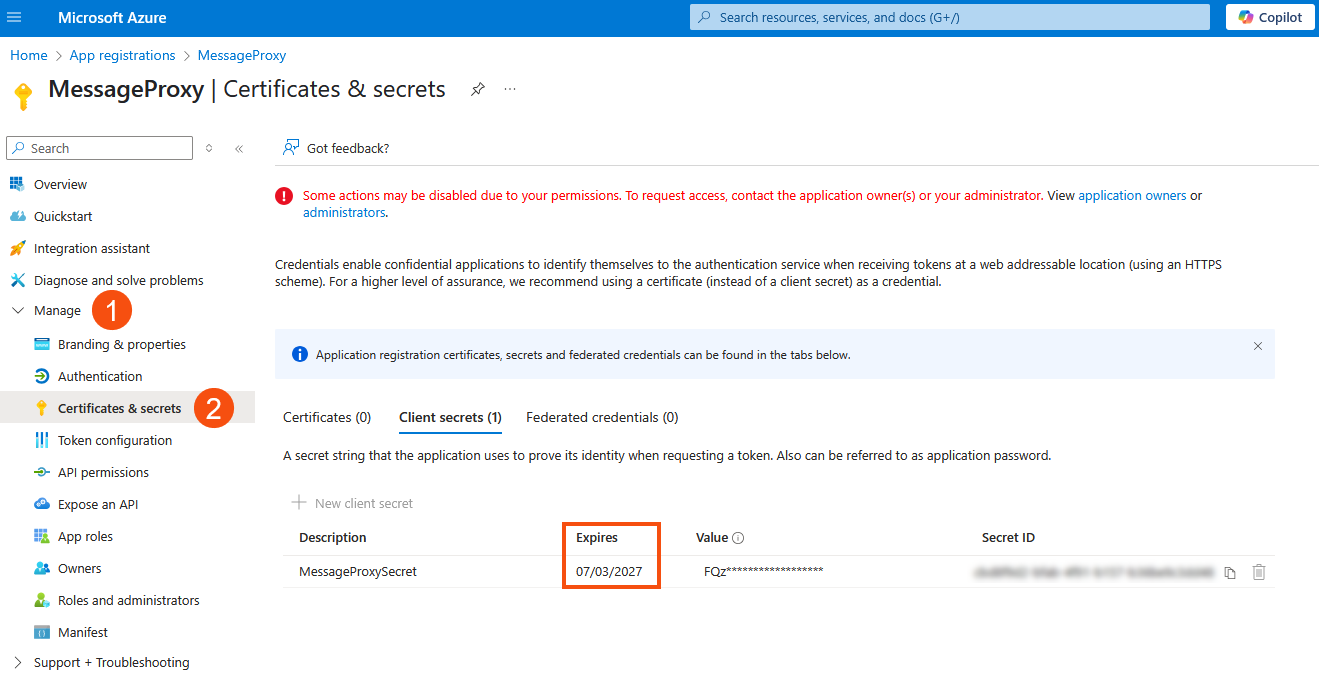
Ms Graph Client Secret cannot be shown or reset in the Azure portal. If you did not paste it in after the script had been run, you have to create a new secret. Go to Manage (1) > Certificates & secrets (2) in the menu on the left and click on New client secret. It is also possible to check when the client secret expires there.
Alternative email addresses
To, for example, send invoices from Opter with a different address, such as invoice@courierservices.com, add the alternative addresses to the OpterMessageProxy_group security group in Exchange. If you changed the name when registering Opter in Azure, the group will be called the name you specified + “_group”. More information is available on the Microsoft website: Allow members to send as or send on behalf of a group (Microsoft). All the sender addresses you have added in Opter must be included in the security group.
For more information and examples on how to add different sender addresses, see Alternative email addresses.
It is not possible to use two-factor authentication (2FA, MFA) for email accounts that are used by Opter.
