Importing orders from Excel to order check
Last updated: 20 April 2022
In this article
In order to ensure that the importing of orders from Excel to order check is working well, the content of the columns must match and the columns must be in the same sequence in Excel and Opter.
The column headings do not have to be the same, the important thing is that the contents of the columns match. For example, a column can be called "Price, manual" in Excel, and "Manual price" in order check; the important thing is to know what data each column in Excel contains so that they can be matched correctly with the columns in order check.
Step 1: Create a new order check view
A new view can be created in Order check settings, where the columns are set in order to match the Excel file. Proceed as follows:
-
Click on Order > Order check.
-
Click on
 next to the drop-down menu Setting in the order check.
The Order check settings window opens.
-
Click on
 to create a new setting and give it a name, for example “Import from Excel”.
 -
Select the Allow to create new orders checkbox on the General tab.
-
Set which columns are to be displayed in the order check and in what order by going to the Columns tab and then following the instructions in .
Opter will create order numbers once you have imported the new orders into Opter and saved them, so if there is a column for order numbers the cells in that column can be left empty in the Excel file.
If an order number has been entered in the order number column in the Excel file, Opter will ignore that order number and instead create new order numbers when the new orders are saved in Opter.
Step 2: Copying and pasting the orders
There is no specific import function, instead the order rows are copied from Excel to order check, but there are some important details to take into account. Proceed as follows:
-
Ensure that order check is displaying the same columns and that they are in the same order as in the Excel file. For example, check that dates and prices are entered in the same format in the Excel file as in Opter.
-
In the Excel file, select all rows except the column headers (first row), and press Ctrl + C to copy.
-
In order check, click on Click here to add new item at the bottom of the order list. A new row is created.
-
In the new row, click on
 to the left of the first column and paste the orders using Ctrl + V.
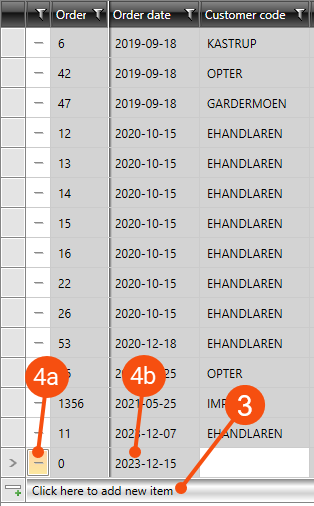
It is also possible to click on field furthest to the left of the fields copied from the Excel file, for example Order date (4b), and then use Ctrl + V to paste in the new orders.
-
Click on Ok in the dialogue box that appears.
-
Check that everything appears to be correct in order check and then click on Save (Ctrl+S) in the top left corner of the General menu tab to save all the new orders. After saving, Opter creates order numbers for the new orders.
If empty rows have been created in order check, it is usually because the customer code pasted in does not match any existing customer code in Opter.
To delete an empty row, click on the far left of the row so that it is selected. Then press the Delete key or Delete at the top left of the window. The row will then have the
 symbol, which means it will be deleted when you click on
  in the top left corner.