App.OpterDriver.Design
Last updated: 20 May 2026
In this article
Applies to Opter Driver for iOS and Opter Driver Labs for Android.
To only set up the information that is displayed in Opter Driver for iOS and Opter Driver Labs for Android, we recommend using the Design field for mobile window, as it is easier than editing the App.OpterDriver.Design XML file. For more information, see Setting which fields are displayed in Opter Driver.
To have a custom layout in Opter Driver for iOS and Opter Driver Labs for Android, this can be created in either App.OpterDriver.Design or App.Design, but to be able to use all the features that are available, App.OpterDriver.Design needs to be used rather than App.Design.For more information on how to customise Opter Driver, see Customising the layout and features of Opter Driver.
If you wish to use different designs for certain customers, certain services and/or certain price vehicle types, you must use App.OpterDriver.Design, For more information, see and App.OpterDriver.Design below.
Conditions
The App.ForceOldDesign mobile data setting must be set to “false” (default) in order to follow the content of App.OpterDriver.Design.
Change the layout in Opter Driver
App.OpterDriver.Design opens in the Layout - apps window. All other windows in Opter are locked when that window is open, but you can switch between different windows that are already open. If you need to see information in other windows, you can open them before opening Layout - apps.
-
Open App.OpterDriver.Design by clicking on Settings > Mobile data > Settings mobile data, and then on Edit next to App.OpterDriver.Design.
Below are links to complete examples of what App.OpterDriver.Design looks like when the Opter system is installed, i.e. the app’s default layout. We recommend that you start from the code example with the default layout and then make your changes.
Tags that can be used are described in Design field for mobile (window) and Text tags in App.OpterDriver.Design.
-
When the changes have been made, we recommend clicking on Check XML to check that the XML syntax is correct. If the syntax is correct, nothing happens. If the syntax is incorrect, the error is described in red text at the top of the window.
-
Close the editor by clicking on
 in the top-right corner. Click on Save in the Mobile data settings window. This will save the changes made in App.OpterDriver.Design.
The changes are displayed in the app once the driver has logged out and then logged back in.
The table below lists the different sections available in App.OpterDriver.Design and where the content of each section is displayed in the app. For example, what is between the tag pair <expanded> </expanded> is shown in the detail view in Opter Driver. If you want to see what the detail view and the various pages look like in the app, see Pages, tabs and menus in Opter Driver and Design field for mobile (window).
|
Section in App.OpterDriver.Design |
Where it is displayed in Opter Driver |
|---|---|
|
<expanded> </expanded> |
In the detail view. |
|
<summary> </summary> |
The shipment list. |
|
<pod> </pod> |
On the proof of delivery signature page. |
|
<scanrows> </scanrows> |
On the scan page (scan list). |
|
<scandetailrows> </scandetailrows> |
On the Scanning details page. |
|
<expandedconsignment> </expandedconsignment> |
In the detail view. This section contains information about consignments. |
|
<summaryconsignment> </summaryconsignment> |
On the shipment page. This section contains information about consignments. |
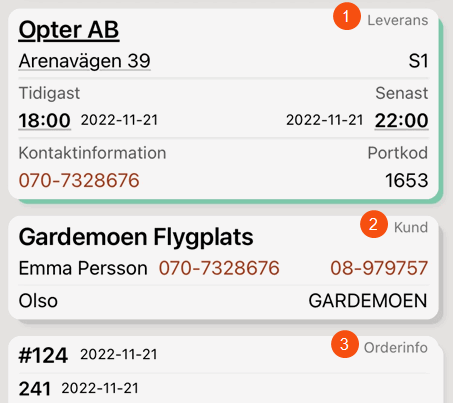
The image shows the Delivery (1), Customer (2), Order info (3) sections in the detail view of the app.
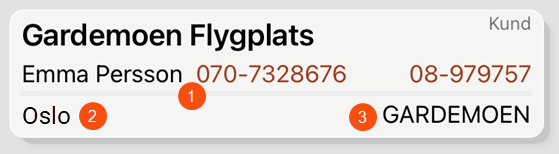
Use the tag pair <box> </box> to add a section. Lines 1 to 20 in the code example below correspond to the section Customer (2) in the picture.
You can also change the name (1) (2) (3) of a section by entering the name you want after headername, see line 1 in the code example below.
You can change the content of a section by deleting or adding rows using the tag pair <row> </row>. Between <row> and </row> you can add one or more information fields using the tag item and the parameter itemname. See lines 2–7 in the code example below. After itemname, you can use plain text or variables that retrieve information from the system. The names of variables that can be used in App.OpterDriver.Design are described in Design field for mobile (window). For example, the variable CUSTOMER displays the customer's name.
Use horizontalalignment to adjust the horizontal position of the field, START (leftmost in the row/section), CENTER (centre of the row/section), or END (rightmost in the row/section). See lines 6 and 18 in the code example below.
Use verticalalignment to adjust the vertical position of the field, where START (top of the row), CENTER (centre of the row), or END (bottom of the row).
Use condition if there are conditions on whether the field should be displayed. For example, on line 9 of the code example below, the customer reference (i.e. CUSTOMERREFERENCE) is only displayed on shipments/orders where the customer reference exists.
<box headername="$Design_Customer" bgcolor="OpterGray0">
<row>
<item itemname="CUSTOMER" font="LARGEBOLD" />
<item itemname="' - '" condition="CUSTOMERNUMBER != "/>
<item itemname="CUSTOMERNUMBER" />
<item itemname="CUSTOMERLOGOTYPE" horizontalalignment="END" height="20" />
</row>
<row>
<item itemname="CUSTOMERREFERENCE,' '" condition="CUSTOMERREFERENCE != " />
<item itemname="CUSTOMERREFERENCEMOBILEPHONE,' '" condition="CUSTOMERREFERENCEMOBILEPHONE != " />
<item itemname="CUSTOMERREFERENCEPHONE" />
</row>
<seperator height="1" condition="CUSTOMER != | CUSTOMERNUMBER != | CUSTOMERREFERENCE != | CUSTOMERREFERENCEMOBILEPHONE != | CUSTOMERREFERENCEPHONE != " />
<row>
<item itemname="CUSTOMERPROJECT" />
<item itemname="CUSTOMERCODE" horizontalalignment="END" />
</row>
</box>You can change the name of a field or column by modifying itemname. For example, if you want the column displaying ExtraID2 (package) in the section Packages to be named "LoW waste code" instead of "Ex. ID 2" then change the code within the tag pair <box headername="$Design_Packages" ... </box> (that is, in the section Packages) from the following:
<item itemname="'$Design_PackageExtraId2_Short'" condition="PACKAGECOUNT > 0" width="65" font="SMALL" color="OpterGray2.5" savewidth="true" />To the following:
<item itemname="'LoW-avfallskod'" condition="PACKAGECOUNT > 0" width="65" font="SMALL" color="OpterGray2.5" savewidth="true" />If you want to change the width of the column, change the number after width. For example, if you need a wider column, change from width="65" to width="75".
The image shows examples of different font styles and sizes in the Delivery section of the app’s detail view.
Use font to select the font style and font size. To make them the right size for the app, we recommend using the predefined font styles and sizes LARGEBOLD (1), BOLD (3), SMALL (2), SMALLER (4), SMALLEST, SMALLBOLD and NORMALLARGEBOLD.
The text (1) in the image above is defined on line 3 of the code example below, i.e. font=”LARGEBOLD”. The text (2) in the image defined on line 27, (3) in the image is defined on line 33 and (4) is defined on line 34 in the code example below.
<box headername="$Design_Delivery" bgcolor="OpterMint">
<row>
<item itemname="ADDRESSTO" bgcolor="OpterGray-3" font="LARGEBOLD" />
</row>
<row>
<item itemname="ADDRESS2TO" font="SMALL" />
</row>
<row>
<item itemname="ADDRESS3TO" font="SMALL" />
</row>
<row multiLine="True">
<item itemname="STREETTO,' ',STREETNOTO" />
<item itemname="'$Design_Comma',' ',ZIPCODETO,' ',CITYTO" font="SMALL" />
<item itemname="ZONETO" horizontalalignment="END" />
</row>
<row>
<item itemname="COMPANYTO"/>
</row>
<seperator condition="ADDRESSTO != | ADDRESS2TO != | ADDRESS3TO != | STREETTO != | ZIPCODETO != | ZONETO != | COMPANYTO != "/>
<row>
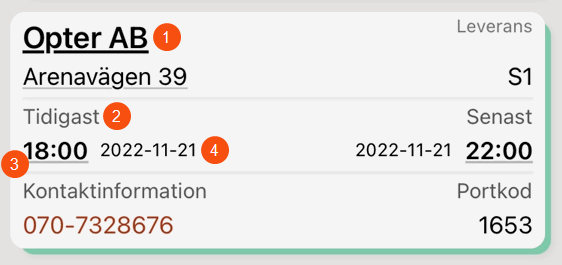
<item itemname="'$Design_Earliest'" font="SMALL" color="OpterGray2.5" condition="EARLIESTDELIVERYTIME != | EARLIESTDELIVERYDATE != " />
<item itemname="'$Design_Estimated'" font="SMALL" color="OpterGray2.5" horizontalalignment="CENTER" condition="ESTIMATEDDELIVERYTIME != " />
<item itemname="'$Design_Latest'" font="SMALL" color="OpterGray2.5" horizontalalignment="END" condition="LATESTDELIVERYTIME != | LATESTDELIVERYDATE != " />
</row>
<row>
<item itemname="EARLIESTDELIVERYTIME,' '" font="BOLD" condition="EARLIESTDELIVERYTIME != " />
<item itemname="EARLIESTDELIVERYDATE" font="SMALLER" verticalalignment="CENTER" />
<item itemname="ESTIMATEDDELIVERYTIME" horizontalalignment="CENTER" />
<item itemname="LATESTDELIVERYDATE" font="SMALLER" horizontalalignment="END" />
<item itemname="' ',LATESTDELIVERYTIME" font="BOLD" horizontalalignment="END" condition="LATESTDELIVERYTIME != " />
</row>
<row>
<item itemname="DELIVERYDATE" font="SMALLER" horizontalalignment="END" />
<item itemname="' ',DELIVERYTIME" font="BOLD" horizontalalignment="END" condition="DELIVERYTIME != " />
</row>
<seperator condition="EARLIESTDELIVERYTIME != | EARLIESTDELIVERYDATE != | LATESTDELIVERYTIME != | LATESTDELIVERYDATE != "/>
<row>
<item itemname="'$Design_Contact'" font="SMALL" color="OpterGray2.5" condition="PHONETO != | RECEIVERREFERENCE != " />
<item itemname="'$Design_PortCode'" font="SMALL" color="OpterGray2.5" horizontalalignment="END" condition="ENTRECODETO != " />
</row>
<row>
<item itemname="RECEIVERREFERENCE,' '" condition="RECEIVERREFERENCE != " />
<item itemname="PHONETO" />
<item itemname="ENTRECODETO" horizontalalignment="END" />
</row>
<row>
<item itemname="'$Design_Fax', ' '" color="OpterGray2.5" Font="SMALL" condition="FAXTO != " />
<item itemname="FAXTO" />
</row>
<seperator condition="PHONETO != | ENTRECODETO != | RECEIVERREFERENCE != "/>
<row>
<item itemname="'$Design_Note'" font="BOLD" condition="ADDRESSINFOTO != " />
</row>
<row>
<item itemname="ADDRESSINFOTO" multiLine="True" />
</row>
<seperator condition="ADDRESSINFOTO != ,DRIVERMESSAGETO != "/>
<row>
<item itemname="'$Design_DriverMessage'" font="BOLD" condition="DRIVERMESSAGETO != " />
</row>
<row>
<item itemname="DRIVERMESSAGETO" multiLine="True" />
</row>
</box>
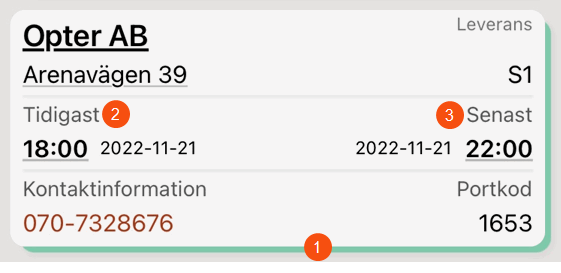
To change the colour of the shadow (1), set bgcolor to the colour you want, for example "#FF3344" or any of the predefined colours "OpterBlue", "OpterYellow", "OpterMint", "OpterWhite", "OpterGray0", "OpterGreenTransparent", "OpterYellowDark", "OpterMintDark" or "OpterOrange". See line 1 in the code example below, where the colour of the section shadow is set to “OpterMint”.
To change the colour of the text (2) and (3), set color to the colour of your choice, for example #F5F5F5 or one of the predefined colours "OpterGray2.5" or "OpterGray1.5". See lines 27 and 29 in the code example.
<box headername="$Design_Delivery" bgcolor="OpterMint">
<row>
<item itemname="ADDRESSTO" bgcolor="OpterGray-3" font="LARGEBOLD" />
</row>
<row>
<item itemname="ADDRESS2TO" font="SMALL" />
</row>
<row>
<item itemname="ADDRESS3TO" font="SMALL" />
</row>
<row multiLine="True">
<item itemname="STREETTO,' ',STREETNOTO" />
<item itemname="'$Design_Comma',' ',ZIPCODETO,' ',CITYTO" font="SMALL" />
<item itemname="ZONETO" horizontalalignment="END" />
</row>
<row>
<item itemname="COMPANYTO"/>
</row>
<seperator condition="ADDRESSTO != | ADDRESS2TO != | ADDRESS3TO != | STREETTO != | ZIPCODETO != | ZONETO != | COMPANYTO != "/>
<row>
<item itemname="'$Design_Earliest'" font="SMALL" color="OpterGray2.5" condition="EARLIESTDELIVERYTIME != | EARLIESTDELIVERYDATE != " />
<item itemname="'$Design_Estimated'" font="SMALL" color="OpterGray2.5" horizontalalignment="CENTER" condition="ESTIMATEDDELIVERYTIME != " />
<item itemname="'$Design_Latest'" font="SMALL" color="OpterGray2.5" horizontalalignment="END" condition="LATESTDELIVERYTIME != | LATESTDELIVERYDATE != " />
</row>
<row>
<item itemname="EARLIESTDELIVERYTIME,' '" font="BOLD" condition="EARLIESTDELIVERYTIME != " />
<item itemname="EARLIESTDELIVERYDATE" font="SMALLER" verticalalignment="CENTER" />
<item itemname="ESTIMATEDDELIVERYTIME" horizontalalignment="CENTER" />
<item itemname="LATESTDELIVERYDATE" font="SMALLER" horizontalalignment="END" />
<item itemname="' ',LATESTDELIVERYTIME" font="BOLD" horizontalalignment="END" condition="LATESTDELIVERYTIME != " />
</row>
<row>
<item itemname="DELIVERYDATE" font="SMALLER" horizontalalignment="END" />
<item itemname="' ',DELIVERYTIME" font="BOLD" horizontalalignment="END" condition="DELIVERYTIME != " />
</row>
<seperator condition="EARLIESTDELIVERYTIME != | EARLIESTDELIVERYDATE != | LATESTDELIVERYTIME != | LATESTDELIVERYDATE != "/>
<row>
<item itemname="'$Design_Contact'" font="SMALL" color="OpterGray2.5" condition="PHONETO != | RECEIVERREFERENCE != " />
<item itemname="'$Design_PortCode'" font="SMALL" color="OpterGray2.5" horizontalalignment="END" condition="ENTRECODETO != " />
</row>
<row>
<item itemname="RECEIVERREFERENCE,' '" condition="RECEIVERREFERENCE != " />
<item itemname="PHONETO" />
<item itemname="ENTRECODETO" horizontalalignment="END" />
</row>
<row>
<item itemname="'$Design_Fax', ' '" color="OpterGray2.5" Font="SMALL" condition="FAXTO != " />
<item itemname="FAXTO" />
</row>
<seperator condition="PHONETO != | ENTRECODETO != | RECEIVERREFERENCE != "/>
<row>
<item itemname="'$Design_Note'" font="BOLD" condition="ADDRESSINFOTO != " />
</row>
<row>
<item itemname="ADDRESSINFOTO" multiLine="True" />
</row>
<seperator condition="ADDRESSINFOTO != ,DRIVERMESSAGETO != "/>
<row>
<item itemname="'$Design_DriverMessage'" font="BOLD" condition="DRIVERMESSAGETO != " />
</row>
<row>
<item itemname="DRIVERMESSAGETO" multiLine="True" />
</row>
</box>Use the tag <seperator/> or the tag pair <seperator> </seperator> to add a horizontal line. A line can be useful for splitting the information into different parts to make it clearer in the app. Use height to specify how thick the line should be. Use condition if there are any conditions for the line to appear.
In the image above and the code example below, the line (1) will be displayed with a 5 pixel thickness and the line will only be displayed if the customer has any Cus.Proj./Proj.No (2) and/or any Customer code (3).
Comments can be added in the XML file. Any text between <!-- and --> will only appear in App.OpterDriver.Design and will not affect the layout of the app.
<!-- Currents status and the time when the current status was set -->
<row>
<item itemname="CURRENTSTATUS" horizontalalignment="START" font="LARGEBOLD" />
<item itemname="' ',CURRENTSTATUSTIME" horizontalalignment="START" />
</row>For example, if you want to test different layouts, you can comment out sections by putting the section between <!-- and -->.
Different designs can be used for orders with specific customers, services and/or price vehicle types. This is done by creating an alternative design in the same App.OpterDriver.Design and then defining conditions for that design. The design is selected at the order level, rather than at, for example, the shipment level or driver level. It is therefore the customer code, service and/or price vehicle type for the order that determines how the shipments are displayed in Opter Driver.
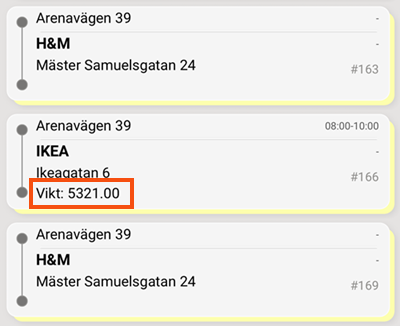
The entire default design does not have to be copied to make the adjustments. Simply copy the section you want to redesign. For example, if you want to display the weight directly in the order list of orders from a particular customer, it is enough to add the summary section to the customer-specific design.
Proceed as follows
-
Start by adding a new design section. You can click on
 on the far left to minimise the various sections. In the image below, we have started to add a design for the customer code "IKEA", which is visible at the bottom.
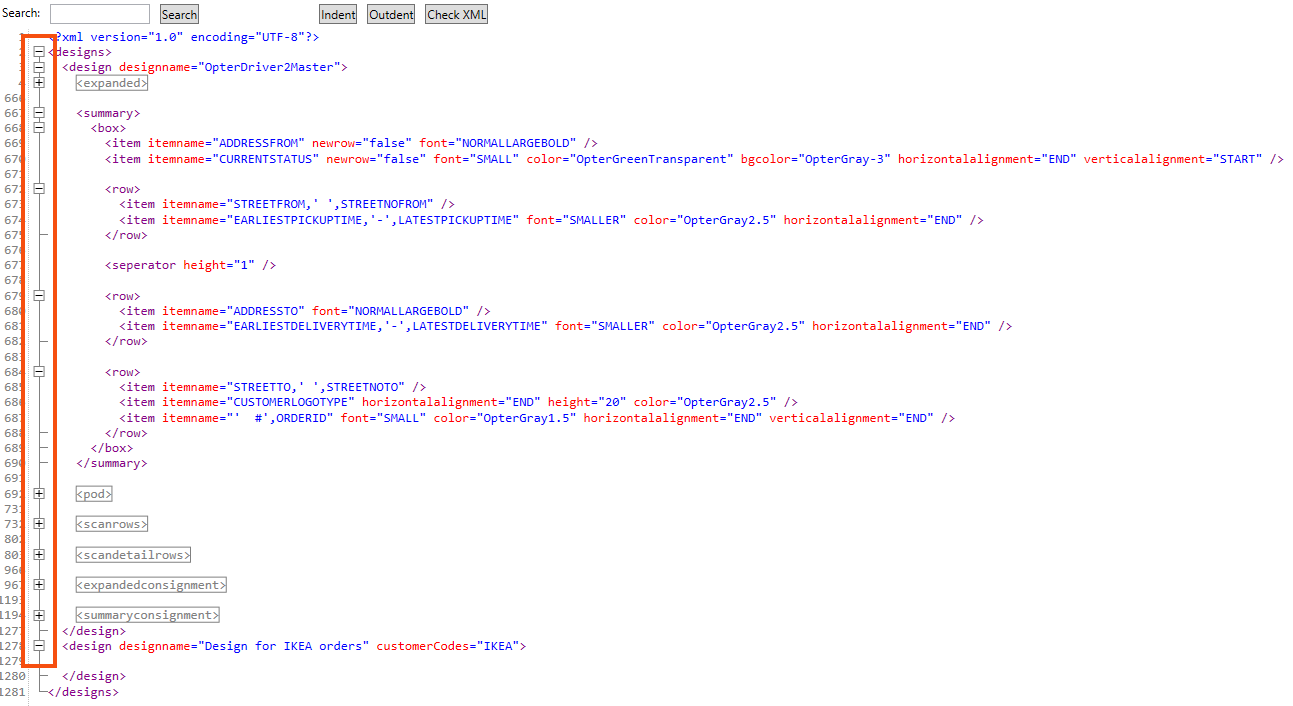
-
Copy the section you want to modify from the default design, in our case the mission list (summary), and make the changes. In the example below, we have added a line showing the weight of the order in the shipment list, see lines 24–26 in the example. Other sections are taken from the standard design "OpterDriver2Master".
-
The tag $Design_PackageWeight_Short retrieves the text Weight.
-
The “IKEA” customer code condition has been added to line 1.
XML<design designname="Design for IKEA orders" customerCodes="IKEA">
<summary>
<box>
<item itemname="ADDRESSFROM" newrow="false" font="NORMALLARGEBOLD" />
<item itemname="CURRENTSTATUS" newrow="false" font="SMALL" color="OpterGreenTransparent" bgcolor="OpterGray-3" horizontalalignment="END" verticalalignment="START" />
<row>
<item itemname="STREETFROM,' ',STREETNOFROM" />
<item itemname="EARLIESTPICKUPTIME,'-',LATESTPICKUPTIME" font="SMALLER" color="OpterGray2.5" horizontalalignment="END" />
</row>
<seperator height="1" />
<row>
<item itemname="ADDRESSTO" font="NORMALLARGEBOLD" />
<item itemname="EARLIESTDELIVERYTIME,'-',LATESTDELIVERYTIME" font="SMALLER" color="OpterGray2.5" horizontalalignment="END" />
</row>
<row>
<item itemname="STREETTO,' ',STREETNOTO" />
<item itemname="CUSTOMERLOGOTYPE" horizontalalignment="END" height="20" color="OpterGray2.5" />
<item itemname="' #',ORDERID" font="SMALL" color="OpterGray1.5" horizontalalignment="END" verticalalignment="END" />
</row>
<row>
<item itemname="'$Design_PackageWeight_Short',': ',WEIGHT" />
</row>
</box>
</summary>
</design> -
-
Close Layout - apps and click on Save in the Mobile data settings window. The changes are not visible in the app until the driver has logged out and in again.
Several conditions
If you set conditions for both the customer code and the service code on a particular design, that design is only used for orders for which both the conditions are fulfilled. This offer applies to orders placed with IKEA using the “Timkörning” service.
If the design is to be used for several customers, the customer codes are comma-delimited. This design applies to orders from IKEA, Opter and Kastrup.
Several designs
You can of course add more designs with different combinations of conditions.
<designs>
<!-- Default design -->
<design designname="OpterDriver2Master">
...
</design>
<!-- Design for IKEA orders with hourly rate -->
<design designname="IKEA with TI" customerCodes="IKEA" serviceTypeCodes="TI">
...
</design>
<!-- Design for IKEA (with other services than TI), Opter and Kastrup -->
<design designname="IKEA, Opter, Kastrup" customerCodes="IKEA,OPTER,KASTRUP">
...
</design>
<!-- Design for orders with price vehicle type TL -->
<design designname="Heavy truck" vehicleTypeCodes="TL">
...
</design>
</designs>"DIF-properties" is not intended to be displayed in the app; they are intended for use in "conditions" in the XML file App.OpterDriver.Design. "DIF properties" is described in Design field for mobile (window).
Complete examples
If you want the app in the default layout, or want to start from the default layout and then make your changes, you can copy the complete code example in one of the following Price items (depending on the version of Opter you are using):