The price item view in Opter Driver
Last updated: 4 November 2025
In this article
Drivers can add new Price items and make changes to existing items on shipments in Opter Driver by selecting Price items from the menu in the detail view. This can be useful, for example, if the driver performs an additional service in connection with the delivery. You can customise the view that opens, the item view.
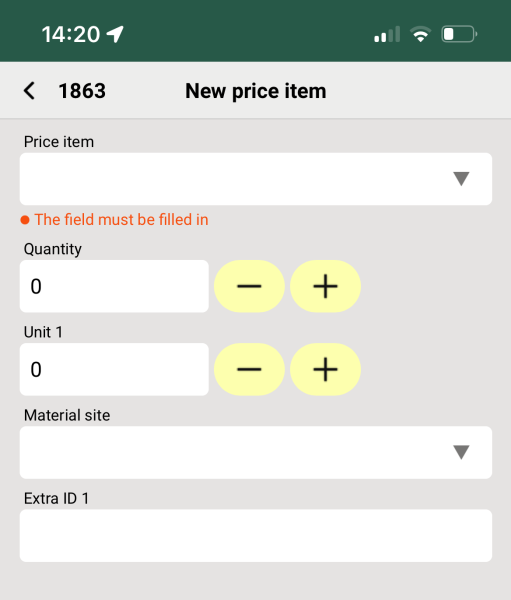
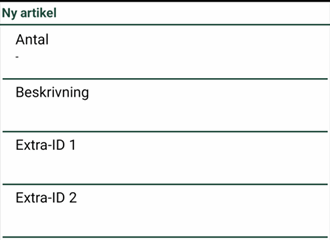
In Opter Driver (classic) for Android, the item view looks like this.
In Opter Driver for iOS and Opter Driver Labs for Android, drivers can also add new price items to the POD view. For more information, see POD view in Opter Driver and Pods (POD) in Opter Driver.
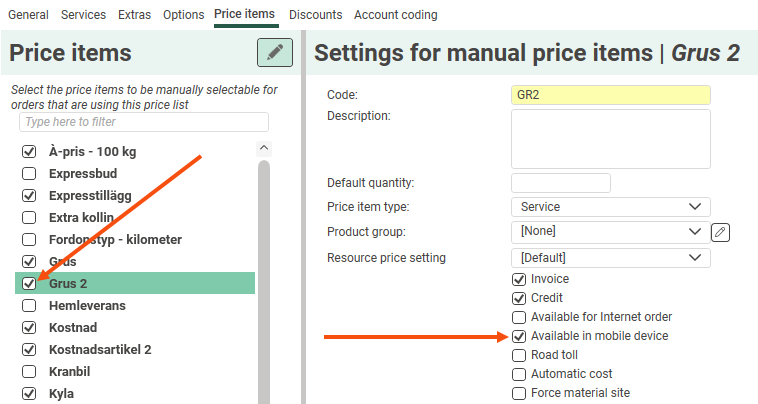
All Price items to be used in Opter Driver must be activated. Go to Economy > Price lists > Price lists > Price items tab and select Available in mobile device.
Prevent drivers from adding or changing Price items
If you want drivers to be able to modify and add Price items, you don't need to do anything. It is standard. However, if you don't want drivers to be able to add or change Price items in the app, set the Mobile data settings ArticlesPermission to "false". Then the menu item Price items is completely hidden in both the detail view and the POD view.
If you want drivers to be able to modify existing Price items, but not add new ones, set the Mobile data settings AddNewPriceItemPermission to "false". This will display the menu item Price items, so drivers can see existing Price items, but they cannot add new ones.
If you want drivers to be able to delete Price items already on the shipment, set the Mobile data settings DeletePriceItemPermission to "true". The Delete button will then appear at the bottom of the article view.
For more information on how to set up Mobile data settings, see Mobile data settings (window).
|
Desired features of the app |
What settings need to be made? |
|---|---|
|
|
Available in mobile device= DeletePriceItemPermission = "true". |
|
|
Available in mobile device = |
|
|
This combination is not possible because the driver can always change existing Price items if the menu item is displayed. It is not possible to deactivate only that option. |
|
|
Available in mobile device = AddNewPriceItemPermission = "false". DeletePriceItemPermission = "true". |
|
|
This combination is not possible because the menu item must be displayed for the driver to remove Price items. Then the driver can also automatically modify existing Price items as it is not possible to disable just that option. |
|
|
Available in mobile device = AddNewPriceItemPermission = "false". |
|
|
This combination is not possible because the menu item must be displayed for the driver to remove Price items. Then the driver can also automatically modify existing Price items as it is not possible to disable just that option. |
|
|
ArticlesPermission = "false". The menu item Price items is not displayed at all in the detail view and POD view. |
By default, changes made in Opter Driver must be manually approved in dispatch for the change to be saved, but it can be set so that no changes at all need to be approved, or only certain changes need to be approved.
For more information, see Setting how changes made in Opter Driver are approved.
Customise the item view
When drivers select Price items from the menu, one of the following happens:
-
If there are Price items on the order, a view opens where drivers can create new items and modify existing items on the shipment. If there are many Price items, you can search for the ones you want to see.

-
If there are no Price items on the shipment, the item view opens directly, where the driver can create a new item.
If you have set up drivers to be able to add new items in the POD view, the Price item view opens where the driver can create a new item. See the image above.
It is possible to choose which fields to display in the price item view and the order in which they are displayed, and also to rename them. The price item view is managed with the settings starting with “SPI_” in the mobile data settings. There are three types of SPI_settings:
-
"SPI_XyzPermission", for example SPI_QuantityPermission: Controls whether or not the field is displayed in the view.
-
”SPI_XyzName”, for example SPI_SAR_IdName: the default name for the field can be replaced by a custom name.
-
"SPI_XyzOrder", for example SPI_SAR_IdOrder: where in the view the field should be displayed. The lower the number, the higher up the view it is.
For more information on the item view settings, see Mobile data settings (window).
All SPI_Permission is "true" by default, which means that all fields are displayed if you do not make any settings at all.
If you set the Permission for one field to "false", you must set the Permission for all fields to be displayed to "true". Otherwise, no fields are displayed at all in the item view (except the field Price item, which is displayed even if you set a field to "false"). If you want to hide certain fields, it is easier to think the other way round. Which fields do you want to show? Set them to 'true'. You never need to set any fields to "false" because the other fields are automatically hidden when you set the first field to "true".
By default, all fields are displayed in the app. If you don't want to show all fields, set the ones you want to show to "true". You do not need to make any settings for the fields you do not want to display. They are automatically hidden if they are not set to "true".
-
Click on Settings > Mobile data > Settings mobile data.
-
Click on an empty row in the Name column and then on the down arrow in the row being added. Select the SPI_XyzPermission setting for the field to be displayed/hidden, for example SPI_QuantityPermission (which controls whether or not the Quantity field is displayed). For more information on which settings correspond to which fields, see Mobile data settings (window).
-
Type "true" in the column Value.
-
Repeat steps 2 and 3 for all fields you want to display.
-
Click on Save. When you have finished configuring the settings, you can close the window.
To change the default names of the fields to your own names, proceed as follows:
-
Click on Settings > Mobile data > Settings mobile data.
-
Click on an empty row in the Name column and then on the down arrow in the row being added. Select the SPI_XyzName setting for the field to be renamed, for example SPI_SAR_IdName (which is the Price item field). For more information on which settings correspond to which fields, see Mobile data settings (window).
-
Enter the new name of the field in the Value column, for example “Price item type”.
-
Repeat steps 2 and 3 for all fields to be renamed.
-
Click on Save. When you have finished configuring the settings, you can close the window.
To specify the order in which the fields are displayed, proceed as follows:
-
Click on Settings > Mobile data > Settings mobile data.
-
Click on an empty row in the Name column and then on the down arrow in the row being added. Select the SPI_XyzOrder setting for the field to be moved up or down in the view, for example SPI_SAR_IdOrder. For more information on which settings correspond to which fields, see Mobile data settings (window).
-
In the Value column, enter a number to indicate where in the view the field should be located. The lower the number, the higher up it is. If “1” is entered, the field will be at the top of the list.
The default setting for all fields is “99”. This means that setting one of them to "2" is not enough for that field to appear in second place. If “1” is not entered for any other option, the field with the value “2” will be placed at the top. The field with the lowest number appears at the top.
-
Repeat steps 2 and 3 for all fields to be moved.
-
Click on Save. When you have finished configuring the settings, you can close the window.
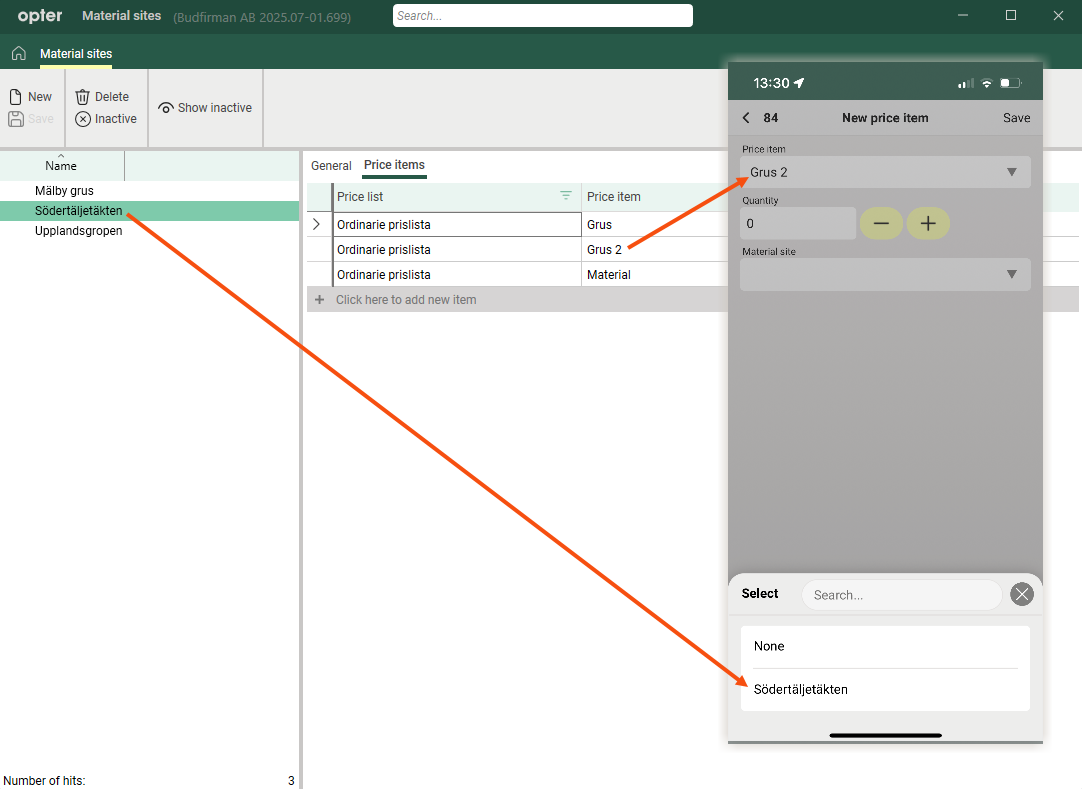
Material Site
In order to select the material site for a Price item in Opter Driver, the following applies:
-
The Price item must be available as a manual item.
-
Price items must be accessible on mobile devices.
-
The Price item must be linked to the material site.
Proceed as follows:
-
Go to Economy > Price lists > Price lists > Price items tab. Make sure that the Price items you want to link to material sites are ticked in the list, and that Available in mobile device is selected.
-
Go to Register > Material sites > tab Price items. As the items are unique to each price list, you first select a price list and then an item in the lists to link the item to the material site.
Drivers will need to log out and back in to the app for the changes to be visible.
In the example below, the Price item Gravel 2 is only linked to one material site, Södertäljetäkten. Therefore, only that material site is displayed in the app when the driver has selected the Price item Gravel 2.