POD view in Opter Driver
Last updated: 2 July 2026
Applies to Opter Driver for iOS and Opter Driver Labs for Android.
In this article
The proof of delivery (POD view) is displayed in Opter Driver at the following times:
-
When the driver changes the status of a shipment and has to register a proof of delivery.
-
When the driver presses the menu item Proof of delivery or the POD-type name, for example Nobody home, in the detail view. For more information, see Setting the POD-type as a quick selection in the Opter Driver menu.
The fields and buttons that are displayed and those that are mandatory to fill in can be defined. Drivers who are logged in to Opter Driver when the settings are saved will need to log out and back in to see the changes. For example, the POD view might look like this.
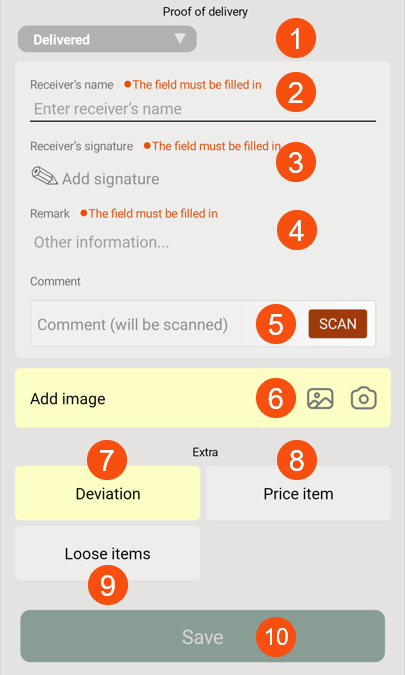
In the image above, the driver selects the proof of delivery type (1), enters the consignee's name (2), adds the signature (3), remark (4), possible comment (5), image (6), deviation (7), possible Price items (8) and loose items (9) and then saves the proof of delivery (10). For more information, see Pods (POD) in Opter Driver.
-
All POD-types to be used in Opter Driver must be enabled. Go to Settings > Proof of Delivery (POD) > Proof of delivery types and select Available in mobile device.
-
If there is a checklist on the order, if the driver should check the waybill number or if the order is delayed and it is mandatory to enter a delay comment, those blocks are displayed in this view.
Preparation
Many of the settings below will be made in the same window in Opter. So you can choose to do in one of the following ways:
-
Follow the instructions below, thereby making the settings for one field at a time (and jumping between the windows).
-
Open one window at a time and make all the settings there, then move on to the next window. Follow the instructions below to find out which settings can be made. The following window contains various settings for the POD view:
-
Settings > Mobile data > Settings mobile data. For more information, see Mobile data settings (window) and below.
-
Settings > Proof of Delivery (POD) > Proof of delivery types. For more information, see Proof of delivery types (window) and below.
-
Register > Customers, Proof of Delivery (POD) tab. (To make exceptions for certain customers).
-
Options on the menu in the detail view
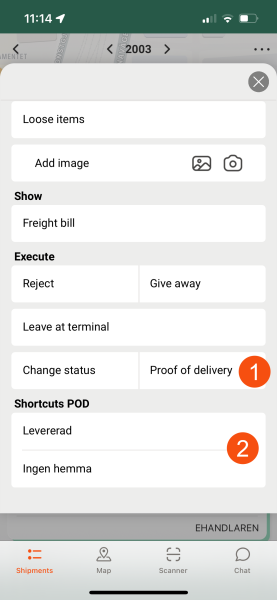
The option Proof of delivery is always displayed by default on the menu in the detail view (1). If you want to hide it, set the Mobile data settings ProofOfDeliveryPermission to "false". You can also add shortcuts to common POD-types directly on the menu by selecting Display on the menu in Opter Driver on that POD-type (2).
Shortcuts are affected if you set any of the Mobile data settings ManualStatusChangePickUpPermission and ManualStatusChangeDeliveryPermission to "false". They are there so that the status can only be changed by scanning, not manually via the menu. Therefore, shortcuts to PODs associated with the status change Set status to pickup/loaded and Set status to delivered/unloaded will be hidden if you set the Mobile data settings to "false". For more information, see Mobile data settings (window) and Proof of delivery types (window).
|
Desired features of the app |
What settings need to be made? |
|---|---|
|
|
No Mobile data settings need to be made. Display on the menu in Opter Driver = |
|
|
No settings need to be made, this is the default setting. |
|
|
This combination is not possible because ProofOfDeliveryPermission must be "false" to hide the menu item. This also hides the shortcuts. |
|
|
ProofOfDeliveryPermission = "false". |
Setting which POD-types are available to select in the app
For example, if you want the proof of delivery types Delivered, Nobody home and New address to be selectable when the driver registers a POD in Opter Driver, do the following
-
Click on Settings > Proof of Delivery (POD) > Proof of delivery types.
-
Select Delivered from the list on the left and highlight Available in mobile device. Repeat for POD-types Nobody home and New address.
Here you also choose whether there should be a shortcut on the menu with the option Display on the menu in Opter Driver.
The field Receiver’s name
The field Receiver’s name is always displayed and cannot be hidden.
You can make it compulsory to indicate the recipient's name by ticking Require name on the delivery note type. For more information, see Proof of delivery types (window).
The setting can be overridden for individual customers by selecting Name always optional on the Proof of Delivery (POD) tab in the customer registry.
The field Receiver’s signature
The field Receiver’s signature is always displayed and cannot be hidden. You can make it mandatory to sign the POD by selecting Require signature on the delivery note type.
The setting can be overridden for individual customers using the Signature always optional option on the Proof of Delivery (POD) tab of the customer register.
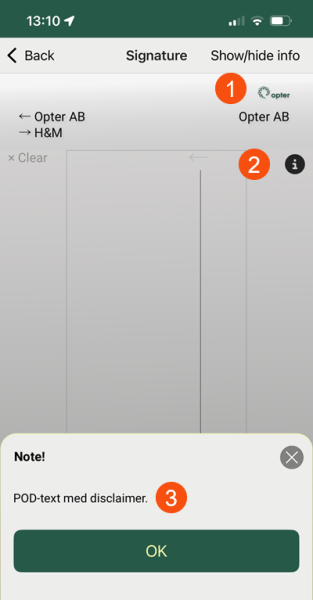
You can display the customer's logo on the signature page (1) by selecting an image on the Proof of Delivery (POD) tab of the customer register, and then adding the field Customer logo [CUSTOMERLOGOTYPE] on the Proof of delivery tab of Design field for mobile, or with the tag CUSTOMERLOGOTYPE in App.OpterDriver.Design.
If you want to display a text on the signature page, for example a disclaimer, enter it on the Proof of Delivery (POD) tab in the customer register. Click on ![]() (2) and the text will appear (3).
(2) and the text will appear (3).
You can set which fields are displayed on the signature page in the Design field for mobile window or in App.OpterDriver.Design. For more information, see Design field for mobile (window), App.OpterDriver.Design and Setting which fields are displayed in Opter Driver.
The field Remark
The field Remark is displayed by default. If you want to hide it, set the Mobile data settings PodRemarkEnabled to "false".
You can make it mandatory to enter a comment by selecting Require remark on the proof of delivery type. For more information, see Proof of delivery types (window).
The setting can be overridden for individual customers by selecting Remark always optional on the Proof of Delivery (POD) tab in the customer registry.
The field Comment
In the Comment field, the driver can enter a comment manually or scan a barcode or QR code containing the comment. Proceed as follows:
-
Set the Mobile data settings PodCommentEnabled "true" to display the field. The default setting is 'false'. For more information, see Mobile data settings (window).
-
Choose whether the driver should enter a comment manually or scan a barcode/QR code. If you want the driver to scan the comment, tick Scan comment on the proof of delivery type. For more information, see Proof of delivery types (window).
-
You can make it mandatory to enter a comment by ticking Require comment on the proof of delivery type.
The setting can be overridden for individual customers by selecting Remark always optional on the Proof of Delivery (POD) tab in the customer registry.
The field Number of packages
This feature can be useful if you are not scanning. The driver indicates the number of packages for which the pod is valid. Once the pod has been registered, the specified number of packages will be displayed in the Confirmed packages column under Proof of delivery (POD) in the Order reception.
The field Number of packages is displayed by default. If you want to hide it, set the Mobile data settings PodPackageCountEnabled to "false".
The field is not displayed when drivers have scanned a parcel or a Freight bill, and then enter the POD view. If the driver has scanned one or more parcels, the pod is registered for the scanned parcels. If the driver has scanned a Freight bill, the delivery pod for all packages is recorded on the Freight bill.
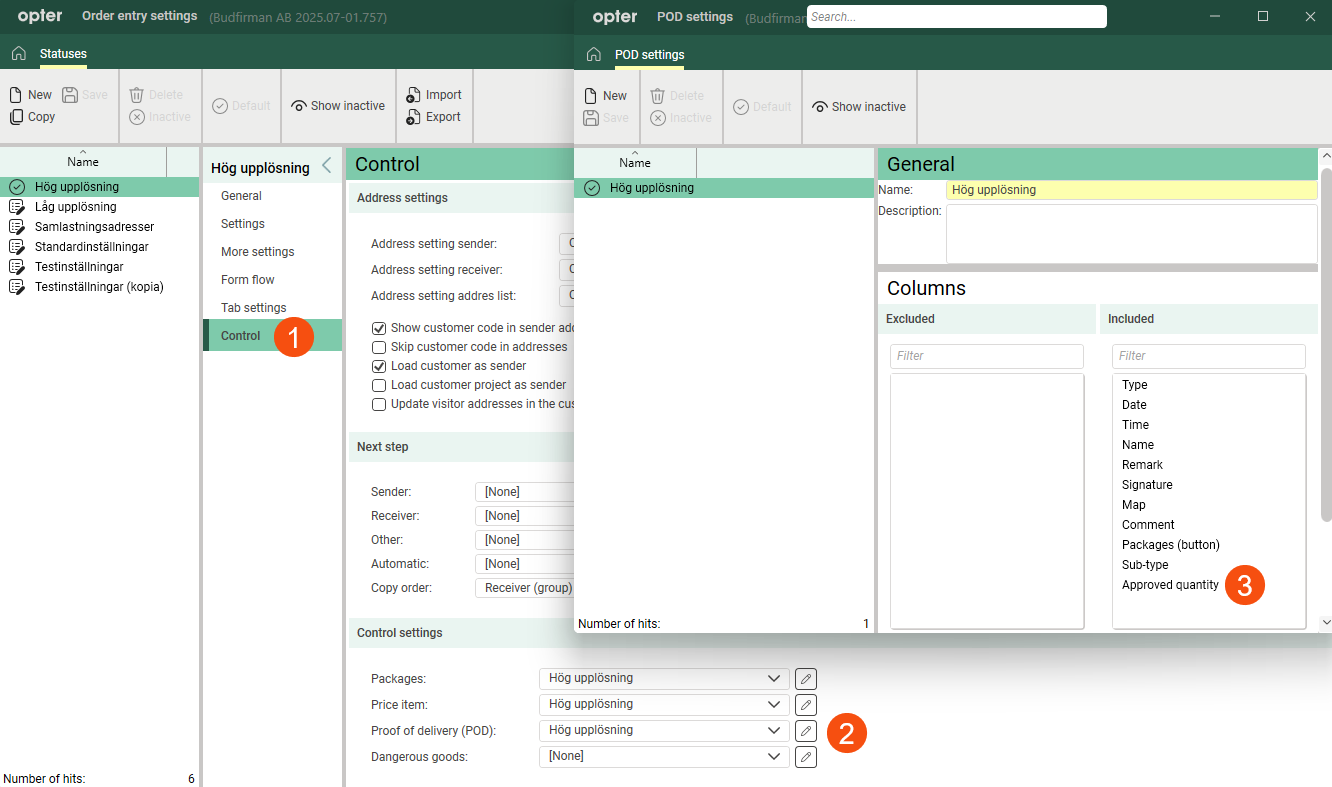
If the column Confirmed packages is not displayed in the Order reception, you can find it in the order settings. Go to the Control tab (1), click on ![]() next to the Proof of delivery (POD) drop-down menu (2) and move Approved quantity to Included (3).
next to the Proof of delivery (POD) drop-down menu (2) and move Approved quantity to Included (3).
The field Add image
This feature allows drivers to add one or more images to the proof of delivery. You can also make it compulsory.
|
Desired features of the app |
What settings need to be made? |
|---|---|
|
|
PodPictureEnabled = "true". Require image = From Opter Driver 2.4.136 and Opter 2026.06.00 onwards You can also choose how many photos drivers must add before the proof of delivery can be saved in the app, by setting Minimum number. For more information, see Proof of delivery types (window) and Set the minimum number of POD images. The requirement to add images can be waived for individual customers by ticking Image always optional on the Proof of Delivery (POD) tab in the customer register. |
|
|
PodPictureEnabled = "true". |
|
|
PodPictureEnabled = "true". GetPictureFromGalleryPermission = "false". Require image = From Opter Driver 2.4.136 and Opter 2026.06.00 onwards You can also choose how many photos drivers must add before the proof of delivery can be saved in the app, by setting Minimum number. For more information, see Proof of delivery types (window) and Set the minimum number of POD images. The requirement to add images can be waived for individual customers by ticking Image always optional on the Proof of Delivery (POD) tab in the customer register. |
|
|
PodPictureEnabled = "true". GetPictureFromGalleryPermission = "false". |
|
|
No settings need to be made, this is the default setting. |
The Mobile data settings GetPictureFromGalleryPermission do not only apply to the POD view. This applies to all areas of the app where the driver can add photos, for example in the detail view and when reporting deviations. For more information, see Mobile data settings (window).
The settings Require image and Minimum number (for the POD-type) do not only apply in Opter Driver; they also apply when scanning a QR code on the freight bill and registering a proof of delivery on the status page (the website). For more information, see QR codes for status change on Freight bills and Set the minimum number of POD images.
Information for drivers can be found in Adding images to Opter Driver.
The button Loose items
Choose whether drivers should indicate the number of loose items when recording pods, and whether it should be mandatory. It is done with two Mobile data settings.
|
Desired features of the app |
What settings need to be made? |
|---|---|
|
|
LooseItemsPermission = "true". LooseItemForceSetValue = "true". The driver must indicate the number of loose items he is taking back after delivery. It will only be mandatory if there are already loose items on the order. In theory, there could be an end value, but no start value. In such cases, the driver must indicate Starting quantity when collecting from the sender. |
|
|
LooseItemsPermission = "true". |
|
|
No settings need to be made, this is the default setting. |
LooseItemsPermission displays the Loose items button both in the POD view and on the menu in the detail view. It cannot be displayed in just one place.
Information for drivers is available at Pods (POD) in Opter Driver.
The Deviation button
If you have ticked Available in mobile device for at least one deviation type, the option Deviation will appear in the POD view and on the menu in the detail view. You can hide it by setting the Mobile data settings DamagesPermission to "false". You can also make it mandatory for the driver to add a deviation when a POD of a certain type is registered.
|
Desired features of the app |
What settings need to be made? |
|---|---|
|
|
Available in mobile device = Deviation mandatory = |
|
|
Available in mobile device = |
|
|
Available in mobile device = Available in mobile device = Deviation mandatory = If it is important that existing deviations, added for example in Order reception, are not visible in the app, you can make copies of the deviation types to be used both in the app and in Order reception, and make only one copy available in Opter Driver. Call one of them "Broken packaging - Order reception" and the other "Broken packaging - Apps". |
|
|
AddNewDamagePermission = "false". |
|
|
DamagesPermission = "false". This is actually the default setting as Available in mobile device = |
Set a preset deviation type, and possibly deviation event and deviation reason, on the POD-types to which it is mandatory to add a deviation, so drivers do not have to manually select it in the app.
See also Require deviation for POD registration in Opter Driver.
It is also possible to claim deviation in case of late delivery, see Managing delays in Opter Driver.
The button Price item
If you have selected Available in mobile device for at least one Price item in the price list, the button Price item will appear in the POD view and Price items in the menu in the detail view. You can hide them by setting the Mobile data settings ArticlesPermission to "false". You can also make it mandatory for the driver to add a Price item when a POD of a certain type is registered. This approach cannot be overridden for individual customers.
For more information on how to set up the item view, see The price item view in Opter Driver.
|
Desired features of the app |
What settings need to be made? |
|---|---|
|
|
Available in mobile device = DeletePriceItemPermission = "true". Price item mandatory = |
|
|
Available in mobile device = DeletePriceItemPermission = "true". |
|
|
Available in mobile device = Price item mandatory = |
|
|
Available in mobile device = AddNewPriceItemPermission = "false". DeletePriceItemPermission = "true". Price item mandatory = |
|
|
Available in mobile device = Available in mobile device = DeletePriceItemPermission = "true". Price item mandatory = If a Price item available in Opter Driver is added to the Order reception, the driver will be able to change it in the app. If it is important that existing Price items are not visible in the app, you can make copies of the items to be used both in the app and in Order reception, and only make one copy available in Opter Driver. Call one of them "Waiting time - Order reception" and the other "Waiting time - Opter Driver". You can also work with a master price list where the Price items are not available in Opter Driver, and then add copies of the items to a child price list that are available in Opter Driver. In this case, you must use the subordinate price list on the order to add Price items to Opter Driver. |
|
|
Available in mobile device = |
|
|
Available in mobile device = AddNewPriceItemPermission = "false". DeletePriceItemPermission = "true". |
|
|
Available in mobile device = AddNewPriceItemPermission = "false". Price item mandatory = |
|
|
Available in mobile device = Available in mobile device = Price item mandatory = If a Price item available in Opter Driver is added to the Order reception, the driver will be able to change it in the app. If it is important that existing Price items are not visible in the app, you can make copies of the items to be used both in the app and in Order reception, and only make one copy available in Opter Driver. Call one of them "Waiting time - Order reception" and the other "Waiting time - Opter Driver". You can also work with a master price list where the Price items are not available in Opter Driver, and then add copies of the items to a child price list that are available in Opter Driver. In this case, you must use the subordinate price list on the order to add Price items to Opter Driver. |
|
|
Available in mobile device = AddNewPriceItemPermission = "false" SPI_QuantityPermission = "false" to hide all fields in the Price item view, so that the driver cannot modify existing Price items. For more information, see Mobile data settings (window). DeletePriceItemPermission = "true". |
|
|
Available in mobile device = Available in mobile device = If a Price item available in Opter Driver is added to the Order reception, the driver will be able to change it in the app. If it is important that existing Price items are not visible in the app, you can make copies of the items to be used both in the app and in Order reception, and only make one copy available in Opter Driver. Call one of them "Waiting time - Order reception" and the other "Waiting time - Opter Driver". You can also work with a master price list where the Price items are not available in Opter Driver, and then add copies of the items to a child price list that are available in Opter Driver. In this case, you must use the subordinate price list on the order to add Price items to Opter Driver. |
|
|
AddNewPriceItemPermission = "false". |
|
|
ArticlesPermission = "false". This is actually the default setting as Available in mobile device = |
The button Changes
The menu item Changes is displayed by default in the POD view and on the menu in the detail view. If you do not want drivers to be able to make changes to shipments, set the Mobile data settings ChangesPermission to "false". For more information, see Changes to orders in Opter Driver.
If you need to make at least one change to the shipment/order in order to change the status to Picked up (for example), select Require changes for the status Picked up in the window Life cycles. For more information, see Require changes when changing status in Opter Driver.

By default, changes made in Opter Driver must be manually approved in dispatch for the change to be saved, but it can be set so that no changes at all need to be approved, or only certain changes need to be approved. For more information, see Setting how changes made in Opter Driver are approved.
The SMS signature button
Select whether drivers should be able to send a text message containing a link directly to the order on Track & Trace, where the recipient can sign the proof of delivery on their own device. For more information, see Activating SMS with a link to Track & Trace.
Warning regarding early collection
You can configure the system so that the driver receives a warning displayed in the POD view if they manually set the status of a shipment to Picked up earlier than the earliest collection time specified on the order. Instructions and further details can be found in Warning in case of premature collection, Opter Driver.