Printing a job list after departure scan (Opter Driver)
Last updated: 15 October 2025
In this article
When drivers depart from the Terminal, they can send a request to Opter to print out the assignment list when they are done. The task list is printed from the Terminal printing window in Opter.
Valid only for collection at the Terminal. Not during arrival scan at the Terminal, collection from the sender or delivery to the consignee.
Step 1: Set the Mobile data settings PrintAssignmentListPermission to "true"
For information on how to set up mobile data settings, see Mobile data settings (window).
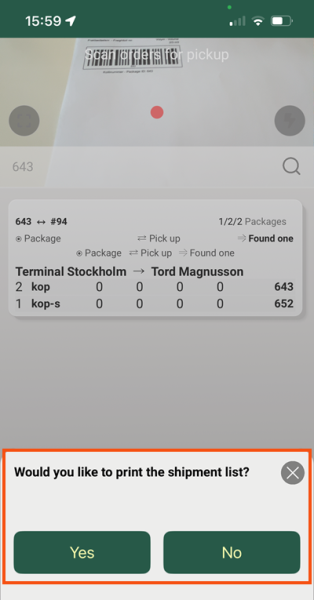
Step 2: Scan the packages
The driver scans the parcels as usual. When it is finished, you will be asked if the job list should be printed. If the driver replies to Yes, the list is not printed directly but sent to Opter, where it can be printed as a PDF or on paper.
Step 3: Print the task list in Opter
-
Click on Order > Terminal printing.
-
Select the Terminal where the scan was performed from the drop-down list Terminal.
-
Click on Select all (which retrieves all the printouts made at the terminal) and then on Refresh. The list of scans at the bottom of the window is updated.
-
Select the shipment list to be printed and click on Print. A preview is displayed, which can then be saved as a PDF or printed. The task list report is set up on the Reports tab in the office settings.
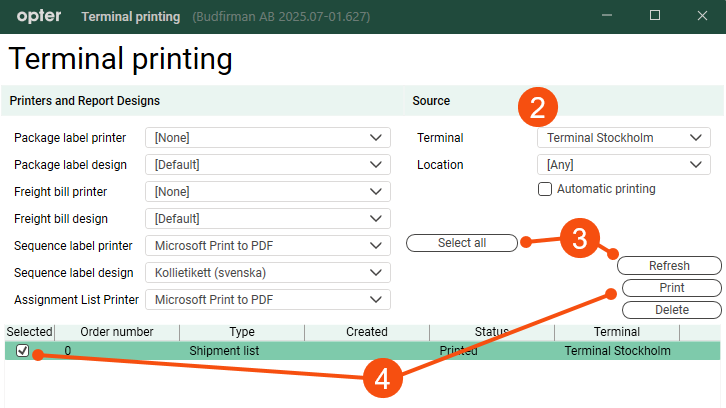
The printers that you want to use on the Terminal are added as regular printers in Windows.
Printing shipment lists later on
If the driver has scanned and sent the assignment list to Opter, you can print it out afterwards.
-
Click on Order > Assignment List Followup.
-
Search for the order list, either by an Order number/order number that you know is included in the scan, or by a time range.
-
Click on
 in the toolbar and select printer or to print to PDF.