Mobile data settings (window)
Last updated: 13 March 2026
In this article
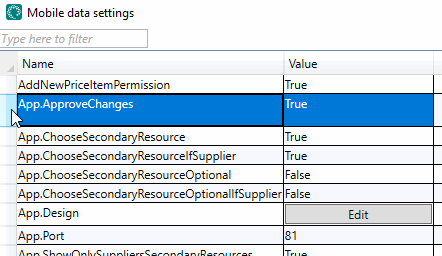
![]() Settings > Mobile data > Settings mobile data
Settings > Mobile data > Settings mobile data
In this window you configure menu items and functions of Opter Driver and Opter Terminal. Most of these settings you will never have to fill in a value for. These settings are counted as having the "default" value in the lists below.
Parts of the window
|
Function |
Description |
|---|---|
|
Type here to filter |
Free text field to filter the list of settings. May be useful if a lot of settings have been configured. |
|
Name |
Name of the settings for which an active setting has been configured. |
|
Value |
The value that has been entered for the setting. Entered manually. It is usually “True” or “False”, but may also be a name or a port number, for example. The Edit button opens another window where you make the actual settings. In most cases an XML editor (for example for App.Design). The button on the empty row at the bottom adds a new row. |
|
Description |
Some settings do not have a description yet. May also include a link to the help. |
|
Save |
Saves the changes in the window. The changes are not saved automatically. |
|
Close |
Closes the window without saving the changes. |
Add and remove settings
How to add a setting:
-
Click on an empty row in the Name column.
-
Click the down arrow on the row and select a setting from the list, or start typing the name of the setting.
(If the Mobile data settings are not in the list, you can manually enter the name of the Mobile data settings).
-
Enter the value for the setting in the Value column. It is usually 'true' or 'false', but for some settings it can be, for example, a number, a name or a port number.
-
Click on Save.
If you have made the settings in another window, for example in the XML editor of App.Design, you still need to save them in this window.
How to delete a setting:
-
Click on the field to the left of the Name column to select the row. It may be necessary to increase the row height in order to select the row.
-
Press Delete on the keyboard.
-
Click on Save.
General settings
If no value is filled in for a setting, the setting indicated as the default applies.
|
Name |
Description |
|---|---|
|
AddImagePermission AddImageOrder (only applies to Opter Driver (classic) for Android) |
Only applies to Opter Driver (classic) for Android. Shows/hides the menu item Add image in the detail view.
With AddImageOrder you specify where on the menu Add image should be by entering a number. 1 = at the top of the menu. |
|
Not valid if DamagesPermission is set to "False".
For more information, see Deviations and The deviation view in Opter Driver. |
|
|
AddNewPackagePermission |
Control whether drivers can add new parcels to the order. It is done in the detail view.
|
|
AddNewPriceItemPermission |
Choose whether drivers should be able to add new Price items to the order.
If ArticlesPermission is set to "False", it is not possible to add Price items to Opter Driver regardless of the setting for AddNewPriceItemPermission. For more information, see POD view in Opter Driver, The price item view in Opter Driver and Allowing price items to be added and deleted in Opter Driver. |
|
AddPackageByScanningPermission AddPackageByScanningOrder (only applies to Opter Driver (classic) for Android) |
Applies to all versions of Opter Driver (classic) for Android. Applies to Opter Driver for iOS and Opter Driver Labs for Android version 2.4.25 and later. Shows/hides the menu item Add package by scanning in the detail view:
This setting can be overridden for individual services by using the Allow Add packages with scanner checkbox in the Services window (Dispatch tab). For more information, see Allow packages to be added by scanning in Opter Driver. Only applies to Opter Driver (classic) for Android: With AddPackageByScanningOrder you specify where on the menu Add package by scanning should be by entering a number. 1 = at the top of the menu. |
|
AddServicePermission AddServiceOrder (only applies to Opter Driver (classic) for Android) |
Shows/hides the Extras option on the menu in the detail view so that the driver can add extras to existing orders.
With AddServiceOrder you specify where on the menu Extras should be by entering a number. 1 = at the top of the menu. To select which extras to add to Opter Driver, select Available in mobile device in Economy > Price lists > Extras types. |
|
App.ApproveChanges |
Applies to Opter Driver only.
New orders created in Opter Driver are always saved directly in Opter, regardless of the settings configured for App.ApproveChanges. If drivers should not to be able to create new orders in Opter Driver, set CreateNewOrderPermission to “false”. For more information, see New orders in Opter Driver. |
|
App.ChooseSecondaryResource |
Only applies to drivers who are not associated with a supplier. The corresponding setting for drivers not associated with a supplier is App.ChooseSecondaryResourceIfSupplier. For more information about Opter Driver user accounts, see Install Opter Driver (classic) and Installing Opter Driver. |
|
App.ChooseSecondaryResourceIfSupplier |
Only applies to drivers associated with a supplier. The corresponding setting for drivers who are not associated with a supplier is App.ChooseSecondaryResource. For more information about Opter Driver user accounts, see Install Opter Driver (classic) and Installing Opter Driver. |
|
App.ChooseSecondaryResourceOptional |
Only applies to drivers who are not associated with a supplier. Only applies if App.ChooseSecondaryResource = “true”. The corresponding setting for drivers not associated with a supplier is App.ChooseSecondaryResourceOptionalIfSupplier. For more information about Opter Driver user accounts, see Install Opter Driver (classic) and Installing Opter Driver. |
|
App.ChooseSecondaryResourceOptionalIfSupplier |
Only applies to drivers associated with a supplier. Only applies if App.ChooseSecondaryResourceIfSupplier = “true”. The corresponding setting for drivers not associated with a supplier is App.ChooseSecondaryResourceOptional. For more information about Opter Driver user accounts, see Install Opter Driver (classic) and Installing Opter Driver. |
|
Applies to Opter Driver for iOS and Opter Driver Labs for Android.
For more information on how to set what is displayed in Opter Driver for iOS, see Design field for mobile (window). In Opter Driver (classic) for Android, nothing is displayed if no logo is available. For more information, see Display customer logo in Opter Driver (classic). |
|
|
App.DefaultCustomerCode |
Enter the customer code that is to be preselected for new orders created in Opter Driver. Enter the customer code as a value, for example “OPT”. For more information, see New orders in Opter Driver. |
|
App.DefaultServiceTypeCode |
Enter the service that is to be preselected for new orders created in Opter Driver. Enter the name of the service as the value, for example “Home delivery”. For more information, see New orders in Opter Driver. |
|
App.Design |
You can customise the layout of the Opter Driver (classic) for Android at App.Design. For more information, see App.Design. For Opter Driver for iOS and Opter Driver Labs for Android we recommend that the Design field for mobile window is used to set the fields to be displayed in the app. For more information, see Setting which fields are displayed in Opter Driver. To have a custom layout in Opter Driver for iOS and Opter Driver Labs for Android, this can be created in either App.OpterDriver.Design or App.Design, but to be able to use all the features that are available, App.OpterDriver.Design needs to be used rather than App.Design. |
|
Controls whether it should be mandatory to register a deviation in case of late delivery.
You can make exceptions to this setting for individual customers. For more information, see Managing delays in Opter Driver. |
|
|
App.ForceDelayReasonOnDelay |
Control whether it should be mandatory to indicate reason and comment in case of delayed delivery.
You can make exceptions to this setting for individual customers. For more information, see . |
|
App.ForceOldDesign |
Applies only to Opter Driver for iOS and Opter Driver Labs for Android. We recommend setting this to “false”.
|
|
App.NoPodNameSuggestions |
Only applies to Opter Driver (classic) for Android. (In Opter Driver for iOS and Opter Driver Labs for Android, suggested names are always shown if there are any). The suggested names are displayed in alphabetical order.
For more information, see Show name suggestions for POD registration in Opter Driver (classic). |
|
App.OpterDriver.Design |
We recommend using the Design field for mobile window to set the fields to be displayed in Opter Driver for iOS and Opter Driver Labs for Android. For more information, see Setting which fields are displayed in Opter Driver. To have a custom layout in Opter Driver for iOS and Opter Driver Labs for Android, this can be created in either App.OpterDriver.Design or App.Design, but to be able to use all the features that are available, App.OpterDriver.Design needs to be used rather than App.Design. App.ForceOldDesign must be set to “false” in order to monitor the content of the XML file in App.OpterDriver.Design or the settings in the Design field for mobile window. For more information, see App.OpterDriver.Design. |
|
App.ShowOnlySuppliersSecondaryResources |
This setting is only valid if App.ChooseSecondaryResourceIfSupplier = “True”.
This setting is only valid if App.ChooseSecondaryResource = “True”. For more information on how to create login credentials for Opter Driver, see Install Opter Driver (classic) and Installing Opter Driver. |
|
App.SyncAllConsignedShipments
|
This setting is only of interest when working with consignments. This setting only applies if GroupConsignments = “true”. If GroupConsignments = "false", it works like App.SyncAllConsignedShipments = "false", even if that has been set to "true".
For more information, see Consignments in Opter Driver. |
|
App.SyncPodNameSuggestions |
Allows you to disable the list of suggested names for pods in Opter Driver. ”True” (default): Suggestions for name clarifications are shown in Opter Driver. “False”: Suggested name clarifications are not displayed in Opter Driver. |
|
App.TargetVersionAndroid |
Applies to Opter Driver (classic) for Android. Enter the oldest authorised version of Opter Driver (classic) for Android in your system, for example "1.7.5". Devices with an older version must be updated in order to log in on them. The setting can be overwritten by a central setting in Opter. Contact support if you change this setting and it has been changed back the next time you open Opter. |
|
Applies to Opter Driver for iOS and Opter Driver Labs for Android version 2.4.19 and later. Enter the oldest authorised version of Opter Driver for iOS and Opter Driver Labs for Android in your system, for example "2.4.20". If a driver has an older version of Opter Driver on their device, the driver must update to the version you specified in App.TargetVersionXamarin or a later version in order to log into Opter Driver. In App.TargetVersionXamarin it is not possible to enter versions older than 2.4.19, as the feature was added in that version. The setting can be overwritten by a central setting in Opter. Contact support if you change this setting and it has been changed back the next time you open Opter. |
|
|
ArticlesPermission ArticlesOrder (only applies to Opter Driver (classic) for Android) |
Shows/hides the menu item Price items in the detail view, and in the POD view in Opter Driver for iOS and Opter Driver Labs for Android.
With ArticlesOrder you specify where on the menu Price items should be by entering a number. 1 = at the top of the menu. |
|
AttachmentsPermission |
For Opter Driver for iOS and Opter Driver Labs for Android
For more information, see Adding images to Opter Driver. For Opter Driver for Android (classic)
For more information, see Attachments in Opter Driver. |
|
ChangesOrder (only applies to Opter Driver (classic) for Android) |
Shows/hides the menu item Changes in the detail view.
For more information, see Changes to orders in Opter Driver. With ChangesOrder you specify where on the menu Changes should be by entering a number. 1 = at the top of the menu. |
|
ChangeShipmentStatusFromMapPermission |
To change the status of a shipment directly on the map in Opter Driver, click on an address and then on
Depending on the status set, the POD view may open as some state changes may require POD. |
|
CreateNewOrderPermission CreateNewOrderOrder (only applies to Opter Driver (classic) for Android) |
Shows/hides the menu item New order in the order lists, which controls whether or not drivers can create new orders in the app.
With CreateNewOrderOrder you specify where on the menu New order should be by entering a number. 1 = at the top of the menu. For more information, see New orders in Opter Driver. |
|
DamagesPermission DamagesOrder (only applies to Opter Driver (classic) for Android) |
Shows/hides the menu item Deviations in the detail view.
With DamagesOrder you specify where on the menu Deviations should be by entering a number. 1 = at the top of the menu. |
|
Applies to all variants of Opter Driver. Select whether drivers should be able to delete Price items added to the order/shipment in Opter:
If ArticlesPermission is set to "False", it is not possible to delete Price items in Opter Driver regardless of the setting for DeletePriceItemPermission. For more information, see Allowing price items to be added and deleted in Opter Driver. |
|
|
FillLoadCarrierPOD |
Applies to Opter Driver for iOS and Opter Driver Labs for Android. Applies to the scan type Fill load carrier. In Opter Driver, drivers choose whether or not to register a proof of delivery after having filled the load carrier. Set whether or not to open the proof of delivery page automatically when drivers finish scanning, i.e. when the driver has tapped Fill load carrier, scanned the packages to add them to the load carrier and then tapped End. Select "true" or "false", pursuant to the following:
For more information, see Load carrier and Handling load carriers in Opter Driver. |
|
FilterOrder (only applies to Opter Driver (classic) for Android) |
Shows/hides the Filter menu option.
With FilterOrder you specify where on the menu Filter should be by entering a number. 1 = at the top of the menu. For more information, see Pages, tabs and menus in Opter Driver. |
|
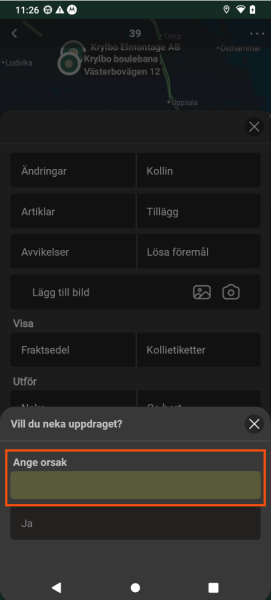
Control if the driver has to give a reason for declining a shipment. Cancelled shipments are displayed as driver messages in the dispatch.
|
|
|
For Opter Driver for iOS and Opter Driver Labs for Android version 2.4.20 and later. Choose whether drivers should be able to add images that they already have on their mobile device:
For more information, see Adding images to Opter Driver and POD view in Opter Driver. For Opter Driver (classic) for Android. Choose whether drivers should be able to add images that they already have on their mobile device:
|
|
|
GiveAwayPermission GiveAwayOrder (only applies to Opter Driver (classic) for Android) |
Shows/hides the menu item Give away in the detail view.
For more information, see Setting whether resources are allowed to give away shipments in Opter Driver, Giving up shipments in Opter Driver and Giving away shipments in Opter Driver for Android. With GiveAwayOrder you specify where on the menu Give away should be by entering a number. 1 = at the top of the menu. |
|
GroupConsignments |
|
|
GuardSystems.Customer GuardSystems.Password GuardSystems.Username |
If you use GSFleet GPS trackers in your vehicles, enter your GSFleet account customer ID, username and password. For more information, see GPS tracker from GSFleet. |
|
IncludeConsignmentChildren |
Applies to Opter Driver for Android.
For more information, see Consignments in Opter Driver. |
|
IncludeConsignments |
Applies to Opter Driver for Android.
For more information, see Consignments in Opter Driver. |
|
InternetBaseAddress |
Enter the web address of the customer web. In the Base address field of the Internet tab in the office settings, you can see which address should be entered here. For example, the URL may be “https://expresstransport.no/opter” or “https://expresstransport.opter.cloud” (if you are using the Opter cloud solution). For more information, seeCustomer web and Track & Trace. InternetBaseAddress is used, among other things, to:
|
|
LoadCarrierPermission |
Applies to Opter Driver for iOS and Opter Driver Labs for Android version 2.4.17 and later. Select if drivers are able to use the load carrier function in Opter Driver or not, pursuant to the following:
For more information, see Load carrier and Handling load carriers in Opter Driver. |
|
LooseItemForceSetValue |
Make it mandatory/not mandatory to indicate loose items if there are already loose items on the order. LooseItemsPermission must be “True” for this setting to have any effect.
For more information, see POD view in Opter Driver. |
|
LooseItemsPermission LooseItemsOrder (only applies to Opter Driver (classic) for Android) |
Shows/hides the Loose items option in the POD view (Opter Driver for iOS and Opter Driver Labs for Android) and in the menu in the detail view (Opter Driver (classic) for Android).
With LooseItemsOrder you specify where on the menu Loose items should be by entering a number. 1 = at the top of the menu. Default: "5". For more information, see POD view in Opter Driver. |
|
Set whether drivers should only be able to change to the status Delivered/Unloaded by scanning.
For more information, see Setting how status can be changed in Opter Driver for Android and Setting how status can be changed in Opter Driver. |
|
|
ManualStatusChangePickUpPermission |
Set whether drivers should only be able to change to the status Pickup/Loaded by scanning:
For more information, see Setting how status can be changed in Opter Driver for Android and Setting how status can be changed in Opter Driver. |
|
Only applies to Opter Driver (classic) for Android: Controls whether package scans are displayed in a block or as separate scans on the Scan tab in Opter Driver:
For more information, see The scan list in Opter Driver (classic). For Opter Driver for iOS and Opter Driver Labs for Android, check scans are always displayed in blocks. For more information, see The scan list in Opter Driver. |
|
|
Applies only to Opter Driver for iOS and Opter Driver Labs for Android. Select how Opter Driver should behave if the driver is far away from a shipment in the shipment list:
For more information, see Selecting long-haul behaviour on shipments in Opter Driver. |
|
|
Controls the information that is displayed about packages in the scan list. The Value column works as a free text field. The variables below allow values to be retrieved from the package rows on the order:
Opter Driver for iOS and Opter Driver Labs for Android: Use PackageDimensionsString together with the variable PACKAGE.DIMENSIONS. For more information, see The scan list in Opter Driver. Opter Driver (classic) for Android: works best if OneScanRowPermission = “true”. Use PackageDimensionsString together with the variable PACKAGE.DIMENSIONS in App.Design. For more information, see The scan list in Opter Driver (classic). Opter Terminal: Make the following settings for onescanrow in Terminal.Settings:
Default: no package dimensions are displayed. For more information, see The scan list in Opter Terminal. The PackageDimensionsString setting applies to both Opter Driver and Opter Terminal, which means that it is not possible to display different dimensions or text in the different apps. |
|
|
PackagesPermission PackagesOrder (only applies to Opter Driver (classic) for Android) |
Shows/hides the menu item Packages in the detail view.
With PackagesOrder you specify where on the menu Packages should be by entering a number. 1 = at the top of the menu. |
|
Shows/hides the field Comment in the POD view.
|
|
|
PodPackageCountEnabled |
Shows/hides the field Number of packages in the POD view. Select whether drivers should be able to enter the number of pods when registering a pod. This feature can be useful if you are not scanning.
For more information, see POD view in Opter Driver. |
|
PodPictureEnabled |
Shows/hides the field Add image in the POD view.
For more information, see POD view in Opter Driver. |
|
Shows/hides the field Remark in the POD view.
|
|
|
PositionUpdateInterval |
Controls how often Opter Driver sends the position to the database. Enter a value in seconds. The lowest permitted value is every 5 seconds. If a value lower than “5” is entered here, it will change to “5”. It is therefore not possible to disable positioning completely by entering “0”. Default: 60 seconds.
|
|
PosTrack.Username |
If you use GPS trackers from Postrack in your vehicles, enter the username and password of your Postrack account. For more information, see GPS tracker from Postrack. |
|
PosTrack.IdleTimeout |
If no positions are received from the Postrack unit, the Opter Driver takes over and sends the vehicle position to the Opter. This setting allows you to specify the number of minutes before the Opter Driver takes over. Default: 30 minutes. For more information, see GPS tracker from Postrack. |
|
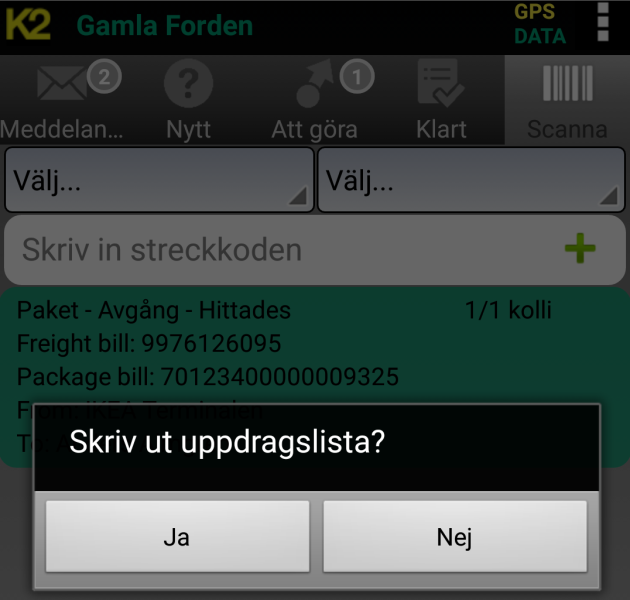
PrintAssignmentListPermission |
Show/hide the query Do you want to print the shipment list? during departure scan from Terminal. If the answer is Yes, a print request is sent to Opter and the job list can be printed from the window Terminal printing. For more information, see Printing a job list after departure scan (Opter Driver).
|
|
PrintPermission PrintOrder (only applies to Opter Driver (classic) for Android) |
Shows/hides the menu item Freight bill/Package labels (Opter Driver for iOS and Opter Driver Labs for Android) and Print (Opter Driver (classic) for Android) in the detail view.
For more information, see View and print Freight bills and parcel labels in Opter Driver. With PrintOrder you specify where on the menu Print should be by entering a number. 1 = at the top of the menu. |
|
ProofOfDeliveryPermission ProofOfDeliveryOrder (only applies to Opter Driver (classic) for Android) |
Shows/hides the menu item Proof of delivery in the detail view.
With ProofOfDeliveryOrder you specify where on the menu Proof of delivery should be by entering a number. 1 = at the top of the menu. |
|
QueryPermission |
Shows/hides checklists in Opter Driver.
For more information, see Check lists. |
|
Select whether the route sequence from Opter Driver should be synchronised with the dispatch.
For more information, see Synchronising the route sequence in Opter Driver and dispatch. |
|
|
ScanScanCommentArrivalPermission |
Applies to all variants of Opter Driver.
For more information, see Setting whether to enter scan comment in Opter Driver and Scanning with Opter Driver. |
|
ScanScanCommentDeliveryPermission |
Applies to all variants of Opter Driver.
For more information, see Setting whether to enter scan comment in Opter Driver and Scanning with Opter Driver. |
|
ScanScanCommentDeparturePermission |
Applies to all variants of Opter Driver.
For more information, see Setting whether to enter scan comment in Opter Driver and Scanning with Opter Driver. |
|
ScanScanCommentName
|
Applies to all variants of Opter Driver. To rename the scan comment box in Opter Driver, enter the name to be displayed. By default, the text Scan scanning comment is displayed. For more information, see Setting whether to enter scan comment in Opter Driver and Scanning with Opter Driver. |
|
ScanScanCommentPickupPermission |
Applies to all variants of Opter Driver.
For more information, see Setting whether to enter scan comment in Opter Driver and Scanning with Opter Driver. |
You can make it mandatory for the driver to give a reason for declining the shipment by setting ForceReasonWhenRejectingShipment to "True" (see above). |
|
|
SetArbitraryStatusDoneTabPermission (Done) SetArbitraryStatusNewTabPermission (New) SetArbitraryStatusToDoTabPermission (Todo) |
Only applies to Opter Driver (classic) for Android. Does not apply if both SetMultipleStatusPermission and SetArbitraryStatusPermission are set to "False", which means that the menu item Select status does not appear in the list view. These settings allow you to make exceptions for individual tabs (New/Todo/Done) so that drivers cannot switch to any status in that particular list. The default for SetArbitraryStatusNewTabPermission is "False", which means you need to set it to "True" if you want drivers to be able to switch to any status on the New tab.
For more information, see Setting how status can be changed in Opter Driver for Android. If you do not make any settings at all for the following settings, drivers can switch to any status on the tabs Todo and Done as well as in the detail view, as all are "True" by default, except SetArbitraryStatusNewTabPermission which is "False" by default.
|
|
SetArbitraryStatusOrder (only applies to Opter Driver (classic) for Android) |
This setting works slightly differently for the different versions of Opter Driver. Opter Driver for iOS and Opter Driver Labs for Android
For more information, see Setting how status can be changed in Opter Driver. Opter Driver (classic) for AndroidShows/hides the menu item Select status, which allows drivers to change to any status in the life cycle.
With SetArbitraryStatusOrder you specify where on the menu Select status should be by entering a number. 1 = at the top of the menu. For more information, see Setting how status can be changed in Opter Driver for Android. |
|
SetMultipleStatusPermission |
Opter Driver for iOS and Opter Driver Labs for Android
For more information, see Setting how status can be changed in Opter Driver. Opter Driver (classic) for Android
For more information, see Setting how status can be changed in Opter Driver for Android. |
|
SetStatusConfirmedInShipmentListPermission |
Does not apply to Opter Driver (classic) for Android. Set whether or not drivers should be able to confirm shipments without having seen all the information that is displayed in the detail view:
For more information, see Setting how status can be changed in Opter Driver. |
|
SetStatusPickedUpInShipmentListPermission SetStatusDeliveredInShipmentListPermission |
Change status to Picked up/Delivered in the assignment list:
For more information, see Setting how status can be changed in Opter Driver for Android and Setting how status can be changed in Opter Driver. |
|
SHI_ |
For all SHI_ settings, see Changes view settings (SHI_ ) and New Order view settings (SHI_ ) below. |
|
ShipmentDeliveryAtTerminalPermission ShipmentDeliveryAtTerminalOrder (only applies to Opter Driver (classic) for Android) |
Shows/hides the menu item Leave at terminal in the detail view.
With ShipmentDeliveryAtTerminalOrder you specify where on the menu Leave at terminal should be by entering a number. 1 = at the top of the menu. |
|
ShowLastScanPickupPermission (1) ShowLastScanDeliveryPermission (2) |
Shows/hides the hotkeys for the last selected scan settings in Opter Driver.
For more information, see Scanning with Opter Driver.
|
|
Applies to Opter Driver for iOS and Opter Driver Labs for Android as of version 2.4.24. The setting does not affect Opter Driver (classic) for Android. Choose whether the setting Turn off GPS should be displayed in the app or not:
|
|
|
ShowSettingHideFutureShipments |
Applies to Opter Driver for iOS and Opter Driver Labs for Android as of version 2.4.24. The setting does not affect Opter Driver (classic) for Android. Choose whether the setting Hide future shipments should be displayed in the app or not:
|
|
ShowSettingHideLockedShipments |
Applies to Opter Driver for iOS and Opter Driver Labs for Android as of version 2.4.24. The setting does not affect Opter Driver (classic) for Android. Choose whether the setting Hide locked shipments should be displayed in the app or not:
|
|
SMS.Design |
Used to create a predefined message to be sent out when you right-click on a shipment and select Send shipment as SMS in the dispatch. For more information, see Text message format (window). |
Opter Driver for iOS and Opter Driver Labs for AndroidValid as of version 2.4.24. Choose whether drivers should be able to send SMS with a link directly to the order on Track & Trace where the recipient can sign the pod on their own device:
Opter Driver (classic) for AndroidApplies to all versions of the app. Choose whether drivers should be able to send SMS with a link directly to the order on Track & Trace where the recipient can sign the pod on their own device:
|
|
|
SortOrder (only applies to Opter Driver (classic) for Android) |
Choose whether drivers should be able to sort the job list.
With SortOrder you specify where on the menu Sort should be by entering a number. 1 = at the top of the menu. For more information, see Sorting shipments in Opter Driver, Manually sort the route sequence in Opter Driver and Pages, tabs and menus in Opter Driver. For Opter Driver (classic) for Android, see Sorting shipments in Opter Driver for Android. |
|
SPA_ListDetails |
Controls what information is displayed about packages in the package list. The Value column works as a free text field. The tags below allow you to retrieve values from the column lines of the order:
The package number is always displayed in the package list. The column Value may contain a maximum of 60 characters including spaces and tags. For more information, see Customising the package list in Opter Driver. |
|
SPA_ |
For all SPA_ settings, see Settings for the control panel (SPA_) below. |
|
SPI_ |
For all SPI_ settings, see Settings for the price item view (SPI_) below. |
|
Terminal.Settings |
Terminal.Settings can be used to set what is displayed and what features are available in Opter Terminal. For more information, see Customising the layout and features of Opter Terminal with Terminal.Settings. |
|
WorkingTimesPermission WorkingTimesOrder |
Only applies to Opter Driver (classic) for Android. Shows/hides the menu item Working hours on the menu, allowing drivers to report to dispatch that they are taking a break.
With WorkingTimesOrder you specify where on the menu Working hours should be by entering a number. 1 = at the top of the menu. |
Settings for the deviation view (DAM_)
These settings control which fields are displayed in the deviation view. For more information, see The deviation view in Opter Driver.
Opter Driver for iOS and Opter Driver Labs for Android.

Opter Driver (classic) for Android.

There are two types of DAM_settings:
-
"DAM_XyzPermission": Show/hide the field ("true"/"false").
-
"DAM_XyzName": Enter a new name for the field.
-
All DAM_XyzPermission are "true" by default, which means that all fields will be displayed if you do not make any settings at all. You just need to hide the fields you don't want to show in the app by setting them to "false".
|
Name |
Description |
|---|---|
|
DAM_CommentPermission DAM_CommentName |
Control the field Comment. |
|
DAM_DAE_IdPermission DAM_DAE_IdName |
Control the field Event. Only displayed if the selected deviation type has events associated with it, and if those events are available on mobile devices. You can also set which events to select, and whether it should be mandatory to enter the event. For more information, see The deviation view in Opter Driver and Deviation types (window). |
|
DAM_DAR_IdPermission DAM_DAR_IdName |
Control the field Reason. Displayed only if the selected deviation event has causes associated with it, and if those causes are available in mobile devices. You can also set which reasons should be selectable, and whether it should be mandatory to enter a reason. For more information, see The deviation view in Opter Driver and Deviation events (window). |
|
DAM_DAT_IdName |
You can rename the field Type, but not hide it. It is always mandatory to indicate the deviation type when registering a deviation. |
|
DAM_DEA_IdPermission DAM_DEA_IdName |
Control the field Image. |
Settings for the Changes view (SHI_)
These settings control how the Changes view in Opter Driver works. It is possible to choose which fields to display and the order in which they are displayed, and also to rename them. The settings are made using the Mobile data settings starting with "SHI_". More information on how to make the settings can be found in Changes to orders in Opter Driver and Setting how changes made in Opter Driver are approved.
Opter Driver for iOS and Opter Driver Labs for Android.

Opter Driver (classic) for Android.

If you do not make a setting for any of the Mobile data settings starting with "SHI_", the following applies:
-
Opter Driver (classic) for Android: All fields are displayed.
-
Opter Driver for iOS and Opter Driver Labs for Android: all the fields except (SHI_DriverMessagePermission), Order date (SHI_OrderDatePermission) and Sender instructions (SHI_SenderInstructionPermission) are displayed.
-
All SHI_Permission is "True" by default, which means that all fields are displayed if you do not make any settings at all.
-
If you set the Permission for one field to "True", you must set the Permission for all other fields to be displayed to "True" as well. Otherwise, only the field that you set to "True" will be displayed.
-
If you set the Permission for one field to "False", you must set the Permission for all fields to be displayed to "True". Otherwise, no fields are displayed at all in the New order view.
Some of the settings below also affect the New order view. For Opter Driver for iOS and Opter Driver Labs for Android version 2.4.27 and later, the settings for extra dimension names and extra IDs also affect the mission list and detail view.
There are three types of SHI_settings:
-
"SHI_XyzPermission": Show/hide the field ("True"/"False").
-
"SHI_XyzName": Enter a new name for the field.
-
"SHI_XyzOrder": Location of the field. The lower the number, the higher up the view it is.
|
Name |
Description |
|---|---|
|
SHI_AreaPermission SHI_AreaName SHI_AreaOrder |
Control the field Pallet space. SHI_AreaPermission: Show/hide. SHI_AreaName: Change the name. SHI_AreaOrder: Location of the field in the view. |
|
SHI_CustomerProjectPermission SHI_CustomerProjectName SHI_CustomerProjectOrder |
Control the field Customer project. |
|
SHI_DeliveryTimePermission SHI_DeliveryTimeName SHI_DeliveryTimeOrder |
Control the field Delivery time. Only applies to Opter Driver (classic) for Android. |
|
SHI_DistanceKMPermission SHI_DistanceKMName SHI_DistanceKMOrder |
Control the field Distance (Opter Driver (classic) for Android)/Distance (km) (Opter Driver for iOS and Opter Driver Labs for Android). |
|
SHI_DriverMessagePermission SHI_DriverMessageName SHI_DriverMessageOrder |
Control the field . "True" is the default for Opter Driver (classic) for Android. "False" is the default for Opter Driver for iOS and Opter Driver Labs for Android. |
|
SHI_ExternalMessagePermission SHI_ExternalMessageName SHI_ExternalMessageOrder |
Control the field . |
|
SHI_ExtraDimension1Permission SHI_ExtraDimension1Name SHI_ExtraDimension1Order even SHI_ExtraDimension5Permission SHI_ExtraDimension5Name SHI_ExtraDimension5Order |
Control the fields Extra dimension 1-Extra dimension 5. For Opter Driver for iOS and Opter Driver Labs for Android version 2.4.27 and later, the following applies: SHI_ExtraDimension1Name-SHI_ExtraDimension5Name affects the Changes view, the task list and the detail view. For more information, see Extra dimensions and extra IDs in Opter Driver. |
|
SHI_ExtraId1Permission SHI_ExtraId1Name SHI_ExtraId1Order even SHI_ExtraId5Permission SHI_ExtraId5Name SHI_ExtraId5Order |
Control the fields Extra ID 1-Extra ID 5. For Opter Driver for iOS and Opter Driver Labs for Android version 2.4.27 and later, the following applies: SHI_ExtraId1Name-SHI_ExtraId5Name affects the Changes view, the task list and the detail view. For more information, see Extra dimensions and extra IDs in Opter Driver. |
|
SHI_FreightBillPermission SHI_FreightBillName SHI_FreightBillOrder |
Control the field Freight bill. Affects both Changes view and New order view. |
|
SHI_GoodsTypePermission SHI_GoodsTypeName SHI_GoodsTypeOrder |
Control the field Goods type. |
|
SHI_LoadMeterPermission SHI_LoadMeterName SHI_LoadMeterOrder |
Control the field Load metre. |
|
SHI_MessagePermission SHI_MessageName SHI_MessageOrder |
Control the field . Affects both Changes view and New order view. In the New order view, the field is called by default. |
|
SHI_OrderDatePermission SHI_OrderDateName SHI_OrderDateOrder |
Control the field Order date. "True" is the default for Opter Driver (classic) for Android. "False" is the default for Opter Driver for iOS and Opter Driver Labs for Android. Affects both Changes view and New order view. |
|
SHI_PackagesPermission SHI_PackagesName SHI_PackagesOrder |
Control the field Packages. Affects both Changes view and New order view. |
|
SHI_PickupTimePermission SHI_PickupTimeName SHI_PickupTimeOrder |
Control the field Pickup time. Only applies to Opter Driver (classic) for Android. |
|
SHI_ProjectNumberPermission SHI_ProjectNumberName SHI_ProjectNumberOrder |
Control the field Project (Opter Driver (classic) for Android)/Project number (Opter Driver for iOS and Opter Driver Labs for Android). Affects both Changes view and New order view. |
|
SHI_ReceiverReferencePermission SHI_ReceiverReferenceName SHI_ReceiverReferenceOrder |
Control the field Receiver reference. Affects both Changes view and New order view. In the New order view, the field is called Receiver by default. |
|
SHI_SenderInstructionPermission SHI_SenderInstructionName SHI_SenderInstructionOrder |
Control the field Sender instructions. "True" is the default for Opter Driver (classic) for Android. "False" is the default for Opter Driver for iOS and Opter Driver Labs for Android. |
|
SHI_SenderReferencePermission SHI_SenderReferenceName SHI_SenderReferenceOrder |
You can rename the Sender reference field by entering the new name here. Affects both Changes view and New order view. In the New order view, the field is called Sender by default. |
|
SHI_ShipmentDatePermission SHI_ShipmentDateName SHI_ShipmentDateOrder |
Control the field Shipment date. |
|
SHI_TimeMinutesPermission SHI_TimeMinutesName SHI_TimeMinutesOrder |
Control the field Time. |
|
SHI_WeightPermission SHI_WeightName SHI_WeightOrder |
Control the field Weight. |
|
SHI_VolumePermission SHI_VolumeName SHI_VolumeOrder |
Control the field Volume. |
View settings New order (SHI_)
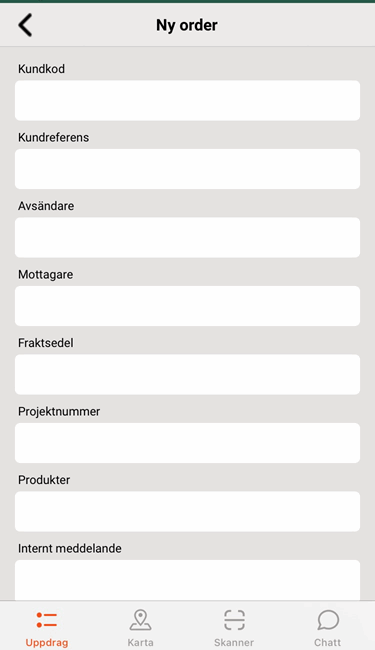
It is possible to select which fields are displayed in the New order view, in addition to the Sender/Sender reference, Receiver/Receiver reference and Packages fields which are always displayed. The order in which fields are displayed can also be set and they can be renamed. It is also possible to set drivers not to be able to create new orders in the app by setting CreateNewOrderPermission to "False". For more information, see New orders in Opter Driver.
By default, drivers can create new orders in the app.
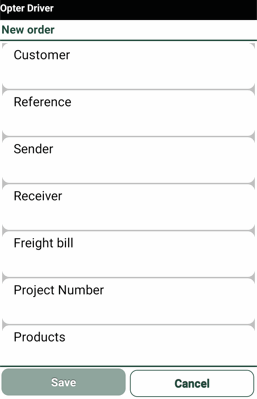
In Opter Driver for iOS and Opter Driver Labs for Android, the New order view looks like this:
In Opter Driver (classic) for Android, the New order view looks like this:
The settings for the New order view are made using the Mobile data settings starting with "SHI_". Some of the settings also affect the Changes view. There are three types of SHI_settings:
-
"SHI_XyzPermission": Show/hide the field ("True"/"False").
-
"SHI_XyzName": Enter a new name for the field.
-
"SHI_XyzOrder": Location of the field. The lower the number, the higher up the view it is.
-
All SHI_Permission is "True" by default, which means that all fields are displayed if you do not make any settings at all.
-
If you set the Permission for one field to "True", you must set the Permission for all other fields to be displayed to "True" as well. Otherwise, only the field that you set to "True" will be displayed.
-
If you set the Permission for one field to "False", you must set the Permission for all fields to be displayed to "True". Otherwise, no fields are displayed at all in the New order view.
|
Name |
Description |
|---|---|
|
App.DefaultCustomerCode |
Enter the customer code that should be used as the default for new orders created in Opter Driver. If the driver does not enter a customer code on the new order, the customer code is automatically set to the value you enter here. |
|
App.DefaultServiceTypeCode |
Enter the service that should be used as the default for new orders created in Opter Driver. If the driver does not specify a service on the new order, the service is automatically set to the value you enter here. |
|
SHI_CustomerCodePermission SHI_CustomerCodeName SHI_CustomerCodeOrder |
Control the field Customer code (Opter Driver for iOS and Opter Driver Labs for Android)/Customer (Opter Driver (classic) for Android). SHI_CustomerCodePermission: Show/hide. SHI_CustomerCodeName: Change the name. SHI_CustomerCodeOrder: Location of the field in the view. With App.DefaultCustomerCode you can set a customer code to be the default on new orders created in Opter Driver. For more information, see New orders in Opter Driver. |
|
SHI_CustomerReferencePermission SHI_CustomerReferenceName SHI_CustomerReferenceOrder |
Control the field Reference (Opter Driver (classic) for Android)/References (Opter Driver for iOS and Opter Driver Labs for Android). |
|
SHI_FreightBillPermission SHI_FreightBillName SHI_FreightBillOrder |
Control the field Freight bill. Affects both Changes view and New order view. |
|
SHI_MessagePermission SHI_MessageName SHI_MessageOrder |
Control the field (Opter Driver (classic) for Android)/Internal message (Opter Driver for iOS and Opter Driver Labs for Android). Affects both Changes view and New order view. In the Changes view, the field is named by default also in Opter Driver (classic). |
|
SHI_OrderDatePermission SHI_OrderDateName SHI_OrderDateOrder |
Control the field Order date. Affects both Changes view and New order view. |
|
SHI_PackagesName SHI_PackagesOrder |
Control the field Packages. This field is always displayed in the New order view and cannot be hidden. Affects both Changes view and New order view. |
|
SHI_ProductsPermission SHI_ProductsName SHI_ProductsOrder |
Control the field Products. |
|
SHI_ProjectNumberPermission SHI_ProjectNumberName SHI_ProjectNumberOrder |
Control the field Project (Opter Driver (classic) for Android)/Project number (Opter Driver for iOS and Opter Driver Labs for Android). Affects both Changes view and New order view. |
|
SHI_ReceiverReferenceName SHI_ReceiverReferenceOrder |
Control the field Receiver (Opter Driver (classic) for Android)/Receiver reference (Opter Driver for iOS and Opter Driver Labs for Android). This field is always displayed in the New order view and cannot be hidden. Affects both Changes view and New order view. In the Changes view, the field is named Receiver reference by default also in Opter Driver (classic). |
|
SHI_ServiceTypeCodePermission SHI_ServiceTypeCodeName SHI_ServiceTypeCodeOrder |
Control the field Service (Opter Driver (classic) for Android)/Service code (Opter Driver for iOS and Opter Driver Labs for Android). In App.DefaultServiceTypeCode, the service code that should be used as the default for new orders created in Opter Driver can be configured. For more information, see New orders in Opter Driver. |
|
SHI_SenderReferenceName SHI_SenderReferenceOrder |
Control the field Sender (Opter Driver (classic) for Android)/Sender reference (Opter Driver for iOS and Opter Driver Labs for Android). This field is always displayed in the New order view and cannot be hidden. Affects both Changes view and New order view. In the Changes view, the field is named Sender reference by default also in Opter Driver (classic). |
Settings for the control panel (SPA_)
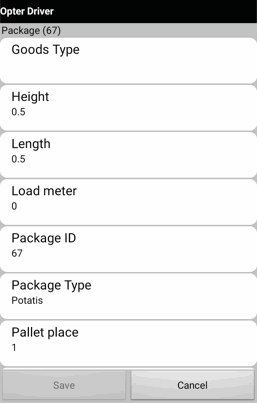
To open the package view in Opter Driver, click Packages on the menu in the detail view and then select an existing package or add a new one. Instructions on how to make the settings for the carbon view can be found in Customising the package view in Opter Driver. Instructions on how to make the settings for the mailing list (SPA_ListDetails) can be found in Customising the package list in Opter Driver.
Opter Driver (classic) for Android.
Opter Driver for iOS and Opter Driver Labs for Android.
You can choose which fields to display in the column view. You can also rename the fields and choose the order in which they appear. The settings for the coal view are made using the Mobile data settings starting at "SPA_". There are three types of SPA_ settings:
-
"SPA_XyzPermission": Show/hide the field ("True"/"False").
-
"SPA_XyzName": Enter a new name for the field.
-
"SPA_XyzOrder": Location of the field. The lower the number, the higher up the view it is.
-
All SPA_Permission is "True" by default, which means that all fields will be displayed in the column view if you do not make any settings at all.
-
If you set the Permission for one field to "True", you must set the Permission for all other fields to be displayed to "True" as well. Otherwise, only the field that you set to "True" will be displayed.
-
If you set the Permission for one field to "False", you must set the Permission for all fields to be displayed to "True". Otherwise, no fields are shown in the Colli view at all.
|
Name |
Description |
|---|---|
|
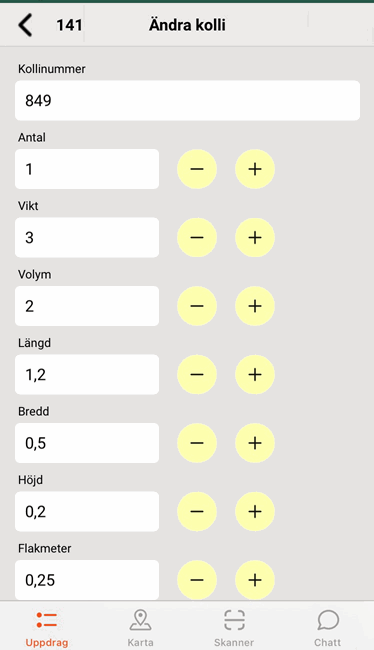
SPA_AreaPermission SPA_AreaName SPA_AreaOrder |
Control the field Pallet space. |
|
SPA_DepthPermission SPA_DepthName SPA_DepthOrder |
Control the field Length. |
|
SPA_ExtraDimension1Permission SPA_ExtraDimension1Name SPA_ExtraDimension1Order – SPA_ExtraDimension5Permission SPA_ExtraDimension5Name SPA_ExtraDimension5Order |
Control the fields Extra dimension 1-Extra dimension 5. |
|
SPA_ExtraId1Permission SPA_ExtraId1Name SPA_ExtraId1Order – SPA_ExtraId5Permission SPA_ExtraId5Name SPA_ExtraId5Order |
Control the fields Extra ID 1-Extra ID 5. |
|
SPA_GoodsTypePermission SPA_GoodsTypeName SPA_GoodsTypeOrder |
Control the field Goods type. |
|
SPA_HeightPermission SPA_HeightName SPA_HeightOrder |
Control the field Height. |
|
SPA_LoadMeterPermission SPA_LoadMeterName SPA_LoadMeterOrder |
Control the field Load metre. |
|
SPA_PackageIdPermission SPA_PackageIdName SPA_PackageIdOrder |
Control the field Package ID. |
|
SPA_PackageTypePermission SPA_PackageTypeName SPA_PackageTypeOrder |
Control the field Package type. |
|
SPA_QuantityPermission SPA_QuantityName SPA_QuantityOrder |
Control the field Quantity. |
|
SPA_TextPermission SPA_TextName SPA_TextOrder |
Control the field Goods text. |
|
SPA_VolumePermission SPA_VolumeName SPA_VolumeOrder |
Control the field Volume. |
|
SPA_WeightPermission SPA_WeightName SPA_WeightOrder |
Control the field Weight. |
|
SPA_WidthPermission SPA_WidthName SPA_WidthOrder |
Control the field Width. |
Settings for the price item view (SPI_)
This is how you get to the article view:
-
Opter Driver for iOS and Opter Driver Labs for Android: Open a shipment in the tab Todo, press the menu (
 ) > Price items and then select an existing Price item or Create new price item.
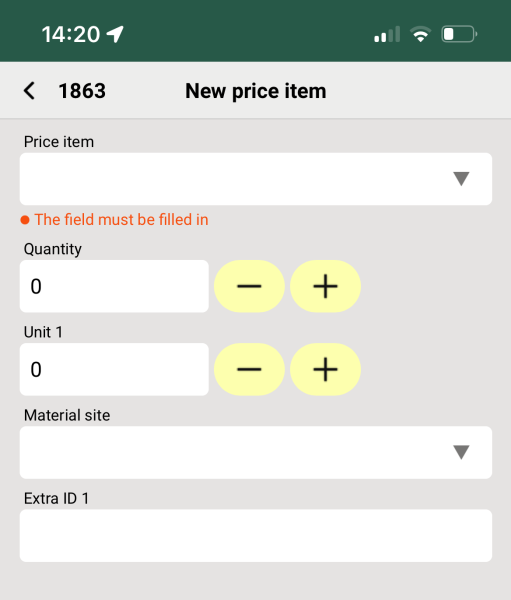
-
Opter Driver (classic) for Android: Open a shipment in the tab Todo, press the menu (
 ) > Price items and then select an existing Price item or Add new.
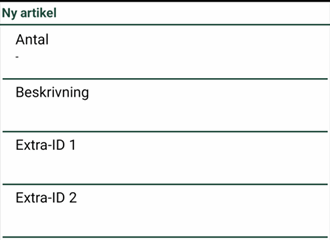
You can choose which fields to display in the item view, rename the fields and the order in which they appear. The settings are made using the Mobile data settings starting with "SPI_". There are three types of SPI_settings:
-
"SPI_XyzPermission": Show/hide the field ("true"/"false").
-
"SPI_XyzName": Enter a new name for the field.
-
"SPI_XyzOrder": Location of the field. The lower the number, the higher up the view it is.
All SPI_Permission is "true" by default, which means that all fields are displayed if you do not make any settings at all.
If you set the Permission for one field to "false", you must set the Permission for all fields to be displayed to "true". Otherwise, no fields are displayed at all in the item view (except the field Price item, which is displayed even if you set a field to "false"). If you want to hide certain fields, it is easier to think the other way round. Which fields do you want to show? Set them to 'true'. You never need to set any fields to "false" because the other fields are automatically hidden when you set the first field to "true".
For more information, see The price item view in Opter Driver.
|
Name |
Description |
|---|---|
|
SPI_DescrPermission SPI_DescrName SPI_DescrOrder |
Control the field Description. SPI_DescrPermission: Show/hide. SPI_DescrName: Change the name. SPI_DescrOrder: Location of the field in the view. |
|
SPI_ExtraId1Permission SPI_ExtraId1Name SPI_ExtraId1Order – SPI_ExtraId8Permission SPI_ExtraId8Name SPI_ExtraId8Order |
Control the fields Extra ID 1-Extra ID 8. |
|
SPI_MAS_IdPermission SPI_MAS_IdName SPI_MAS_IdOrder |
Control the field Material site. In order to select material sites in Opter Driver, the material sites must be linked to Price items in the register Material sites. For more information, see The price item view in Opter Driver. |
|
SPI_QuantityPermission SPI_QuantityName SPI_QuantityOrder |
Control the field Quantity. |
|
SPI_SAR_IdPermission SPI_SAR_IdName SPI_SAR_IdOrder |
Control the field Price item. It is possible to hide this field by setting SPI_SAR_IdPermission to "false", but then it is not possible to add Price items to Opter Driver. The app says that a Price item has been added, but the item is not saved on the order. In Opter Driver (classic), an item is submitted to the dispatch, but without a Price item, which causes errors. So do not use the field SPI_SAR_IdPermission. However, you can use SPI_SAR_IdOrder and SPI_SAR_IdName to move and rename the field. |
|
SPI_Unit1QuantityPermission SPI_Unit1QuantityName SPI_Unit1QuantityOrder – SPI_Unit2QuantityPermission SPI_Unit2QuantityName SPI_Unit2QuantityOrder |
Control the fields Unit 1 and Unit 2. |