Manually sort the route sequence in Opter Driver 2.4.21
Last updated: 27 May 2025
Valid only for Opter Driver for iOS and Opter Driver Labs for Android version 2.4.21.
We recommend that you update to the latest version of the app, and then check Manually sort the route sequence in Opter Driver instead.
In this article
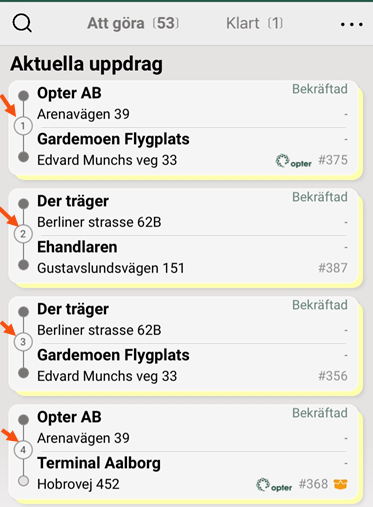
In the image below, four shipments are shown with the order numbers 1-4.
Driving order number manually or from route optimisation
Shipments can be given an order number in two different ways:
-
The traffic controller has done a route optimisation in Opter.
-
The driver has manually assigned shipment numbers in Opter Driver.
Order of shipments in the shipment list
The following applies to the task list in Opter Driver:
-
By default, the mission list in Opter Driver is displayed in the same order as in dispatch, i.e. according to the route optimisation.
-
If the menu items Sort and Manual route sequence are displayed, you can sort the job list as you wish.
(As of version 2.4.22 of Opter Driver, the dispatcher can set the route sequence you make in the app to be displayed in the dispatch, or not).
Driving order number from route optimisation
For shipments that have received a route number from route optimisation, the following applies when sorting the shipment list
-
Menu option Sort: If the shipments have route order numbers from route optimisation, that sorting/order is the primary one. That is, if you click on Sort and choose how to sort the list, the sorting/order of the shipments that have received the order number from route optimisation will not change. The other shipments are sorted as you choose, for example according to Point in time (most recently scanned).
If you have Sort > Order set to ↑ Ascending, the shipments that have received the route optimisation order number are displayed at the top of the list and the rest of the shipments are displayed at the bottom of the list. For more information on the Sort menu item, see Pages, tabs and menus in Opter Driver.
-
Menu option Manual route sequence: If the shipments have route numbers from route optimisation, you can still give them a route number. After that, the route sequence you have specified applies.
If you have Sort > Order set to ↑ Ascending, then the shipments that have been given the order number by the driver will appear at the top of the list and the rest of the shipments will appear at the bottom of the list.
The route sequence can be transferred to the dispatch centre
The route sequence can be transferred to dispatch as of version 2.4.22 of Opter Driver for iOS and Opter Driver Labs for Android.
In version 2.4.21 and earlier, changes to the route sequence in Opter Driver cannot be transferred to dispatch.
If you press Manual route sequence on the menu to assign run order numbers to the shipments and save your changes, the following applies:
-
The new route sequence is not transferred to the dispatch, it is only displayed in Opter Driver.
If the shipments had route sequence numbers from route optimisation, but you give them new route sequence numbers, the route sequence you have specified will now apply. The new route sequence is only displayed in Opter Driver, (that is, not in the dispatch).
-
The new route sequence is not saved on the mobile data server, so if you log out and later log back into Opter Driver, your manually entered route sequence will not be there.
Assigning an order number to one, several or all shipments
You can choose whether you want to assign an order number to one, several or all shipments in the shipment list. If you don't put order numbers on all the shipments, they will be sorted as follows
-
Manually entered driving order number. Those with the lowest queue number should be handled first (is the idea).
-
The shipments that have not been manually assigned an order number are sorted as Sort is set, for example Status or Point in time (most recently scanned).
If Order (under Sort) is set to ↑ Ascending, then shipments with manually entered order numbers will appear at the top of the list and those shipments that have not been manually assigned order numbers will be at the bottom of the list. If Order is set to ↓ Descending, the shipments will appear in reverse order in the list.
Example
If you manually assign shipment numbers to all shipments, and Sort is set to Status and ↑ Ascending, then the following applies:
-
They are displayed in ↑ Ascending order, i.e. the shipment with the lowest order number appears at the top. The shipment with the highest order number appears at the bottom of the list.
-
If you have skipped one or more numbers, it does not matter. For example, you may have entered the order numbers 1, 2, 3, 6, 7, 8 and 9. They are listed in ascending order even if some numbers are missing.
-
If you have given the same order number to several shipments, they will appear sequentially in the list, (but randomly among themselves). For example, you may have entered the order numbers 1, 2, 3, 4, 4, 4, 9.
-
The Status of the shipments does not matter for the order in the list anymore, as you have manually given all shipments new order numbers.
If Sort is set to Point in time (most recently scanned) and ↑ Ascending, and you then manually assign some (but not all) of the shipment order numbers, the following applies:
-
The top of the list shows the shipments with manually entered order numbers. They are displayed in ↑ Ascending order, i.e. the shipment with the lowest order number appears at the top.
-
At the bottom of the list are the shipments that have not been manually assigned an order number. These shipments are still sorted according to Point in time (most recently scanned) and in ↑ Ascending order.
If you have a shipment that suddenly needs to be prioritised, and Sort is set to Status and ↑ Ascending.
-
Follow the ' Do this' instruction below, but only give the shipment to be prioritised an order number, for example the number '1'.
-
Once you have saved your changes, the prioritised shipment will appear at the top of the shipment list. The REST of the shipments are sorted as before, for example by Status.
Here's how to do it
To manually assign a shipment number to one, several or all shipments, proceed as follows
-
Click on the menu (
 ) and check that Sort is set as you want it. If you want the shipments with manually entered order numbers to appear at the top of the list, select ↑ Ascending.
 If it is set to ↓ Descending then you can press Sort and then press Order and it will change from ↓ Descending to ↑ Ascending. Then tap
 .
. -
Click on Manual route sequence in the menu of the job list.
-
Tap on the shipment to which you want to assign an order number. The keyboard opens. Enter the order number you want the shipment to have.
For example, enter the number "1". The authorisation number must be an integer.
-
Tap the next shipment to which you want to assign an order number. Enter the order number, for example "2" or "3".
-
Orange circle (3) means you can give the shipment an order number, if you wish.
-
Green circle (1) and (2) means that you have given the shipment an order number. The number is shown in the green circle.
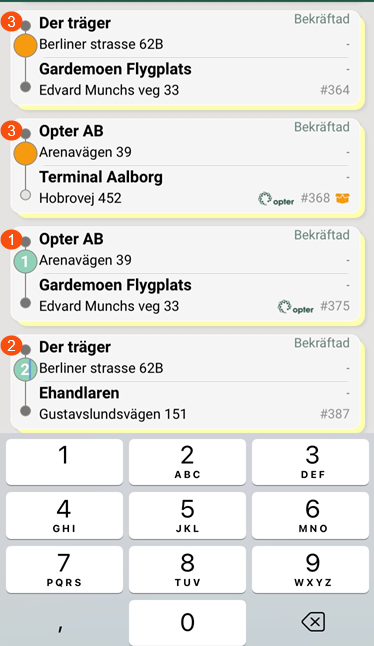
The image shows a shipment list where we have given two shipments order numbers (1) and (2).
-
-
Tap the next shipment to which you want to assign an order number. Enter the queue number, for example "4" or "10".
To ensure that the order numbers are clearly displayed in the app, do not enter order numbers larger than "99". For example, if you enter the order number "110", it will look like "11" in the shipment list, but the shipment will be in the right place in the list in terms of order.
-
When you have finished making changes to the route sequence, press the last modified shipment again and the keyboard will disappear.
-
To save the manually entered route sequence, press the menu (
) again and then press Save route sequence. Your changes will be saved and the shipments with manually entered order numbers will now appear at the top of the list, if you selected ↑ Ascending. The REST of the shipments are sorted as before, for example by Status (and in ascending order).
The image shows the driving order numbers in the light grey circles.
During loading and unloading
Shipments can be given an order number in two different ways, and the following happens
-
If the dispatcher has done a route optimisation in Opter:
-
The status of the shipment is Confirmed: The shipment shows the pick-up address's routing number.
-
The status of the shipment is Picked up: The shipment now shows the delivery address's routing number instead.
-
(The status of the shipment is Delivered: The shipment still shows the delivery address's order number).
-
-
If the driver manually assigns shipment numbers in Opter Driver:
-
By status Confirmed:
-
The status of the shipment is Confirmed: The driver gives the shipment a routing number for the pick-up address.
-
The status of the shipment then changes to Picked up: The shipment now has no order number. If the driver wants, he can give the shipment a new order number for the delivery address.
-
-
By status Picked up:
-
The status of the shipment is Picked up: The driver gives the shipment a routing number for the delivery address.
-
(The status of the shipment is then changed to Delivered: The shipment still shows the order number that the driver GIFed to the shipment).
-
-
Deleting or changing a driving licence number
If you want to delete or change the driving licence number, do the following:
-
Follow the ' Do this' instruction above.
-
If you want to change the order number, tap on the shipment and enter the new number.
-
If you want to delete the order number, press the shipment and use the backspace key on your keyboard to delete the number.
-
-
Once you have saved your changes, they will appear in the task list in Opter Driver.
Depending on the settings made by the system administrator or the dispatcher, the changes in route sequence are either passed on to the dispatcher, or they are only displayed in the Opter Driver.
Undo
This is how it works if the system administrator has chosen to:
If you press Manual route sequence on the menu, give the shipment a route sequence number and save your changes, there is no way to undo the new route sequence (after you have saved it).
What you can do is press Manual route sequence again and choose a new route sequence, or remove the numbers that indicate the route sequence. If you delete the numbers and save, the shipments are sorted according to the setting at Sort in the menu, for example Point in time (most recently scanned) or Status.
If the shipments first had route optimisation order numbers, and if you then manually GIF the shipments with new order numbers, you cannot go back to the route optimisation order numbers.
If you click on Manual route sequence in the menu, give the shipments an order number and save your changes, the following applies:
-
As a new route sequence is only saved locally in the app (and not saved on the mobile data server or in the dispatch), you can undo the manually entered route sequence by logging out and then logging back into Opter Driver, in which case your manually entered route sequence is gone.
-
If the shipments first had route optimisation order numbers, and if you then manually assigned new order numbers to the shipments, you can revert to the route optimisation order numbers by logging out and then logging back into Opter Driver.