Last updated: 11.06.2024
Valid from: 2022.11.00 and later, Opter Driver for iOS and Opter Driver Labs for Android 2.4.7 and later
Register proof of delivery (POD) in Opter Driver for iOS
When the status of a shipment is changed, it may be necessary to register a proof of delivery. It is also possible to choose to register a proof of delivery by clicking on the Proof of delivery menu option or the proof of delivery type name, for example Nobody home.
Depending on the settings made by the dispatcher or system administrator, the app works in various ways when registering a proof of delivery. For example, this is what it could look like, see the image below.
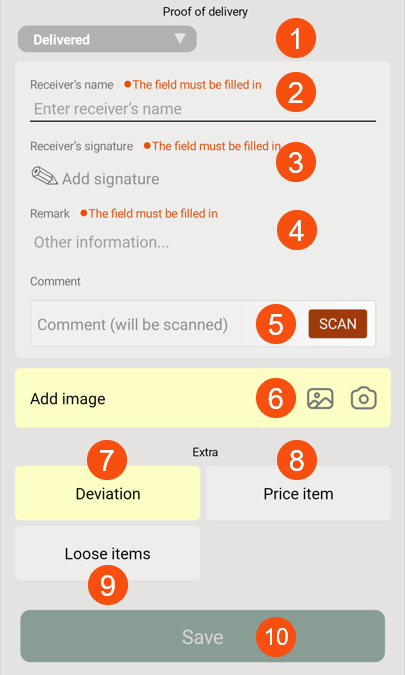
In the image above, select the type of proof of delivery (1), enter the receiver's name (2), add the signature (3), remark (4), possible comment (5), image (6), deviation (7), possible price items (8) and loose items (9), and then save the proof of delivery (10).
In the image above, the SCAN button appears in the Comment field (5); this means that you can or must scan in a comment (for example, scan a freight bill). The Add image field (6) is yellow, which means an image has to be added. The Deviation field (7) is yellow, which means an deviation has to be added. The Price item (8) and Loose items (9) buttons are grey, which means price items and loose items can be added if desired, but this is not mandatory. The Save button (10) is dimmed, which means that the proof of delivery cannot be saved until all the mandatory information has been filled in.
Registering a proof of delivery
On the Proof of delivery page, you can get the opportunity or be obliged to do the following:
-
Check the freight bill number.
If the field Check freight bill numberis already filled in, compare the freight bill number in the app with the one on the package or freight bill and make sure they match.
If the freight bill number is not correct or has not been filled in, enter the freight bill number manually in the field, or scan it. To scan, press the SCAN button and scan the number of the package or freight bill. When you are satisfied with the scan, press the SCAN button again. For more information, see Checking the freight bill number in Opter Driver for iOS.
-
Answer the checklist questions.
If there are questions regarding the shipment, you have to answer them. For example, if the delivery is a new washing machine, the questions could be "Have you installed the new washing machine?" and "Have you taken the old washing machine for recycling?".
Answer the questions by clicking on Yes (1) or No (2), or type in the answer (3).
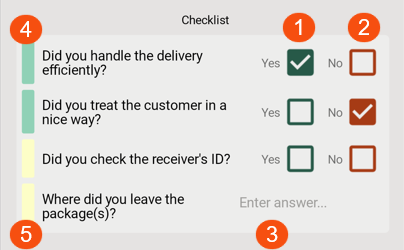
A green colour at the question (4) means that you have done everything necessary, but if you want, you can change your answer until you press Save at the bottom of the page. A yellow colour at the question (5) means that you must answer the question before you can save the proof of delivery.
-
Select the POD type, for example Delivered, Nobody home or New address.
-
Enter receiver’s name.
-
To add a signature, tap Add signature and get the receiver to write their signature on the screen using their finger or a pen designed for such screens. Then tap Save signature.
To wipe a signature that went wrong, press Clear. Then the receiver can write their signature again.
-
To add a remark, press Other information and enter the remark.
-
Add a comment.
Comments can be added in the following ways:
-
If it says SCAN in the Comment field, you can or must scan the comment (for example, scan a barcode).
To scan the comment, press the SCAN button and then scan a barcode, for example. When you are satisfied with the scan, press the SCAN button again.
To delete an incorrect scan, press the SCAN button again and scan the correct comment; the previous comment will be replaced by the new comment.
-
If the field does not say SCAN, you can click on Space for further comments and enter your comment.
-
-
Enter the reason for the delay and the delay comment.
If the Select reason for delay drop-down list appears, a reason for delay has to be selected, and a delay comment must be entered in the Comment field.
-
Add pictures.
If the Add image field is yellow, this means an image must be added.
Choose whether to add an image that is already on the mobile device (1) or to take a new image (2). For more information, see Adding images in Opter Driver for iOS.

It is only possible to attach one image to a proof of delivery. The menu in the detail view can be used to attach several images to the shipment. For more information, see Adding images in Opter Driver for iOS.
-
Register deviations.
Press the Deviations button to register a new deviation. Select Type (deviation type), and optionally Event, Reason, write a comment and add images. Some fields may be mandatory, depending on the settings applied by your dispatcher.
Once Save has been tapped, it is no longer possible to change the deviation in the app.
If a picture is added, it will be displayed at the bottom of the detail view, under Attached files. For more information, see Adding images in Opter Driver for iOS.
The colour of the Deviations button can be grey, yellow or green, as follows:
-
Grey means you don't have to do anything, but you can register deviations if desired.
-
Yellow means you need to register a deviation.
-
Green means you have done all that is needed, but if you want you can add new deviations.
-
-
Register loose items.
Click the Loose items button to register new and modify existing loose items. Tap Save when finished.
The colour of the Loose items button can be grey, yellow or green, as follows:
-
Grey means that no loose items are registered. You don't have to do anything, but you can register loose items if you wish.
-
Yellow means that there are loose items registered and you have to state the number.
For example, if you deliver a shipment for which there are 1 pallet and 4 straps registered at the start, you have to register how many pallets and straps there are at the end of the transport.
-
Green means you have done all that is needed, but if you want you can add new and modify existing loose items.
-
-
Add price items, for example if carrying out an extra service in connection with the delivery.
If the Price item field is yellow, this means a price item must be added. If the button is grey, adding price items is optional.
-
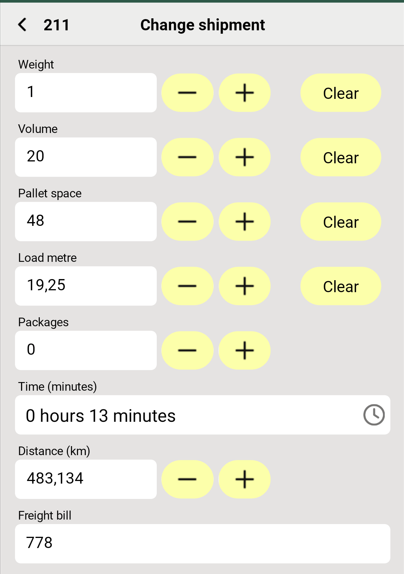
Make changes to the shipment, for example if the number of packages or the driving time is incorrect. If the Changes button appears, changes can be made. Press the Changes button, make the changes and press Save in the top right corner when done. (However, the changes are not saved until the entire proof of delivery has been completed and Save at the bottom of the proof of delivery page is pressed).
For more detailed instructions, see Changing orders in Opter Driver for iOS.
Once you have filled in everything that is mandatory to fill in and everything you want to fill in, press Save. The proof of delivery is saved, and the time and place of the proof of delivery are automatically registered in the system.