Adding images to Opter Driver
Last updated: 8 July 2026
Applies to Opter Driver for iOS and Opter Driver Labs for Android.
In this article
Images can be added to shipments/orders in Opter Driver. For example, the image may show damage on the package, or where the goods have been placed.
You can add images in the following ways:
-
Take a new picture (a new photo) and attach it. (2).

-
Attach images that you already have in your mobile device (1). You can do this if your transport manager or system administrator has chosen for it to work.
If the
 button does not appear, it means that you cannot add images that you already have. Instead, you can go to
  , take a new picture and attach it.
If the Add image field is not displayed, you cannot add images.
Images you add will appear under Attached files in the detail view. It also displays images and other files that have been added to the order by means other than Opter Driver.
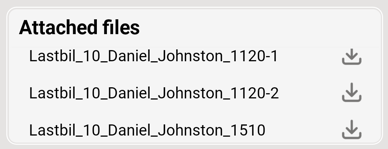
To share or download the image to your mobile device, please visit ![]() .
.
In the shipment list, the icon ![]() appears on shipments that have images and/or other files attached. For more information, see Pages, tabs and menus in Opter Driver.
appears on shipments that have images and/or other files attached. For more information, see Pages, tabs and menus in Opter Driver.
Add images to the detail view
-
Tap on the shipment in the shipment list so that the detail view opens.
-
Tap
 in the top right-hand corner.
 -
Choose whether to add one or more images you already have (1) or take a new picture (2).
-
: Opens the gallery, where you can select one or more images to attach. Then tap "Add" or similar (depending on what it says on your mobile).
-
: Opens the camera, so you can take a new picture. If you are not satisfied with it, tap the cross at the top right of the image and take a new one.
-
-
The app automatically suggests a name for the image. If you wish, you can press the field (3) and give the image a name yourself.
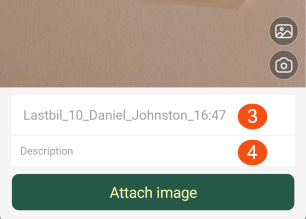
If you want, you can press the field (4) and give the image a description.
If multiple images are added, all the images will have the same name with a number as a suffix, "name-1", "name-2" and so on. If a description is entered, all the images will have the same description.
If you start typing a name or description, then change your mind and don't want to attach the picture, the keyboard may have made the tick in the top right corner invisible. Press the image once and the keyboard will disappear.
-
Tap Attach image to add the images to the shipment.
Once you have pressed Attach image, it is not possible to delete the images in the app.
Images can be added when registering a deviation
-
Tap on the shipment in the shipment list to open the detail view.
-
Tap
in the top right-hand corner and select Deviations. -
Fill in the fields to register a deviation.
-
Choose whether to add an image you already have (1) or take a new picture (2).
-
: Opens the gallery, where you can select the image you want to attach. Then give the image a name (if you want). Then tap Attach image.
To attach another image, tap
again. -
: Opens the camera, so you can take a new picture. If you are not satisfied, click on the cross at the top right of the image, then click on again and take a new one. When you are satisfied, give the image a name (if you wish). Then tap Attach image.
You can remove images that you do not want to attach by tapping the cross in the top-right corner of the image.
-
The images are not saved with the shipment until you save the deviation. After that, it is no longer possible to delete the images in the app.
Adding images when you register a proof of delivery (POD)
Once you’ve added images in POD view, you can’t delete them in the app. However, you can replace the image with another one by selecting another image from the gallery or taking a new picture with the camera.
-
The Proof of delivery page can be opened automatically when the status of a shipment is changed, but it can also be opened manually by tapping
in the detail view and selecting Proof of delivery. -
Fill in the fields to register a the proof of delivery.
-
Choose whether you want to add one or more photos that you already have on your mobile device (1) or take a new photo (2).
-
: Opens the gallery on your mobile device, where you can select the image you want to attach.
-
: Opens the camera, so you can take a new picture and attach it. If you are not satisfied with the image, tap on again and take a new one.
The image is automatically given a name that cannot be changed.
-
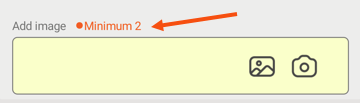
If the Add image field is light grey, it means you can add images if you wish.
If the Add image field is yellow, it means you must add at least one image. For example, if the text “Minimum 2” appears, you must add at least two images.
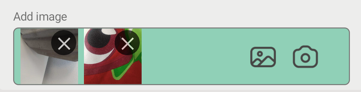
If the box is green, it means you’ve done everything you need to, but you can add more photos if you like. You can add as many as you like.
The image is not saved with the shipment until you save the proof of delivery. If you want to delete an image, click on the cross on the image.
Once you have saved the proof of delivery, you will no longer be able to delete the images in Opter Driver.
For more information about registering a proof of delivery, see Pods (POD) in Opter Driver.
You can only attach one image per POD. If you want to add more images to the shipment, you can do so via the menu in the detail view.
Once you’ve added an image in POD view, you can’t delete it in the app. However, you can replace the image with another one by selecting another image from the gallery or taking a new picture with the camera.