Changing the status of shipments in Opter Driver
Last updated: 14 March 2025
Applies to Opter Driver for iOS and Opter Driver Labs for Android.
In this article
To ensure that it is possible for the status to be changed as quickly and smoothly as possible, there are several different ways to change the status of a shipment in Opter Driver.
Depending on the settings made by the dispatcher or system administrator, the app works in various ways when changing the status of a shipment:
-
It can be possible to confirm shipments directly from notifications.
-
It can be possible to change the status of several shipments at the same time, if they are to be set to the same status.
-
It may be possible to change the status of shipments without seeing all the information displayed in the detail view, or you may have to open the detail view of each shipment before you can change its status. It can also be set so that you only have to go into the detail view to change to the Picked up and/or Delivered status.
-
It can be set so that you can only change to the Picked up and/or Delivered status by scanning.
-
It can be possible to change to any status in the life cycle, or just the next status in the life cycle. For example, if it is only possible to change the status to the next status in the life cycle and if a shipment is in the Picked up status then it can only be changed to the Delivered status.
In the shipment list, it is not possible to change to any status in the life cycle, it is only possible to change to the next status in the life cycle. In the detail view, it can be possible to change to any status in the life cycle.
Changing the status of a shipment on the shipment page
To change the status of a shipment on the shipment page, drag the shipment to the right or left (1). If the shipment is dragged to the right, the next status in the life cycle is displayed, for example Delivered (2).
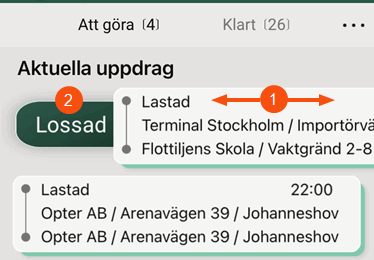
To change the status to Delivered, drag the shipment to the right until the word Delivered can be seen and release the shipment.
If your dispatcher has made a setting so that you cannot change the status to Picked up and/or Delivered in the shipment list, then when you drag the shipment sideways in the shipment list, the detail view of the shipment opens instead.
If you want to give the shipment away or leave it at a terminal, drag the shipment to the left and drop it.
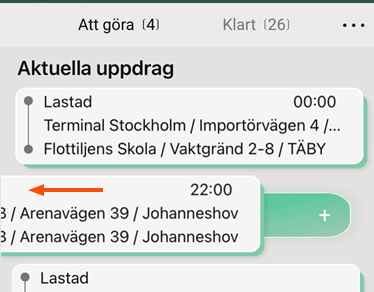
A menu will then appear. Tap Give away or At terminal.
Change the status of a shipment in the detail view
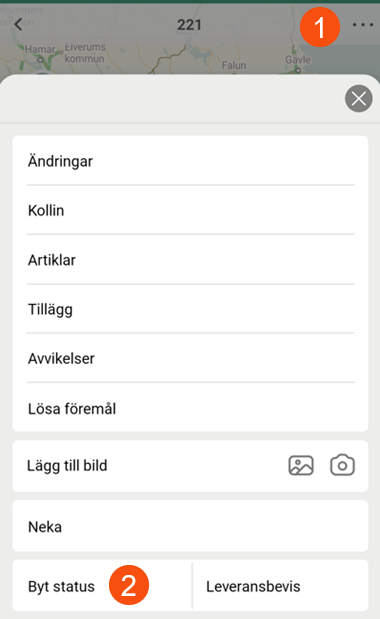
If you tap a shipment on the shipment page, the shipment’s detail view is displayed. To change the status of the shipment, tap the menu (![]() ) in the top right corner (1) and select Change status (2).
) in the top right corner (1) and select Change status (2).
Select the status, or search for a status by entering it in the search field.
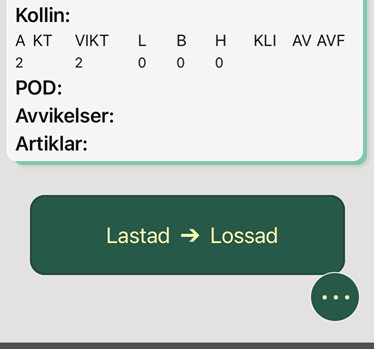
To quickly switch to the next status in the life cycle from the detail view, you can scroll to the bottom of the page and tap the button that shows the current status and the next status. In the image below, the shipment status will then change from Picked up to Delivered.
To change the status to a status other than what the button suggests, tap the menu (![]() ) below the button and select Change status, and then select the status.
) below the button and select Change status, and then select the status.
Changing the status of several shipments at the same time on the shipment page
If your dispatcher has selected this setting, it is possible to change the status of several shipments at the same time, if they are to be set to the same status.
To change the status of all shipments at the same time, one of the following methods can be used:
-
Drag a shipment to the left in the shipment list. Tap Select all and then tap on the status under Apply to selected.
-
Tap the menu (
 ) in the top right corner of the shipment page and select Select. Then tap Select all, and then tap on the status under Apply to selected.
To change the status of several but not all shipments, one of the following methods can be used:
-
Drag a shipment to the left in the shipment list. Then select more shipments by dragging them to the left or tapping them in the shipment list. Then tap on the status under Apply to selected.
-
Tap the menu (
) in the top right corner of the shipment page and select Select. Then select more shipments by dragging them to the left or tapping them in the shipment list. Then tap on the status under Apply to selected.