Last updated: 23.10.2024
Setting which fields are displayed in Opter Driver
Applies to Opter Driver for iOS and Opter Driver Labs for Android.
In this article
We recommend using the Design field for mobile window to set the fields to be displayed on the order page, the detail view, the signature page for pods, the scan page and the Scanning details page in Opter Driver.
To set which fields are displayed in the Column View, Column List, Item View, Deviation View, Changes View and New order View, see Mobile data settings (window).

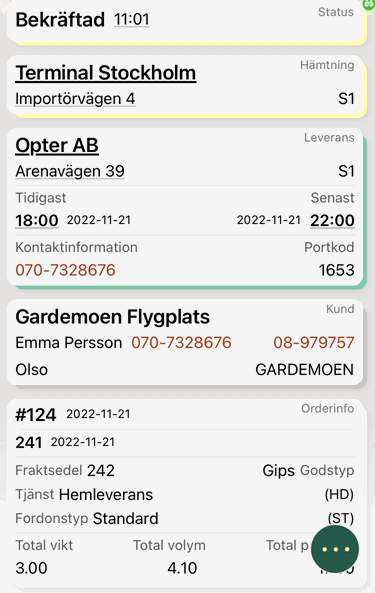
The image above shows an example of what it might look like in the detail view.
The default settings regarding which fields to display on the order page, detail view, proof of delivery signature page, scan page, and the Scanning details page are one of the following:
-
If Opter is being reinstalled, use the settings in the Design field for mobile window. The fields in the Included column in Design field for mobile are displayed in Opter Driver.
-
If you have Opter version 2022.12.xx, and update to 2023.06.01 or later, the default settings in Design field for mobile (and thus in Opter Driver) are based on the settings in App.Design, except for the settings for the detail view, which are instead based on the settings you had in Design field for mobile.
(If you have used App.OpterDriver.Design, that will still be used after the update.
For more information, see Design field for mobile (window), App.OpterDriver.Design and App.Design.
We recommend using Design field for mobile to set the fields to be displayed in Opter Driver for iOS and Opter Driver Labs for Android.To have a custom layout, this can be created by editing App.OpterDriver.Design or App.Design. To be able to use all the features available in Opter Driver for iOS and Opter Driver Labs for Android, the Design field for mobile or App.OpterDriver.Design window must be used, and notApp.Design. To continue using the settings from App.Design in Opter Driver for iOS and Opter Driver Labs for Android, set the App.ForceOldDesign mobile data setting to “true”.
Conditions
For the settings configured in the Design field for mobile window to be displayed in the app, the following must apply:
-
The App.ForceOldDesign mobile data setting is set to “false” (default). If it is set to "true", App.Design is used as the layout in the app instead. For more information, see Mobile data settings (window).
-
The XML file in the Mobile data settings App.OpterDriver.Design is empty, or it only contains "<?xml version="1.0" encoding="UTF-8"?>". If App.OpterDriver.Design contains anything else, that is used instead of the settings in the Design field for mobile window). . For more information, see App.OpterDriver.Design.
Setting the fields to be displayed in the app
-
Click on Settings > Mobile data > Design field for mobile.
-
Click on the tab for the view for which settings are to be made, for example Shipment list, Detail view or Scanning view.
-
Drag and drop the fields that are to be displayed in the Included list and those that are not to be displayed in the Excluded list. It is also possible to double-click on a field to move it to the other list.
Several fields can be moved at the same time by Ctrl-clicking or Shift-clicking on them and then pressing Enter to move them between the lists, or dragging and dropping them into the other list.
In the text fields above the lists, it is possible to search for the name of a field.
The order in which the fields are listed in Included does not matter.
For more information about the fields, see Design field for mobile (window).
-
Click on Save at the bottom of the window.
The changes are displayed in the app once the driver has logged out and then logged back in.
Troubleshooting
If the changes made in Design field for mobile are not visible in the app:
-
It may take a while for the changes to appear in the app.
-
Check that the App.ForceOldDesign mobile data setting is set to “false”.
-
Check that App.OpterDriver.Design is empty, or that it only contains <?xml version="1.0" encoding="UTF-8"?>.
-
The changes are displayed in the app once the driver has logged out and then logged back in.
-
For the fields selected for display, the following applies:
-
Most of the fields and sections are only displayed if there is any information to display, i.e. if the shipment/order contains that information.
-
The following fields are displayed even if there is no information to display: Weight [WEIGHT], Volume [VOLUME], Pallet space [AREA], Load metres [LOADMETER], Time (minutes) [TIMEMINUTES], Distance (km) [DISTANCEKM], Extra dimension 1 [EXTRADIMENSION1] – Extra dimension 5 [EXTRADIMENSION5] and Extra ID 1 [EXTRAID1] – Extra ID 5 [EXTRAID5].
-
-
If changes have been made in the detail view, note the following:
If the Pickup section contains the same address as the Pickup・order section, Pickup・order will not be displayed as it would just be a repetition of the same information.If the Delivery section contains the same address as the Delivery・order section, Delivery・order will not be displayed as it would just be a repetition of the same information.