The deviation view in Opter Driver
Last updated: 12 December 2025
In this article
The driver can register deviations in Opter Driver at the time of POD registration, scanning, or directly when they are detected by selecting Deviations in the menu in the detail view. You can customise the view that opens, the deviation view.
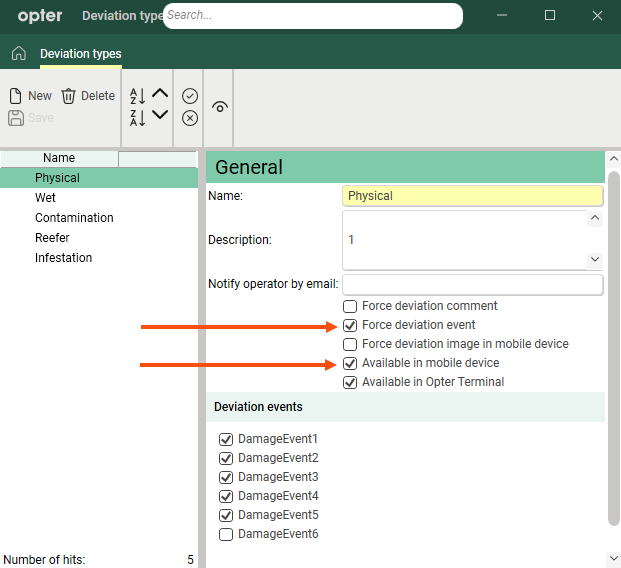
All deviation types to be used in Opter Driver must be activated. Go to Settings > Deviations > Deviation types and select Available in mobile device.

In Opter Driver (classic) for Android, the deviation view looks like this.

Preventing drivers from recording deviations
If you want drivers to be able to see existing deviations and add new ones, you don't need to do anything. It is standard. However, if drivers should not be able to see existing deviations or add new ones, set the Mobile data settings DamagesPermission to "false". Then the menu item Deviations is completely hidden in both the detail view and the POD view.
If you want drivers to be able to see existing deviations, but not add new ones, set the Mobile data settings AddNewDamagePermission to "false". This will display the menu item Deviations, allowing drivers to view existing deviations on the order, but not to add new ones.
It is not possible to delete deviations in Opter Driver. It must be done in the Order reception.
For more information on how to set up Mobile data settings, see Mobile data settings (window).
|
Desired features of the app |
What settings need to be made? |
|---|---|
|
|
Available in mobile device = |
|
|
This combination is not possible as the driver can always see existing deviations if the menu item is displayed. It is not possible to deactivate only that option. |
|
|
Available in mobile device = AddNewDamagePermission = "false". |
|
|
DamagesPermission = "false". The menu item Deviations is not displayed at all in the detail view and POD view. |
By default, changes made in Opter Driver must be manually approved in dispatch for the change to be saved, but it can be set so that no changes at all need to be approved, or only certain changes need to be approved.
For more information, see Setting how changes made in Opter Driver are approved.
Customise the deviation view
When a driver selects Deviations from the menu, one of the following happens:
-
If there are deviations registered on the shipment, a view opens where drivers can see existing deviations and register new ones.
-
If there are no deviations on the shipment, the deviation view opens directly, where the driver can register a new deviation. It is also possible to register deviations in the POD view.
Setting which fields are to be displayed
By default, all fields are displayed in the app. Event is displayed when the driver selects a deviation type that has events associated with it, and Reason is displayed when the driver selects a deviation event that has causes associated with it.
It is always mandatory to specify a deviation type when registering a deviation, so the field Type cannot be hidden. Other fields can be hidden by setting the following Mobile data settings to "false":
-
Event: DAM_DAE_IdPermission.
-
Reason: DAM_DAR_IdPermission.
-
Comment: DAM_CommentPermission.
-
Image: DAM_DEA_IdPermission.
For information on how to set up mobile data settings, see Mobile data settings (window).
Renaming fields
To rename the fields, enter a new name for the following Mobile data settings
-
Type: DAM_DAT_IdName (for example "deviation type")
-
Event: DAM_DAE_IdName (for example "deviation event")
-
Reason: DAM_DAR_IdName (for example "deviation reason")
-
Comment: DAM_CommentName (e.g. "Deviation comment").
-
Image: DAM_DEA_IdName (e.g. "Deviation image").
For information on how to set up mobile data settings, see Mobile data settings (window).
Optional and mandatory types/events/causes
You set which deviation types, deviation events and deviation reasons are available in Opter Driver by selecting Available in mobile device in the respective register under Settings > Deviations.
There you can also set the mandatory selection of deviation event and deviation reason.
-
If it is mandatory to enter a deviation event for a deviation type, select Force deviation event in the Deviation types window.
-
If it is mandatory to enter a deviation reason for a deviation event, select Force deviation reason in the Deviation events window.
It is always mandatory to select the deviation type when registering a deviation.
Troubleshooting
This may be because no deviation types can be used in Opter Driver. Go to Settings > Deviations > Deviation types and check that the checkbox Available in mobile device is ticked for at least one deviation type. If it is not selected for any deviation types at all, the menu item will not appear in the app at all.