Last updated: 2026-02-03
Installing Opter Driver
Applies to Opter Driver for iOS and Opter Driver Labs for Android.
In this article
Step 1: Install the app
Opter Driver requires iOS version 15.0 or later. To see which iOS version your phone is running, tap Settings > General > About.
How to install the app:
-
Open App Store on your iPhone or iPad.
-
Search for “Opter Driver” and install the app with that name.
The new Opter Driver Labs app for Android has the same underlying technology as Opter Driver for iOS, and all the features found in, for example, version 2.4.20 of Opter Driver for iOS are also found in version 2.4.20 of Opter Driver Labs for Android.
Opter Driver Labs for Android is currently a beta version, which means it is still under development. The app may lack some specialised functionality.
Opter Driver Labs requires Android 7.1 or later. You can see the Android version of your mobile phone by tapping Settings > About phone > Android version (or Software information).
To start using Opter Driver Labs for Android, proceed as follows:
-
Open the Play Store on your mobile phone, search for "Opter Driver Labs" and install the app with that name.
-
Then follow the instructions below.
Step 2: Configure the app
To connect the app to your Opter system, proceed as follows:
-
Open Opter on a computer. Click on QR codes and links for our apps on the left of the main menu in Opter. There you will see the QR code and server address that you need in step 4 below.
-
Open Opter Driver on your mobile.

-
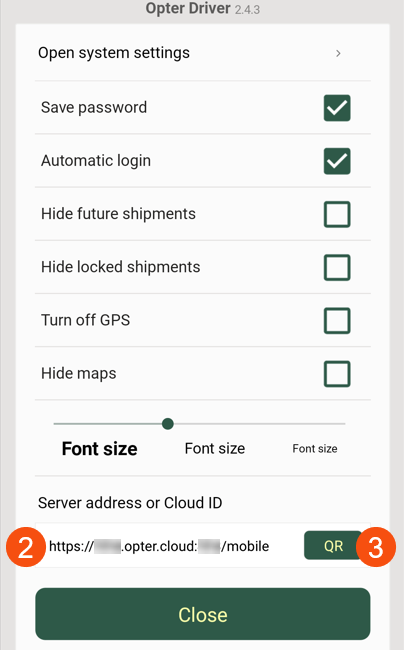
Tap Settings (1).
-
Connect the app to your Opter system by doing one of the following
-
Enter your cloud ID (cloud name) in the Server address or Cloud ID field (2). The cloud ID is your company name as it is called in Opter, for example "courierservices". There must not be any spaces in or after the name.
-
Tap QR (3) and scan the QR code for Opter Driver. The QR code can be found under QR codes and links for our apps on the left of the main menu in Opter.
-
Enter your server address, for example "https://courierservices.opter.cloud:xyz/mobile" in the Server address or Cloud ID field (2).
-
-
Tap Close to save the settings.
To ensure the times of shipments are displayed correctly in the app, the correct time zone must be set. On an iPhone, tap Settings > General > Date and time and activate Set automatically. On your Android device, tap the Settings icon> System > Date and time and activate Set automatically.
Step 3: Login as a vehicle or driver, and assignment of shipments
Choose whether drivers log into the app as vehicles or drivers, and choose whether shipments are assigned to vehicles or drivers. Click on Settings > Mobile data > Mobile device types and select Vehicles or Drivers under Log in as or Assign shipments to.
Step 4: Choose whether drivers have to enter a secondary resource when logging in
The following settings can be configured:
-
Should drivers be able to add a different resource type than the one they logged in as, and if so, should it be mandatory or not? For example, if they log in as drivers and then add a vehicle, or if they log in as vehicles and then add a driver.
-
Whether drivers should be able to see all other resources or only those resources that are associated with the same supplier as them.
How to configure the settings:
-
Click on Settings > Mobile data > Settings mobile data.
-
Click on an empty row in the Name column and then on the down arrow in the row being added.
-
Select the setting to be configured from the list, for example App.ShowOnlySuppliersSecondaryResources. Enter “true” or “false” in the Value column.

 If the user logging into the app is associated with a supplier
-
Should the user be able to add a resource type that is different to the one they logged in as?
Select App.ChooseSecondaryResourceIfSupplier from the list.
-
“True” = the driver can add a resource type that is different to the one they logged in as.
-
“False” = the driver cannot add a resource type that is different to the one they logged in as.
-
If no value is specified for App.ChooseSecondaryResourceIfSupplier, it will be treated as “true”.
If you set App.ChooseSecondaryResourceIfSupplier to “true”, continue to step 2 below. If you set to “false”, you have finished and can click on App.ChooseSecondaryResourceIfSupplier.
-
-
Should it be mandatory or optional for the driver to add a resource type other than the one they logged in as?
Select App.ChooseSecondaryResourceOptionalIfSupplier from the list.
-
“True” = the addition of a different resource type is optional.
-
“False” = the addition of a different resource type is mandatory. If, for example, the driver logs in as a driver, they must then add a vehicle.
-
If no value is specified for App.ChooseSecondaryResourceOptionalIfSupplier, it is treated as “false”.
-
-
Should the driver be able to see all other resources or only those that are associated with the same supplier?
Select App.ShowOnlySuppliersSecondaryResources from the list.
-
“True” = only show other resources associated with the same supplier. This means that drivers who log in and are associated with a supplier cannot see other suppliers’ drivers or vehicles. Nor do they see drivers and vehicles without suppliers. They only see other resources that are associated with the same suppliers as them.
-
“False” = show all other possible resources, not just those associated with the same supplier as the driver.
-
If no value is specified for App.ShowOnlySuppliersSecondaryResources, it will be treated as “true”.
-
-
Click on Save.
If the driver logging into the app is not associated with a supplier
-
Should the driver be able to add a resource type that is different to the one they logged in as?
Select App.ChooseSecondaryResource from the list.
-
“True” = the driver can add a resource type that is different to the one they logged in as.
-
“False” = the driver cannot add a resource type that is different to the one they logged in as.
-
If no value is specified for App.ChooseSecondaryResource, it will be treated as “true”.
If you set App.ChooseSecondaryResource to “true”, continue to step 2 below. If you set to “false”, you have finished and can click on App.ChooseSecondaryResource.
-
-
Should it be mandatory or optional for the driver to add a resource type other than the one they logged in as?
Select App.ChooseSecondaryResourceOptional from the list.
-
“True” = the driver can add a resource type that is different to the one they logged in as.
-
“False” = the driver must add a resource type that is different to the one they logged in as. For example, if you log in as a driver, you must then add a vehicle.
-
If no value is specified for App.ChooseSecondaryResourceOptional, it is treated as “false”.
-
-
Should the driver be able to see all other resources or only those that are not associated with a supplier?
Select App.ShowOnlySuppliersSecondaryResources from the list.
-
“True” = drivers who log in and are not associated with a supplier will only see other resources that are not associated with a supplier.
-
“False” = show all other resources, i.e. both those associated with a supplier and those not associated with a supplier.
-
If no value is specified for App.ShowOnlySuppliersSecondaryResources, it will be treated as “true”.
-
-
Click on Save.
-
Step 5: Create login credentials
Depending on the user login procedure adopted in step 3 above, login credentials are created for vehicles or drivers.
Proceed as follows:
-
In Opter, click on Register > Vehicles.
-
Select a vehicle in the list on the left and go to the Mobile/web tab.
-
Enter the username and password that the resource is to use to log into the app, under Credentials. For more information, see Vehicles (window).
-
Click on Save to save all changes.
The users can now log into the app using the credentials defined by you.
The login credentials are also valid for the vehicle web.
Proceed as follows:
- In Opter, click on Register > Employees.
-
Select an employee from the list on the left, then select the Driver checkbox on the General tab. A call number for the driver also has to be entered. If the driver is not listed as an employee, add him/her by clicking on
 .
.
- Enter the username and password that the resource is to use to log into the app on the Mobile/web tab. For more information, see Employees (window).
-
Click on Save to save all changes.
The users can now log into the app using the credentials defined by you.
The login credentials are also valid for the driver web.
Step 6: Control oldest authorised version
To control which is the oldest allowed version of Opter Driver for iOS and Opter Driver Labs for Android on your system, set the Mobile data settings App.TargetVersionXamarin to the oldest allowed version, for example "2.4.20".
If a driver has an older version of Opter Driver on their device, the driver must update to the version you specified in App.TargetVersionXamarin in order to log into Opter Driver.
For more information, see Mobile data settings (window).