Last updated: 06.12.2023
The scan list in Opter Driver
In this article
The scan list is the view displayed when a driver has scanned packages with Opter Driver. The layout of the scan list is set in the <scanrows> section of App.Design. If the section is not in your App.Design, you can copy the factory settings below. The colours in the scan list cannot be changed and it is not possible to use conditions or calculations.
<scanrows>
<row>
<item font="BOLD" itemname="CREDITEDTOOTHERRESOURCEBLOCK"/>
</row>
<row>
<item font="BOLD" itemname="CREDITEDTOOTHERRESOURCEWARNING"/>
</row>
<row>
<item font="BOLD" itemname="CREDITEDTOOTHERRESOURCE"/>
</row>
<row>
<item itemname="STATUS,PACKAGECOUNT"/>
</row>
<row>
<item itemname="PACKAGE.PACKAGEID,' ',PACKAGE.STATUS,' ',PACKAGE.SCANTIME,' ',PACKAGE.RESOURCE,' ',PACKAGE.HUBNAME,' ',PACKAGE.DIMENSIONS" multiline="true"/>
</row>
<row>
<item itemname="ADDRESSINDEXTITLE,ADDRESSINDEX"/>
</row>
<row>
<item itemname="FREIGHTBILLTITLE,FREIGHTBILL"/>
</row>
<row>
<item itemname="PACKAGEIDTITLE,PACKAGEID"/>
</row>
<row>
<item itemname="ADDRESSFROMTITLE,ADDRESSFROM"/>
</row>
<row>
<item itemname="ADDRESSTOTITLE,ADDRESSTO"/>
</row>
</scanrows>Several variables can be displayed one after the other by separating them with commas. If you want spaces between variables in the app, type ' ' between them, for example <item itemname="PACKAGE.PACKAGEID,' ',PACKAGE.STATUS,' ',PACKAGE.SCANTIME"/>.
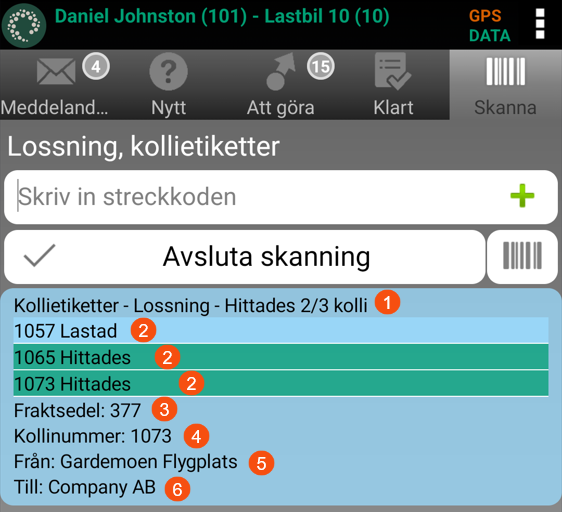
For more information about variables, see below and in Tags in App.Design. This is what the scan list looks like with the factory settings.

-
STATUS,PACKAGECOUNT
- STATUS: Package labels - Unloading - Found one. Shows whether package labels or freight bills have been scanned, which scan direction was performed and the status of the most recently scanned package.
-
PACKAGECOUNT: 2/3 package. Shows how many packages have been scanned of the total number of packages in the shipment.
Once all the packages for this shipment have been scanned, 3/3 is displayed and the entire block belonging to the shipment turns green in the scan list (if OneScanRowPermission is set to “true”, which is the default setting and is shown in the image). If OneScanRowPermission is set to “false”, all the blocks belonging to the shipment will be green in the scan list.
-
Package information that is repeated for each package in the order. Preferably used when OneScanRowPermission is set to "true". If the row for a package is green, it means that the package has been scanned.
-
PACKAGE.PACKAGEID: Package ID.
-
PACKAGE.STATUS: Latest package status.
-
PACKAGE.SCANTIME: Date and time when the package was last scanned. (Not displayed in the image).
-
PACKAGE.RESOURCE: The resource that last scanned the package. (Not displayed in the image).
-
PACKAGE.HUBNAME: The terminal where the package was last scanned. (Not displayed in the image).
-
PACKAGE.DIMENSIONS: Displays the text and the package dimensions set for the mobile data setting PackageDimensionsString in the scan block, for example “Weight: 20 kg". (Not displayed in the image).
For more information, see Mobile data settings (window) and Displaying package dimensions in the scan list (Opter Driver).
-
PACKAGE.SCANCOMMENT: The latest scan comment for the package. (Not displayed in the image. The variable PACKAGE.SCANCOMMENT is not included by default in App.Design when installing Opter and is therefore not included in the code example above, but you can add PACKAGE.SCANCOMMENT,' ' on line 15 of the code example above).
-
- FREIGHTBILLTITLE,FREIGHTBILL
-
FREIGHTBILLTITLE: Freight bill:
-
FREIGHTBILL: The freight bill number on the order.
-
-
PACKAGEIDTITLE,PACKAGEID
- PACKAGEIDTITLE: Package ID:
-
PACKAGEID: Displays the package number of the most recently scanned package (if OneScanRowPermission is set to "true", which is the default setting and is shown in the image). If OneScanRowPermission is set to “false”, the package number is displayed on the scanned package.
- ADDRESSFROMTITLE,ADDRESSFROM
-
ADDRESSFROMTITLE: From:
-
ADDRESSFROM: Sender’s name, for example, a company name or a private individual. (Address line 1).
-
- ADDRESSTOTITLE,ADDRESSTO
-
ADDRESSTOTITLE: To:
-
ADDRESSTO: Receiver’s name, for example, a company name or a private individual. (Address line 1).
-
Variables that are not shown in the image above:
-
CREDITEDTOOTHERRESOURCEBLOCK: If it is set up so that scanning is blocked from a certain status onwards if the driver tries to scan a shipment that is not assigned to that resource, the text Stop! This shipment is assigned to another resource. is displayed
The setting is made under Settings > Offices on the Scanningtab. An exception for a specific driver can be set up at Register > Employees, on the Mobile/web tab. For more information, see Employees (window). An exception for a specific vehicle can be set up at Register > Vehicles, on the Mobile/web tab. For more information, see Vehicles (window).
-
CREDITEDTOOTHERRESOURCEWARNING: If it is set up so the driver is warned from a certain status onwards if they scan something that is assigned to a different resource, the text Note! This shipment has been transferred from another resource. is displayed
The setting is made under Settings > Offices on the Scanningtab. An exception for a specific driver can be set up at Register > Employees, on the Mobile/web tab. For more information, see Employees (window). An exception for a specific vehicle can be set up at Register > Vehicles, on the Mobile/web tab. For more information, see Vehicles (window).
-
CREDITEDTOOTHERRESOURCE: If the driver scans something that is assigned to/scheduled for another resource, it is stated from which resource they are trying to take the shipment. For example, it might say “Shipment assigned to: Lewis Hamilton The fast car".
-
ADDRESSINDEXTITLE,ADDRESSINDEX
-
ADDRESSINDEXTITLE: Next order:
-
ADDRESSINDEX: If route optimisation has been carried out, the next stop’s route sequence number according to the route optimisation is displayed here. The last stop’s route sequence number is also displayed here. Example “2/5”, i.e. the next stop is number two and the last stop is number five in the route sequence. (So there are a total of four stops left).
-
Customising the scan list
-
Displaying scans of the same shipment in a block (Opter Driver)
-
Displaying package dimensions in the scan list (Opter Driver)