Employees (window)
Last updated: 5 March 2026
![]() Register > Employees
Register > Employees
In this article
In this window, you register your employees and drivers.
General
Use this tab to enter basic information about the employee, such as a name, contact details, whether the employee is a driver or not, whether the employee is associated with a supplier or not, and whether the employee should receive fuel and currency extras.
|
Function |
Description |
|---|---|
|
First name |
The employee’s first name. |
|
Last name |
The employee’s last name. |
|
SMS number |
The mobile number to be used when contacting the employee via SMS. |
|
Phone 1 |
A telephone number for the employee. |
|
Phone 2 |
A telephone number for the employee. |
|
Mobile phone |
A mobile phone number for the employee. |
|
|
An email address for the employee. |
|
Driver |
Select the checkbox if the employee works as a driver. If the checkbox is marked, the driver is visible in dispatch. |
|
Call no |
The employee’s call number. Used in dispatch, among other things. A call number is required for each employee who is a driver. |
|
Region |
Select the region in which the employee works. |
|
Supplier |
If the employee is associated with a supplier, select the supplier with which the employee is associated. |
|
Resource Pricing |
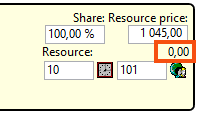
Select resource pricing for the employee. It is also possible to add new resource prices or change existing resource prices by pressing [Default]/[None] means that no cost is generated, even if you enter manual cost.
In the figure above, no cost has been generated for the shipment. The picture shows the group Shipments in the Order reception. [Default]/[None] means thus:
|
|
Crediting interval |
To add a note about the credit interval that applies to the employee. |
|
Fuel extra |
This setting only applies if the No fuel extra checkbox below is deselected. Select the fuel extra the employee should receive. If no settings are configured here, the following applies:
For more information, see Fuel surcharge (fuel extra), overview and Selecting fuel extra for an employee. |
|
No fuel extra |
Choose whether or not the employee should receive a fuel extra:
If no setting is configured or if the checkbox is deselected, the description provided for the Fuel extra drop-down list above applies. For more information, see Fuel surcharge (fuel extra), overview and Selecting fuel extra for an employee. |
|
Currency extra |
This setting only applies if the No currency extra checkbox is deselected. If the employee should receive a currency extra, select the currency extra the employee should receive. |
|
No currency extra |
If no setting is configured here, the general settings for currency extras under Settings > Offices, in the Currency extra drop-down list on the Pricing tab, will apply. If the general setting should not apply to this employee, use the No currency extra checkbox as follows:
|
Details
Other settings
|
Function |
Description |
|---|---|
|
Social security no |
The employee’s personal identity number. |
|
Employment date |
The employee’s date of employment. |
|
Quit |
If the employee has left, enter the end date here. |
|
Employee no |
The employee’s unique employment number. |
|
Name |
The name of the employee. |
|
c/o |
The department in which the employee works. |
|
Street/No. |
Street and street number of the employee’s home address. |
|
Postcode/City |
Postcode and city/town of the employee’s home address. |
|
Country |
Country of the employee’s home address. |
Other
|
Function |
Description |
|---|---|
|
Notes |
Free text field for internal notes. The description is not displayed anywhere else but here. |
|
Terminal |
The terminal with which the employee is associated. |
|
Cost pool |
The cost pool with which the employee is associated. |
Route optimisation settings
|
Function |
Description |
|---|---|
|
Allow only automatic calculation of arrival time |
Select whether to allow the automatic calculation of ETA on assigned shipments. Only the ETA is continuously updated. The aim is to be able to send out reliable delivery notifications. The setting for this checkbox only applies if the driver (employee) is the primary resource and if the Allow only automatic calculation of arrival time or Allow automatic calculation of route sequence and arrival time checkbox is selected in the office settings and for the service. The office settings have priority over the other settings for this checkbox. For rules and instructions, see Automatic route optimisation. |
|
Allow automatic calculation of route sequence and arrival time |
Choose whether to allow the automatic calculation of the route sequence and delivery time. Both the route sequence and the ETA are continuously updated. The aim is to make transport operations as efficient as possible. The setting for this checkbox only applies if the driver (employee) is the primary resource and if the Allow automatic calculation of route sequence and arrival time checkbox is selected in the office settings and for the service. The office settings have priority over the other settings for this checkbox. For rules and instructions, see Automatic route optimisation. |
|
Service time factor |
If the driver (employee) is used as a primary resource, a specific Service time factor for the driver can be entered here. An experienced driver may only need 80% of the service time, while an inexperienced driver may need 110%. For more information, see Service time. |
|
Driving time factor |
If the driver (employee) is used as a primary resource, a specific Driving time factor for the driver can be entered here. If a driver generally needs a longer driving time than calculated, enter a percentage that is higher than 100. Setting a percentage lower than 100 means that the driver has to move faster than the calculated driving time, which is based on factors such as speed limits. For more information, see Driving time. |
|
Fallback position |
If a driver’s position cannot be determined, for example due to poor mobile coverage, a fallback position can be entered. The fallback position is set in the office settings, but a fallback position for a specific driver can be set here in the employee registry by clicking on If there is a setting there already that is to be changed, click on For more information, see Vehicle position. If no fallback position is set, Opter’s Stockholm office will be used as the fallback position, which can produce unexpected results during route optimisation. |
|
Home location |
Home location can be used to ensure that routes start/end close to the resource’s home so that the system can optimise the route sequence for shipments so that resources are used as efficiently as possible. A home location can be set for a driver by clicking on If there is a setting there already that is to be changed, click on For more information, see Home location for vehicles and drivers. |
Advanced
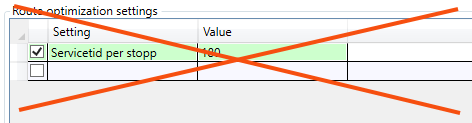
It is only for internal Opter use, and should not be used. Even if a row is added and a value is entered in the table, such as "Service time per stop 180 seconds", it is not used in the route optimisation.
Working Session
On this tab it is possible to view, edit and export working sessions. Working sessions are created based on the activities that the drivers state in Opter Driver, or that the dispatchers add to drivers or vehicles in dispatch.
New rows can be added manually by clicking in a field in the empty row at the bottom of the list. Double-click in the field in the Activity column and a drop-down list will appear, in which it is possible to choose, for example, Working, Sick or On holiday.
Double-click in the From, To, Lunch from and Lunch to fields, and then it is possible to either enter the date and time manually or click on the calendar icon in the field and select the date and time, then click on Close. If the time needs to be adjusted, click in the field again and enter the correct time.
To export working sessions to Excel, see Exporting working sessions to Excel.
|
Function |
Description |
|---|---|
|
date field List box with time periods |
Select from to which date you want to show shifts, or a time period in the drop-down list. |
|
|
Copy row. If you click on the far left of a row, it will be highlighted, then you can click on |
|
|
Merging working sessions. To merge shifts, select two or more rows and then click on this button. If two working sessions are merged, the earliest start time and the latest end time are used. Example: If you merge a work shift that is at 9:00-12:00 with a work shift that is at 16:00-21:00 on the same date will be the new evening session at 9:00–21:00. |
|
|
Export to Excel. The shifts currently displayed in the list are exported to Excel. |
|
Column |
Description |
|---|---|
|
Activity |
Double-click in the field in the Activity column and a drop-down list will appear, in which it is possible to choose, for example, Working, Sick or On holiday. |
|
From |
Enter the date on and time at which the working session started. Double-click in the From, To, Lunch from and Lunch to fields, and then it is possible to either enter the date and time manually or click on the calendar icon in the field and select the date and time, then click on Close. If the time needs to be adjusted, click in the field again and enter the correct time. |
|
To |
Enter the date on and time at which the working session ended. |
|
Lunch from |
Enter the date on and time at which the lunch break started. Double-click in the From, To, Lunch from and Lunch to fields, and then it is possible to either enter the date and time manually or click on the calendar icon in the field and select the date and time, then click on Close. If the time needs to be adjusted, click in the field again and enter the correct time. |
|
Lunch to |
Enter the date on and time at which the lunch break ended. |
|
Work time |
Opter calculates the working time and displays the number of hours and minutes in the column. |
|
of which break |
Opter calculates the break time and displays the number of hours and minutes in the column. This shows the break time excluding the lunch break time. |
|
Work time incl. lunch |
Opter calculates the working time including the lunch break and displays the number of hours and minutes in the column. |
|
Vehicle |
Shows which vehicle was used. If desired, it is possible to enter or change the vehicle for the working session. |
|
Meter start |
Enter the mileage reading of the vehicle at the start of the working session, if the number of kilometres the vehicle drives during the working session is to be registered. |
|
Meter stop |
Enter the mileage reading of the vehicle at the end of the working session, if the number of kilometres the vehicle drives during the working session is to be registered. |
|
Target cost |
Enter the budgeted cost for the resource. If desired, it is possible to enter or change the target cost. For more information, see Budgeted cost of resources. |
|
Office |
Shows at which office the working session was registered. |
|
Comment |
Displays comment for the working session. It is possible to enter or change the comment. |
|
Created by |
Shows who created the working session. If it says "mdc", it means that the working session was created automatically based on the activities entered in Opter Driver by the driver. |
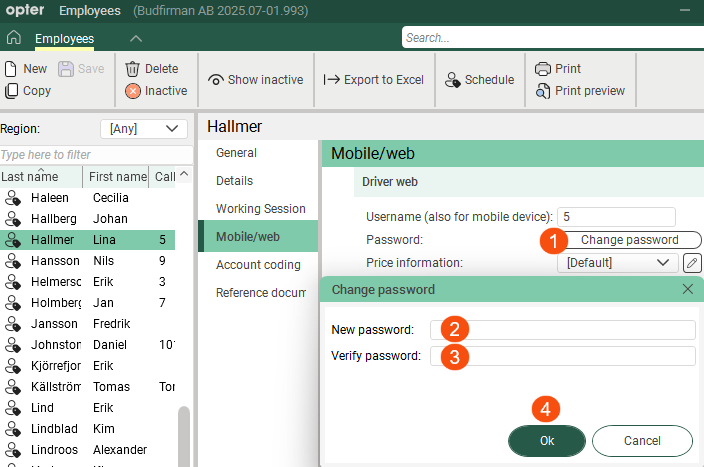
Mobile/web
Driver web
|
Function |
Explanation |
|---|---|
|
Username (also for mobile device) |
Username for logging in to the driver web and also to the Opter Driver and Fleet 101 K2 Mobile apps if the user logs in as a driver. For more information, see User accounts for The driver web and Installing Opter Driver. For information on how to set the resource type (driver or vehicle) that app users log in as in Opter Driver and how to create employee login details, see Install Opter Driver (classic). |
|
Password Change password (The button is available as of Opter 2025.12.00.) |
Password for logging into the driver web and the Opter Driver and Fleet 101 K2 Mobile apps.
For more information, see User accounts for The driver web and Installing Opter Driver. |
|
Price information |
Set whether resource prices should be displayed on the driver web, and whether resource prices should be displayed per day, per shipment or per shipment in the form of price rows. |
|
Internet order settings |
Select the internet order setting for the employee on the driver web. To add a new access category or change the access of an existing category, click on |
|
Login hours |
The function was not used and is therefore removed as of Opter 2025.12.00. |
|
Skip approval for order changes from mobile devices |
The setting only has an effect if App.ApproveChanges = "True". If the mobile data setting App.ApproveChanges is set to "True", the dispatcher must authorise changes made by the driver in Opter Driver. This checkbox allows exceptions to be made for a driver.
For more information, see Setting how changes made in Opter Driver are approved. |
Mobile devices
The mobile devices used by the employee are displayed here.
|
Column |
Description |
|---|---|
|
Mobile device |
If “App” is indicated, this means that the employee uses or has used one of the Opter Driver or Fleet 101 K2 Mobile apps. If several mobile device types have been enabled, they will also be displayed here, e.g. “SMS”. If desired, more mobile device types can be enabled under Settings > Mobile data > Mobile device types. |
|
Address |
Settings for mobile device types, such as SMS and Transics. If desired, more mobile device types can be enabled under Settings > Mobile data > Mobile device types. For example, if SMS is enabled, use the Address field to enter the mobile number to which the SMS is to be sent. |
|
Address 2 |
Settings for mobile device types, such as Transics and DHL. |
|
Active |
For information only. The checkbox provides the following information:
|
|
Version |
This shows which version of Opter Driver or Fleet 101 K2 Mobile the employee is using. |
|
Latest use |
This shows the date and time when the employee last logged in to the app. |
|
|
Operating system of the mobile device, for example Android or iOS. |
|
|
Version of the operating system, for example version 11 (SDK 30). |
|
Model |
Make and model of the mobile device, for example Sony G8441 or Samsung SM-N770F. |
Scanning
|
Function |
Description |
|---|---|
|
Warn if other resource when departure scan from following status (inclusive) |
Applies when the driver performs departure scanning at the terminal. If no setting is configured here, the setting on the Mobile/web tab in the vehicle registry applies. If no setting is configured here for the driver or the vehicle, the general setting on the Scanning tab, the office settings, applies. If you want the driver to receive a warning in the Opter Driver app if the driver scans something that belongs to another resource's shipment, select from which status. The default setting is Picked up. For more information, see Block or warn about another resource when scanning in Opter Driver. |
|
Warn if other resource when pickup scan from following status (inclusive) |
Applies when the driver performs pickup scanning at the sender. If no setting is configured here, the setting on the Mobile/web tab in the vehicle registry applies. If no setting is configured here for the driver or the vehicle, the general setting on the Scanning tab, the office settings, applies. If you want the driver to receive an alert in the Opter Driver app if the driver scans something that belongs to another resource's shipment, select from which status. The default setting is Picked up. For more information, see Block or warn about another resource when scanning in Opter Driver. |
|
Block change of status/resource if other resource when departure scan from following status (inclusive) |
Applies when the driver performs departure scanning at the terminal. If no setting is configured here, the setting on the Mobile/web tab in the vehicle registry applies. If no setting is configured here for the driver or the vehicle, the general setting on the Scanning tab, the office settings, applies. If you do not want anyone other than the person assigned to the shipment to be able to make changes to the status or resource in the Opter Driver app during the departure scan, select the status from which the blocking applies. The default setting is Picked up. For more information, see Block or warn about another resource when scanning in Opter Driver. |
|
Block change of status/resource if other resource when pickup scan from following status (inclusive) |
Applies when the driver performs pickup scanning at the sender. If no setting is configured here, the setting on the Mobile/web tab in the vehicle registry applies. If no setting is configured here for the driver or the vehicle, the general setting on the Scanning tab, the office settings, applies. If you do not want anyone other than the person assigned to the shipment to be able to make changes to the status or resource in the Opter Driver app during the pickup scan, select the status from which the blocking applies. The default setting is Picked up. For more information, see Block or warn about another resource when scanning in Opter Driver. |
Account coding
In Opter, the VAT rate on the order determines the income and cost account to which a certain amount is booked. On this tab you can make exceptions to the regular account coding. The tabs you make changes to are marked with ![]() .
.
Click on ![]() to display the VAT rates held in the system. Then select the account to which amounts with the different VAT rates should be posted. More information on the individual drop-down lists can be found at The Account coding tab. The settings in this tab apply if you reach item 4 in the list in How Opter selects accounts for income and expenses. If [Default] is selected for any of the options here, the account coding is taken from the VAT rate.
to display the VAT rates held in the system. Then select the account to which amounts with the different VAT rates should be posted. More information on the individual drop-down lists can be found at The Account coding tab. The settings in this tab apply if you reach item 4 in the list in How Opter selects accounts for income and expenses. If [Default] is selected for any of the options here, the account coding is taken from the VAT rate.
For more information on how Opter selects the VAT rate on orders (column Sales) and supplier bills (column Cost), see How Opter chooses the VAT rate for customer invoices and How Opter chooses the VAT rate on credits.
Reference documents
On the Reference documents tab, files that can be opened on other computers can be added. The files that are added are not attached to orders, instead the function works as a file server and is intended for exchanging information. The files are saved in the database.
|
Function |
Description |
|---|---|
|
New |
Adds a file that is on the computer. It is only possible to add one file at a time. |
|
Delete |
Deletes files from the registry. It is only possible to delete one file at a time. |
|
Open |
Opens the selected file in the list. |
|
File name (column) |
The file name. |
|
Created |
When the file was added as a document in Opter. |
|
File name (field) |
The file name of the selected file. You can rename the file by typing the new name and clicking Save on the menu. Remember to keep the same file extension (for example “.docx”), otherwise the application to use has to be selected when the file is opened. |
|
Comment |
Free text. Information about the file. The information is only shown here. |