Customers (window)
Last updated: 18 March 2026
![]() Register > Customers
Register > Customers
In this article
The customer registry brings together all your customers and is where you configure settings that affect pricing, invoicing, account coding, how orders are dispatched and so on.
For information on the Customer section of Order reception, see Customer (order reception).
The Search box
To display a list of all your customers, leave the Find field blank and click on Search.
|
Function |
Description |
|---|---|
|
Drop-down list |
Choose how to search for the customer:
|
|
Find |
Free text field for searching. The whole or the first part of the search string can be entered. "opt" finds "Opter" and "Optimal". "ter" does not find "Opter". The search is not case-sensitive. |
|
Region |
You can search for customers in a specific region or in all ([Any]). |
General
Information
In Opter, a customer code is used instead of a customer number to identify customers in the system. The customer code can contain both letters and numbers. To work on customer numbers instead, this can be done in Opter using what are known as sales ledger numbers.
|
Function |
Description |
|---|---|
|
Customer code |
Acts as a customer number and is used to identify the customer in the system. The customer code can contain both letters and numbers, unlike the sales ledger number, which can only contain numbers. |
|
Name |
Enter the customer's name. |
|
Sales ledger number |
Enter the customer's sales ledger number. (The field can only contain numbers.) If you are creating a new customer in the customer register, and want the customer to receive the next available sales ledger number, press the button to the right of the field. Opter then fills in the next available number. (If there is a gap in the number series, Opter will select the sales ledger number.) The number series for the sales ledger numbers is controlled in the office settings (Settings > Offices > Default selections) in the fields Start number for ledger no. (customer) and End number for ledger no. (customer). |
|
Corporate ID number |
The customer’s corporate ID number. |
|
Phone |
The customer’s main telephone number, for example, mobile number "+46707328676999". |
|
Phone 2 |
The customer’s secondary telephone number, for example, mobile number "+4673777876777". |
|
Fax |
The customer's fax number. |
|
Email address |
The customer's email address. |
|
Price list |
Select a price list for the customer. |
|
Information |
Used for internal notes about the customer. |
Visiting address
The physical address of the customer. It sometimes differs from the billing address, which is indicated on the Invoice information tab.
|
Function |
Description |
|---|---|
|
Name |
Enter the customer's name. |
|
c/o |
The field can be used for the department of a company, the company name, c/o, or something else. |
|
Street/No. |
Street addresses. On the Map tab, you can manually adjust the address position, if you want it more precise. |
|
Postcode/State/City |
Postcode and town. The field State is only displayed if:
|
|
Country |
Indicate the country in which the visiting address is located. |
|
Information |
Information about the customer's address. The text is downloaded to the Information field under Sender/Receiver, and the Information column in the address list, in the Order reception The text can be displayed in Opter Driver with the fields Order - Address information (from) [DELIVERYADDRESSINFOFROM] and Order - Address information (to) [DELIVERYADDRESSINFOTO] (the tags DELIVERYADDRESSINFOFROM/DELIVERYADDRESSINFOTO if you use App.OpterDriver.Design). For more information, see Information linked to the customer’s address and Design field for mobile (window). |
|
Entrée code |
Enter the port code if applicable. Database fields: CUS_EntreCode |
Log
|
Function |
Description |
|---|---|
|
Created Updated |
Date and time when the customer was created and last modified, and who made the modification. This information is included when you export the customer register to Excel. |
Proof of Delivery (POD)
Use this tab to set up how the proof of delivery for customer orders will be handled in Opter Driver.
Proof of Delivery (POD)
|
Function |
Description |
|---|---|
|
Standard POD type |
Select the proof of delivery type to be used as the default for the customer. If you select [Default], the type set as the default in the Proof of delivery types window is used. |
|
Disable change of main POD type in mobile |
If the checkbox is selected, the main proof of delivery type cannot be changed in the apps. It is only possible to choose between the proof of delivery types available under the main proof of delivery type set in the Standard POD type field above. |
|
POD time limit |
Select the time limit within which the proof of delivery must be registered after ordering or delivery. If you select [Default], the time specified by default in the POD time limits window, which you can open by clicking on |
|
Name always optional |
|
|
Signature always optional |
|
|
Remark always optional |
|
|
Remark always optional |
|
|
Image always optional |
Database fields: CUS_PodPictureAlwaysOptional |
|
Information text to show in app on POD |
: Text that is displayed in Opter Driver when the receiver accepts the proof of delivery. For example, this could be a disclaimer. If an image is selected in the Logo to show in app on POD field, it will be displayed above the information text. |
Images
|
Function |
Description |
|---|---|
|
Logo to show in app on POD |
The image can be displayed in the job list, the detail view and on the signature page in Opter Driver. The image must first be uploaded to the image library to be selected here, and then added with Customer logo [CUSTOMERLOGOTYPE] in Design field for mobile, or with the tag CUSTOMERLOGOTYPE in App.OpterDriver.Design/App.Design. You open the image library with For more information, see POD view in Opter Driver and Display customer logo in Opter Driver (classic). |
Order Settings
Mandatory fields in order reception
Here you specify which fields should be mandatory to fill in on new orders for this customer. These settings override the corresponding settings on the Form flow tab in the order settings (see Order entry settings (window)).
Mandatory fields are highlighted in yellow in order reception.
![]() : Mandatory to fill in on orders for this customer.
: Mandatory to fill in on orders for this customer.
![]() : The setting on the Form flow tab in the order settings applies.
: The setting on the Form flow tab in the order settings applies.
|
Function |
Fields in Order reception |
|---|---|
|
Reference |
The field Reference under Customer. |
|
Customer project |
Literature section of the field Cus.Proj./Proj.No under Customer. |
|
Project |
The project part of the field Cus.Proj./Proj.No under Customer. |
|
Receiver reference |
The field Receiver's ref under Data. |
|
Sender reference |
The field Sender's ref. under Data. |
|
Freight bill number |
The field Freight billunder Data. |
|
Account coding projects |
The field Account coding projectunder Customer. |
|
Extra ID 1–Extra ID 5 |
The fields Extra ID 1-Extra ID 5under Data. If these fields have been given names on the Terminology tab in the office settings, those names will be displayed instead of “Extra ID 1”. |
Settings
|
Function |
Description |
|---|---|
|
Address history |
Addresses that are entered in order reception and on the web portals are stored in a temporary address registry. Enter the number of days the addresses will be stored in the temporary address registry. If nothing is entered here, the addresses will be saved for as long as is specified in the office settings (Order Settings tab). |
|
Weight calculation |
Select the calculation to be used for converting dimensions to a pricing weight. If [Default] is selected, the option specified in the price list used on the order will be used. |
|
Status time group |
Select the times that are to be suggested for orders in order reception. If [None] is selected, the option specified for the service used on the order is used. |
|
Never delay |
|
Freight bill number
|
Function |
Description |
|---|---|
|
Number series |
The number series used for freight bills. [Default]: the option specified in the office settings (Order Settings tab) is used. |
|
ID extension |
The modification of the freight bill number used. [Default]: the option specified in the office settings (Order Settings tab) is used. |
|
On pickup in Opter Driver |
No check (default): the freight bill number does not need to be checked. Check valid freight bill number: The freight bill number is already filled in Opter Driver and needs to be checked. Force new freight bill number entry: The freight bill number must be scanned or entered into Opter Driver. By default, the check is made when the status of the first shipment of an order changes to Picked up and/or when the last shipment of an order changes to Delivered/Delivered, i.e. at the sender and/or receiver of the order. However, it can be defined that the check is done during the loading or unloading of each shipment on the order by setting the mobile data setting CheckFreightBillAtAllPickUpAndDelivery to "True". For information on how to set up mobile data settings, see Mobile data settings (window). |
|
On delivery in Opter Driver |
No check (default): the freight bill number does not need to be checked. Check valid freight bill number: The freight bill number is already filled in Opter Driver and needs to be checked. Force new freight bill number entry: The freight bill number must be scanned or entered into Opter Driver. By default, the check is made when the status of the first shipment of an order changes to Picked up and/or when the last shipment of an order changes to Delivered/Delivered, i.e. at the sender and/or receiver of the order. However, it can be defined that the check is done during the loading or unloading of each shipment on the order by setting the mobile data setting CheckFreightBillAtAllPickUpAndDelivery to "True". For information on how to set up mobile data settings, see Mobile data settings (window). |
|
Check Digit Calculation |
The method by which the freight bill number should be checked. Currently only the Modulus 10 option is available. A checksum can only be calculated if the freight bill numbers contain only numbers. Database fields: CUS_CDC_Id_FreightBillCheckMobile |
|
Number of characters |
Enter the number of characters that make up the freight bill number, if you want it to be checked in Opter Driver. If you do not want the number to be checked, enter “0” (default). |
Package id
|
Function |
Description |
|---|---|
|
Number series |
The number series used for packages. [Default]: the option specified in the office settings (Order Settings tab) is used. |
|
ID extension |
The modification of the package ID used. [Default]: the option specified in the office settings (Order Settings tab) is used. |
Invoice information
The default invoicing setting applicable to all customers is configured on the Invoice settings tab in the office settings. To use different settings for a specific customer, configure those settings here.
Invoice information
|
Function |
Description |
|---|---|
|
Fee |
The invoice fee, which is added to all the customer’s invoices. For more information, seeInvoice fee. [Default]: the setting is retrieved from the Invoice settings tab in the office settings. |
|
Supplier/Subcontractor |
|
|
Invoice attachment |
Used to show/hide elements with the condition CUS_InvoiceAttachment in reports, such as invoice reports. This means that the same report can be used, but showing or not showing certain information based on the specific customer.
Example: <item name="**Bilagor" condition="CUS_InvoiceAttachment" x="0" y="10" width="65" /> Displays the text "**Attachments" on invoices to customers with the checkbox ticked, but not on invoices to customers where it is unticked. The attachments themselves are not attached. This is done via the invoice export. For more information, see Attaching files to invoices. |
|
Internal customer |
Report tag: Header.CUS_InternalCustomer (displays "True"/"False"). For more information, see Internal invoicing. |
|
Currency |
The currency in which the customer is invoiced. Report tag (currency code): CUR_Code_Standard |
Information
The invoice address. If it is the same as the visiting address, as entered on the General tab, it can be copied by clicking on Same as address.
|
Function |
Description |
|---|---|
|
Name |
Enter the customer's name. |
|
c/o |
The field can be used for the department of a company, the company name, c/o, or something else. Database fields: CUS_CompanyInv |
|
Street/No. |
Street addresses. |
|
Postcode/State/City |
Postcode and town. The field State is only displayed if:
|
|
Country |
Please indicate the country in which the billing address is located. |
|
Information |
Information about the billing address. |
Dispatching
Dispatch
|
Function |
Description |
|---|---|
|
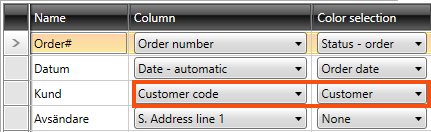
If you wish, you can specify the background colour and text colour for the customer. You can then choose how the colour setting will be used in the dispatch system by doing the following
For more information, see Dispatch settings (window). |
|
|
Number of extra days before completed shipments are removed from dispatch |
Enter the number of extra days you want completed shipments to remain in the dispatch before they are cleared. |
|
Number of extra days before shipments without POD are removed from dispatch |
Enter how many extra days you want shipments without pods to remain in the dispatch queue before they are cleared. |
|
Service time per stop (s) |
Service time is the time it takes to drop off the goods in addition to the actual driving time between addresses. Indicate how many seconds each stop is expected to take. For more information, see Service time. |
|
Time per additional shipment (s) |
State how much extra time a delivery to the same address is expected to take in addition to the service time, for example if there is a delivery to floor 3 and a delivery to floor 5 in the same building. Enter the time in seconds. For more information, see Service time. |
|
Function |
Description |
|---|---|
|
The early pick-up warning will appear in Opter Driver if the following applies:
When the driver receives the alert in the app, they can choose to undo the scan/status change or go ahead and still change the status to Picked up. So it's just a warning, not a block. For more information, see Warning in case of premature collection, Opter Driver.
|
|
|
When a driver delivers a shipment later than the latest delivery time indicated on the order, the delivery is considered late. With the Mobile data settings App.ForceDelayReasonOnDelay you can set whether drivers have to give a reason for the delay. This setting allows you to make exceptions to the Mobile data settings for this customer. This only applies to deliveries to the recipient, not to the Terminal.
The reason and comment are displayed in the Times (deadlines) group in the Order reception. For more information, see . |
|
|
When a driver delivers a shipment later than the latest delivery time indicated on the order, the delivery is considered late. With the Mobile data settings App.ForceDamageOnDelay you can set whether drivers have to register deviations for late deliveries. This setting allows you to make exceptions to the Mobile data settings for this customer. This only applies to deliveries to the recipient, not to the Terminal.
For more information, see Managing delays in Opter Driver. |
Opening hours
The customer's opening hours affect the collection times for orders where the customer is the sender. For example, you do not want an order to have a pick-up time of 9:00 a.m. if the customer does not open until 10:00 a.m. On the More settings tab in the order settings, you can choose how opening hours should affect orders created in the order reception.
Internet
Customer-specific settings for the customer web and Track & Trace.
Information
|
Function |
Description |
|---|---|
|
Internet order setting |
Customer's internet order setting. You may have a different setting for individual references (see Reference (window)), for example a variation of the customer’s internet order setting, but with a few changes. |
|
Internet style sheets |
CSS file used to format the customer web. The CSS file is also used on Track & Trace after a search has been made. |
Images
|
Function |
Description |
|---|---|
|
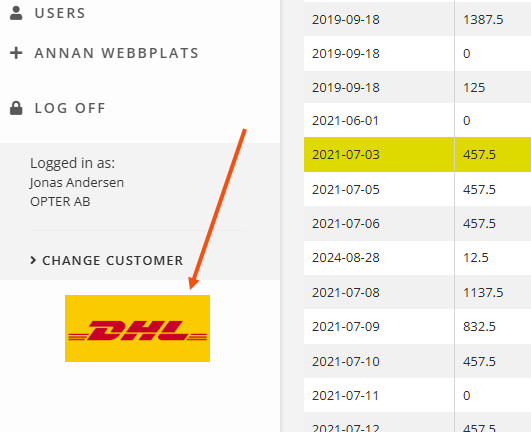
Internet image |
This image is shown in the bottom left corner. A logo or something else that identifies the customer may be appropriate.
|
|
When the recipient searches for an order belonging to this customer on Track & Trace, the original background image is replaced. [None]: The image is not replaced when the search is made. The same background image as for the web portals is used. It is set on the Internet tab in the office settings. |
Reference documents
On the Reference documents tab, files that can be opened on other computers can be added. The files that are added are not attached to orders, instead the function works as a file server and is intended for exchanging information. The files are saved in the database.
|
Function |
Description |
|---|---|
|
New |
Adds a file that is on the computer. It is only possible to add one file at a time. |
|
Delete |
Deletes files from the registry. It is only possible to delete one file at a time. |
|
Open |
Opens the selected file in the list. |
|
File name (column) |
The file name. |
|
Created |
When the file was added as a document in Opter. |
|
File name (field) |
The file name of the selected file. You can rename the file by typing the new name and clicking Save on the menu. Remember to keep the same file extension (for example “.docx”), otherwise the application to use has to be selected when the file is opened. |
|
Comment |
Free text. Information about the file. The information is only shown here. |
Account coding
In Opter, the VAT rate on the order determines the income and cost account to which a certain amount is booked. On this tab you can make exceptions to the regular account coding. The tabs you make changes to are marked with ![]() .
.
Click on ![]() to display the VAT rates held in the system. Then select the account to which amounts with the different VAT rates should be posted. More information on the individual drop-down lists can be found at The Account coding tab. The settings in this tab apply if you reach item 4 in the list in How Opter selects accounts for income and expenses. If [Default] is selected for any of the options here, the account coding is taken from the VAT rate.
to display the VAT rates held in the system. Then select the account to which amounts with the different VAT rates should be posted. More information on the individual drop-down lists can be found at The Account coding tab. The settings in this tab apply if you reach item 4 in the list in How Opter selects accounts for income and expenses. If [Default] is selected for any of the options here, the account coding is taken from the VAT rate.
For more information on how Opter selects the VAT rate on orders (column Sales) and supplier bills (column Cost), see How Opter chooses the VAT rate for customer invoices and How Opter chooses the VAT rate on credits.
Map
The address position of the customer's Visiting address (on the General tab) may need to be manually adjusted to make it more accurate. For example, if the entrance to the address is from another side of the property.
Zoom in on the address on the map and place the tick where you want the exact address position to be, or enter the exact coordinates.
In Opter classic design, you zoom in the map by scrolling. In the new design, you zoom by holding down the Ctrl key and scrolling.
Hold the mouse pointer where you want the cross on the map and click. If you want to move the tick, hover over the new position and click. Click on Save when you are satisfied.
If you only want to adjust the address position for a specific order, you can do so in the order reception, in group Sender or Receiver, by clicking on ![]() . For more information, see Map (window).
. For more information, see Map (window).
For more information, see Addresses and address positions and Adjust address positions (window).
The menu
The following options are available in the customer register menu.