Order entry settings (window)
Last updated: 20 July 2026
![]() Main menu: Settings > Order reception > Order settings
Main menu: Settings > Order reception > Order settings
![]() Order reception: Shortcuts > Order settings
Order reception: Shortcuts > Order settings
In this article
In the Order entry settings window, you can configure what is displayed in the order reception area and how it should work. For more information, see Organising the groups in Order reception and The tab order in order reception.
General
|
Function |
Description |
|---|---|
|
Edit reference |
|
|
Edit customer project |
|
Settings
These settings override the corresponding office settings (Order Settings tab).
![]() : The office setting applies.
: The office setting applies.
![]() /
/![]() : The setting in this window applies.
: The setting in this window applies.
Default values
Default settings for new orders.
Values to keep when copying orders
Settings that are transferred to the new order when orders are copied. The settings only apply when orders are copied in order reception, not when they are copied in any other way.
More settings
Times and Dates
|
Function |
Description |
|---|---|
|
Change succeeding times |
If the pickup time is changed on the order, the delivery time will change accordingly.
A service has given the order a latest pickup time of 3 pm and a latest delivery time of 4 pm. If the pickup time is changed to 3.30 pm, the delivery time will be 4.30 pm. |
Pricing
|
Function |
Description |
|---|---|
|
Validate pricing weight |
|
Data
Show/hide fields under Data in order reception.
|
Function |
Description |
|---|---|
|
Show result |
|
|
Show contribution margin |
The contribution margin is shown in per cent and is calculated as follows: Result / Income That is, the total profit of the order divided by the total revenue of the order.
|
|
Show VAT |
|
Form flow
Here the following are set:
-
Which fields and settings are to be shown. Select Visible.
Fields ending with ‘(group)’, for example Home delivery (group), show/hide all fields in that block, but the block itself remains visible. If you want to remove the block, you can do so on the tab Tab settings.
-
Which fields and settings must be filled in when a new order is created. Select Mandatory.
-
Which fields and settings are important stops. Select Major stop. You jump forwards and backwards between the important fields in order reception by pressing Enter and Shift + Enter.
-
The order in which you jump between the fields with the tab key. Drag the fields up or down in the list, or use

 to move them up or down. For more information, see The tab order in order reception.
 -
The function for displaying fields in capital letters is not currently working.
For more information, see Fields and checkboxes in Order reception and in the sections on the individual groups within the order reception department.
Field
Most fields have the same name in the order reception as in the list, but there are a few exceptions.
|
Function |
Description |
|---|---|
|
Length |
Settings for the Length weight length field in the block Dimensions. |
Tab settings
To help you work as efficiently as possible in order reception, you can choose which information to display and in what order. You can set the following:
-
Which groups are displayed.
-
Which groups are displayed on which tabs.
-
The order in which the groups appear on each tab and the order in which the tabs are arranged.
-
Which groups should be placed next to each other and which groups should occupy the full width of the window.
For more information, see Organising the groups in Order reception.
The button Make my settings the default
The button and its function are only available if you are using the new version of Opter; it is not available in the classic version. The new design is available from version 2025.12.00 onwards.
In the order reception section, each individual user can adjust the size (height/width) of the groups by dragging the group borders. (See the image below.) Opter saves group sizes by order settings, user and computer.
If you click the Make my settings the default button, the following will happen for the order setting highlighted in the list on the left:
-
The dimensions (height/width) of the groups in the order reception area that you currently have will be set as the new default for all users who have not made their own adjustments.
-
Users who have made their own size adjustments will retain them, but if they click the Reset my heights and widths button (in the order reception under Help), your current size adjustments will take precedence. (If they subsequently make their own adjustments, Opter will automatically save those adjustments for each order setting, user and computer.)
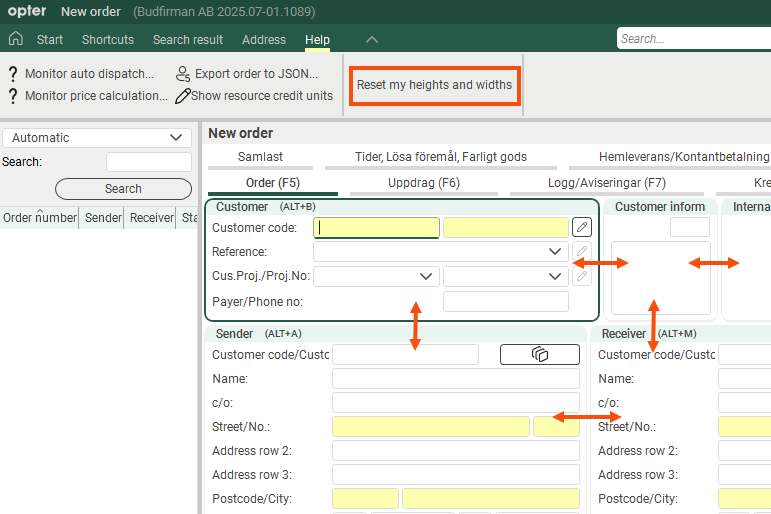
Once one of you has clicked the Make my settings the default button, you cannot remove the new default setting (for your Opter), but you can always adjust the sizes in the order reception again and then save them as the default by clicking the Make my settings the default button once more.
For more information, see Organising the groups in Order reception.
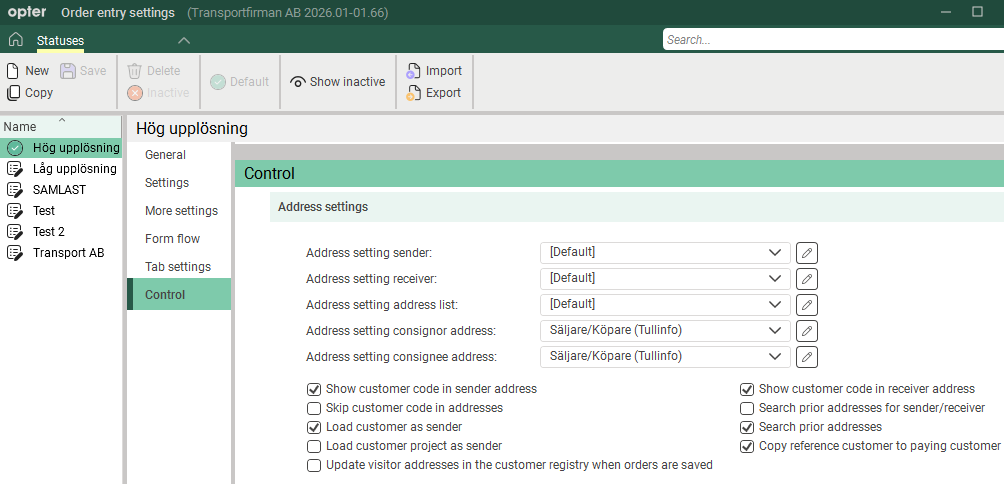
Control
Address settings
|
Function |
Description |
|---|---|
|
Address setting sender Address setting receiver |
Select the address settings for groups Sender and Receiver in the order reception. For more information, see Sender/Receiver (order reception). If you select [Default], the setting you have chosen in the office settings on the Order Settings tab will be applied Address settings (order page). If you want to change or create a new address setting, click |
|
Address setting address list |
Select the address settings for group Addresses in the order reception. If you select [Default], the setting you have chosen in the office settings on the Order Settings tab will be applied Address settings (order page). If you want to change or create a new address setting, click |
|
Address setting consignor Address setting consignee |
Select the address settings for groups Consignor and Consignee in the order reception.
These groups are used for customs information. For more information, see / (ordermottagningen) and Tullinformation. If you select [Default], the setting you have chosen in the office settings on the Order Settings tab will be applied Address settings (order page). If you want to change or create a new address setting, click |
|
Load customer project as sender |
The sender address on the order changes when the customer project changes. |
