Last updated: 10.04.2024
Organising the groups in Order reception
To help you work as efficiently as possible in order reception, you can choose which information to display and in what order. You can set the following:
-
Which sections are displayed.
-
Which sections are displayed under which tabs.
-
The order in which the sections appear on each tab and the order in which the tabs are arranged.
-
Which sections are next to each other and which sections take up the full width of the window.
It is also possible to choose which fields, drop-down lists and checkboxes are to be visible, important stops, mandatory to complete (required) and which are to be displayed in capital letters. For instructions, see Fields and checkboxes in Order reception and Order entry settings (window).

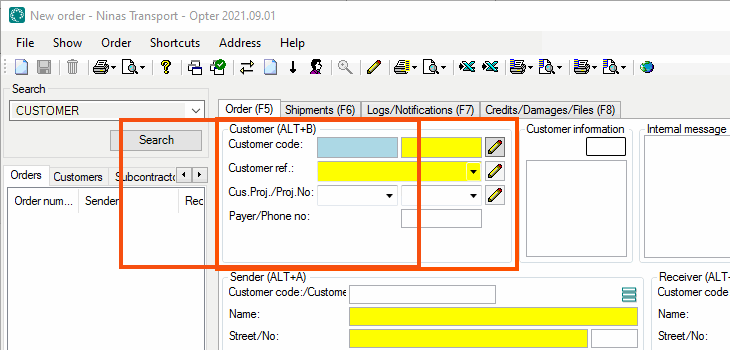
The image above shows the Customer section, which in this example is displayed on the Order tab in order reception.
It is possible to add settings or choose to use one of the default settings High resolution or Low resolution. High resolution has fewer tabs but more sections on each tab compared to Low resolution. If so desired, you can start from the default setting High resolution and then adapt it to your needs.
Adding a tab in order reception
Proceed as follows to add tabs in order reception:
-
Click on Settings > Order &reception > Order settings.
-
Click on the setting you want to change in the list on the left, for example High resolution or a setting you have created yourself. To create a new custom setting, click on
 and give the new order setting a name in the Name field.
 -
Click on the Tab settings tab. Each tab in order reception is shown here as a folder.
-
Click on Add. A new folder is created for the new tab.
-
Give the tab a name in the Name field.
-
To move the tab, drag and drop it to the desired location in the tree view.
The tab (folder) at the top of the tree view will appear on the far left, and the tab at the bottom will appear on the far right in order reception.
For instructions on how to organise the sections on the tabs, see Arranging the sections in order reception below. -
Click on Save to save all changes.
Changes made on the Tab settings tab will become visible in order reception when the setting is saved.
Arranging the sections in order reception
How to organise the sections in order reception:
-
Click on Settings > Order &reception > Order settings.
-
Click on the setting you want to change in the list on the left, for example High resolution or a setting you have created yourself. To create a new custom setting, click on
 and give the new order setting a name in the Name field.
 -
Click on the Tab settings tab. Here you can choose which sections to display in order reception, on which tabs and in what order. Each tab in order reception is shown here as a folder. If you want to add a new tab, see Adding a tab in order reception above.
-
Double-click on the tab (folder) you want to change. You will now see the numbers 1-6.
-
Drag and drop the sections you want to have in order reception from the Excluded list to the tab. Add sections under 1 if you want them at the top of the order reception window. Add sections under 6 if you want them at the bottom of the window. Place two or more sections under the same number if you want to have the sections next to each other in the order reception window.

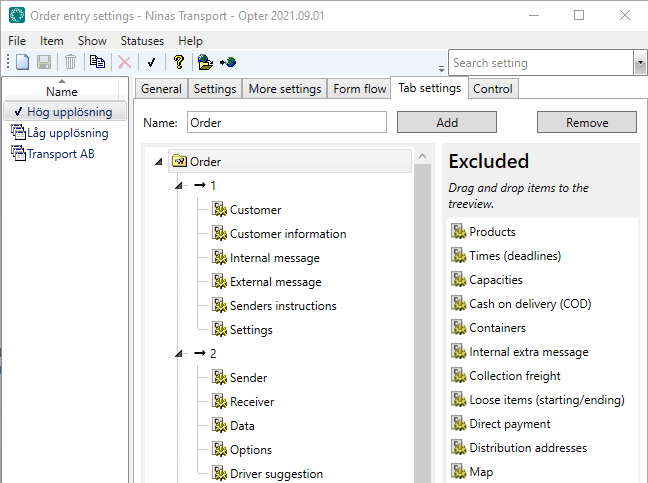
The image above shows that you have chosen to display a tab called Order in order reception, and that if you click on the Order tab the Customer section will appear in the top left corner of the window in order reception. To the right of the Customer section is the Customer information section, then the Internal message and External message sections. The Settings section is to the far right, at the top of the window. The Sender, Receiver, Data, Options and Driver suggestion sections are located below these sections.

The image above shows how the sections are arranged in order reception after the selections for the Order tab have been made as above.

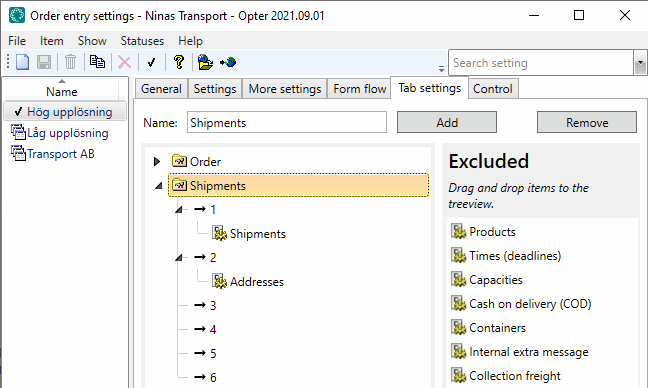
The image above shows that you have chosen to display a tab called Shipments in order reception, and if you click on the Shipments tab the Shipments section appears at the top of the window and the Addresses section at the bottom. Both the Shipments and Addresses sections fill the entire width of the window, as they are the only sections under each number.
-
Click on Save to save all changes.
Changes made on the Tab settings tab will become visible in order reception when the setting is saved.
Changing the order of tabs in order reception
-
Click on Settings > Order &reception > Order settings.
-
Click on the setting you want to change in the list on the left.
-
Click on the Tab settings tab.
-
Select the tab (folder) you want to move and drag and drop it where you want it in the tree view.
The tab (folder) at the top will be displayed on the far left, and the tab at the bottom will be displayed on the far right of order reception.
-
Click on Save to save all changes.
Changes made on the Tab settings tab will become visible in order reception when the setting is saved.
Deleting a tab or section in order reception
-
Click on Settings > Order &reception > Order settings.
-
Click on the setting you want to change in the list on the left.
-
Click on the Tab settings tab.
-
Select the tab (folder) or section you want to delete from order reception. Click on Remove.
Sections that you delete are only moved to the Excluded list on the right.
-
Click on Save to save all changes.
Changes made on the Tab settings tab will become visible in order reception when the setting is saved.