Fields and checkboxes in Order reception
Last updated: 28 July 2026
In this article
It is possible to choose which fields, drop-down lists and checkboxes are to be visible, important stops, mandatory to complete (required) and which are to be displayed in capital letters. For more information, see Order entry settings (window). You can also set certain fields to be mandatory when a particular customer is selected, see Setting which fields are mandatory for a particular customer below.
Adding a field, drop-down list or checkbox
-
If you want to make changes to groups Sender, Receiver, Consignor, Consignee or Addresses, see Address settings (window).
-
If you want to add a field, a drop-down list or a tick box:
 Proceed as follows
-
Click on Settings > Order reception > Order settings.
-
Select the configuration to be changed from the list on the left. Click on the Form flow tab.
To make it easier to work with the settings, you can pin the Form flow tab by clicking
 (1).
(1).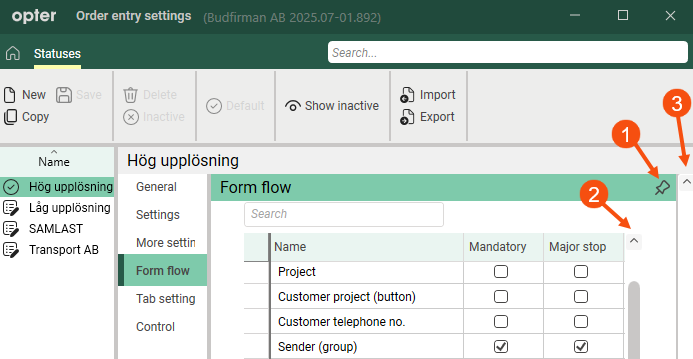
Once you have pinned the tab Form flow, the list’s scroll bar (2) is still visible, but the window’s scroll bar (3) is no longer visible. For more information, see New design.
-
Search for the field (for example, Distance) and tick the box in the column Visible.
-
Check the checkbox in the Mandatory column if the field is mandatory to fill in.
-
Check the checkbox in the Major stop column to allow users to go to the field by pressing Enter.
For more information on settings for shifting between fields in order reception, see The tab order in order reception.
-
-
Select the checkbox in the Upper case column if the name of the field should be shown in capital letters.
-
Click on Save to save all changes.
The field Distance appears in the Dimensions group in the order reception.
-
-
If you want to add an extra field, such as the Extra dimension1 field in the Dimensions group in the order reception:
Proceed as follows
-
Click on Settings > Offices > and on the Terminology tab.
-
Give the Extra dimension1 field a name.
-
Click on Save to save all changes.
-
Click on Settings > Order reception > Order settings.
-
Select the configuration to be changed from the list on the left. Click on the Form flow tab.
-
Search for Extra dimension1 and select the checkbox in the Visible column.
-
Check the checkbox in the Mandatory column if the field is mandatory to fill in.
-
Check the checkbox in the Major stop column to allow users to go to the field by pressing Enter.
For more information on settings for shifting between fields in order reception, see The tab order in order reception.
-
-
Select the checkbox in the Upper case column if the name of the field should be shown in capital letters.
-
Click on Save to save all changes.
The field Extra dimension1 appears in the Dimensions group in the order reception.
-
Setting which fields are mandatory for a particular customer
Under Register > Customers, on the Order Settings tab in the Mandatory fields in order reception box, it is possible to see which fields can be set as mandatory to complete for a particular customer, for example Reference, Freight bill number and Extra ID 1.
Here’s how to add the Extra ID 1 field to the Data group in the order reception screen and make it mandatory to fill in when a specific customer is selected in the order reception screen:
-
Click on Settings > Offices > and on the Terminology tab.
-
Give the ExtraID1(order) field a name, for example “Invoice reference”.
-
Click on Save to save all changes.
-
Click on Settings > Order reception > Order settings. Click on the configuration to change in the list on the left, for example High resolution.
-
Click on the Form flow tab and search for Extra ID1.
-
Select the Visible checkbox on the Extra ID1 row. (If you also tick the box Mandatory for row Extra ID1 here, the field Extra ID 1 in group Data in the order reception will become mandatory for all customers).
-
Click on Save to save all changes.
-
Click on Register > Customers. In the list on the left, select the customer for whom the Extra ID 1 field should be mandatory.
-
Click on the Order Settings tab in the Mandatory fields in order reception box and select the Extra ID 1 checkbox.
-
Click on Save to save all changes.
-
To set the Extra ID 1 field to be mandatory to complete for more customers, repeat steps 8-10 above for each customer to which this setting should apply.
(To make the field mandatory for all customers, select the checkbox in the Mandatory column for Extra ID1 on the Form flow tab under Settings > Order reception > Order settings) instead.
The Extra ID 1 field now appears in the Data group in the order reception and is mandatory for those customers for whom you have set it as mandatory.
Deleting a field, drop-down list or checkbox
To delete a field, drop-down list or checkbox from order reception, proceed as follows:
-
Click on Settings > Order reception > Order settings.
-
Click on the setting to be changed in the list on the left. Click on the Form flow tab.
-
Search for the field, drop-down list or checkbox to be deleted, for example by typing its name in the search box.
-
Deselect the checkbox in the Visible column.
-
Click on Save to save all changes.
Notification of hidden fields in order reception
This feature is only available if you are using the new Opter design; it is not available in the classic design. The new design is available from version 2025.12.00 onwards.
If there are fields that are not displayed in a group in the order reception, Opter indicates this by displaying three small dots in the frame.
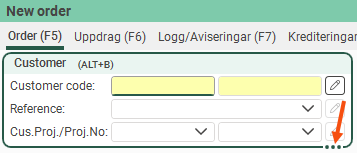
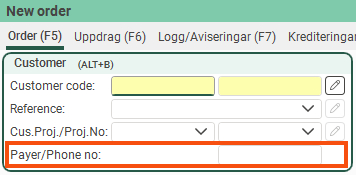
If you want to see all the fields, drag the frame. The bullet points disappear when all fields are displayed.
For more information, see Organising the groups in Order reception.