Importing customers from Excel
Last updated: 19 May 2026
In this article
To import customers from Excel to the customer registry in Opter, the Excel file that is to be imported has to be in a specific format. The minimum requirement is that it is a tab-separated TXT file with column headings on the first line, and that the file contains a column with a customer code. The column headings in the file are mapped to the fields in the customer registry in Opter. If the column headings do not match the names of the fields in Opter, you can map them manually during the import.
There are three different ways of importing customers:
-
Export existing customers from Opter and add new customers to the exported Excel file, which is then reimported.
-
If you already have a customer registry in an Excel file from a different system, which you want to import into Opter, but do not want to map all the fields manually, you can do an export of an existing customer registry in Opter and change the name of the columns in the Excel file that you want to import, so that they have the same names as the columns in the file exported from Opter.
-
Map the columns in an existing Excel file manually during import. The Excel file can be created manually or exported from a different system.
Step 1: Create an Excel file for import to Opter
If you already have at least one customer in the customer registry in Opter, you can export it and either edit the Excel file directly or use it as a template for a different Excel file that you want to import.
If you have created an Excel file manually, or exported it from another system, and wish to map the columns in it manually, go to Step 2: Import the Excel file to Opter below.
How to export the customer registry from Opter and create an import file:
-
Click on Register > Customers.
-
Click Export to Excel in the menu and then Ok to save the file.
-
Open the Excel file and add the customers that you want to import into Opter, one on each line.
If you already have an Excel file with customers, you can rename the columns so that they have the same names as in the export file from Opter.
To import the customers, the Customer code column in the Excel file must be filled in. Customers without a customer code are not imported into Opter.
-
Delete row 1, with the heading Customers, so that the file looks like this:

-
Click File > Save As > Browse in Excel.
-
Click File format and select Unicode text (*.txt).

-
Save the file.
Step 2: Import the Excel file to Opter
If you have created an Excel file manually that you wish to import, or have exported a file from another system, you must first save it as Unicode text (see points 5–7 in step 1 above). Then import the file as follows:
-
Click on Register > Customers.
-
Click on Import in the menu.
-
Browse to the TXT file you have prepared and click on Open. A preview of the import opens in Opter.
-
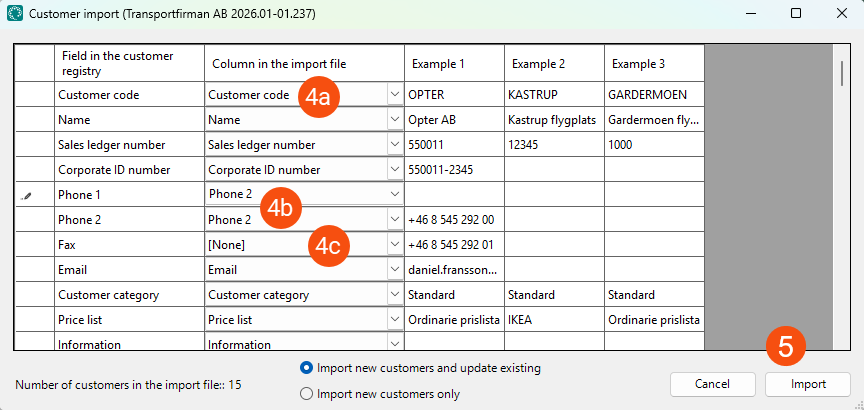
Check that the information displayed in the three sample columns is what is to be imported into the fields in the Field in the customer registry column. If any of the fields are not correct, you can select the correct column in Column in the import file.
-
The field Customer code must be mapped to a column in the import file, otherwise no customers will be imported.
-
The same Excel column can be mapped to multiple fields in Opter. The same information is then imported into all those fields. In the example below, the telephone number in column Phone 2 of the Excel file is imported into both Phone 1 and Phone 2 in the customer register.
-
If [None] is selected for an Excel column, no information is imported into that field in Opter. In this example, the fax number is not imported into the customer database.
-
-
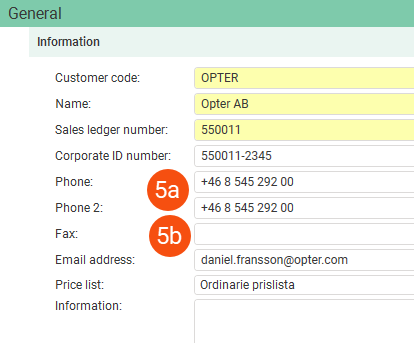
Click on Import in the bottom right-hand corner. When the import has finished, a message with the result of the import and any errors is displayed. In our example, the telephone number has been imported into two fields (5a) and the fax number has not been imported (5b).
The import function can also be used to update existing customers, for example if you have to make the same change to several different customers. In Excel, you can do it at the same time for all customers instead of having to open them one by one in the customer registry. Export the customers from Opter, make the edits in Excel and import the customers again with the Import new customers and update existing option selected in the Customer import window.