Check lists
Last updated: 19 November 2025
In this article
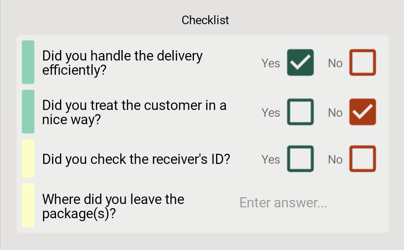
You can create checklists for the driver to fill in at the time of pick-up or delivery. It is possible to select different checklists both in the Order reception and on the web portals, but it is only possible to have one checklist per order.
If you want checklists, checklist questions and the answers to the questions to be sent to other systems, please contact the EDI team at . For information about the cost of EDI work, see your agreement with Opter.
Information for drivers on how to manage checklists in Opter Driver is available at Pods (POD) in Opter Driver.
Create checklists
The checklists consist of a number of checklist questions. The checklist questions can be used in several different checklists. So, to put together a checklist, we start by creating the questions to be included in it, and then we select them in the checklist itself.
Here's how to create the questions you can use in the checklists.
-
Click on Settings > Checklist questions.
-
Click on New and give the question a name. Then enter the question itself in the field Question. If it is a yes/no question, tick Yes/No answer. The driver is then given only two choices in the app. If it is an open question, the driver must enter the answer.
Use the same text as the name and question to make it easier to see the exact question when you select questions for the checklist later.
-
Select at which points in the life cycle the question should appear in the app. It is only possible to have one checklist per order. If you want to display a checklist of questions at pick-up, for example "Have you notified reception?", and another checklist of other questions at delivery, for example "Have you switched on the washing machine?", put all questions in the same checklist and set at question level which ones to display at pick-up, and which ones to display at delivery.
For more information about the settings, see Checklist question (window).
Then go ahead and create the checklist itself.
-
Click on Settings > Checklist.
-
Click on New and give the checklist a name.
-
In the table, select the questions to be included in the checklist and in which order. Click on an empty row in the column Query and select the question from the drop-down list. The other columns show the settings for the question. If you want to change a question, click on
 and the window Checklist question will open.
For more information about the settings, see Checklist (window).
Notifications of completed checklists
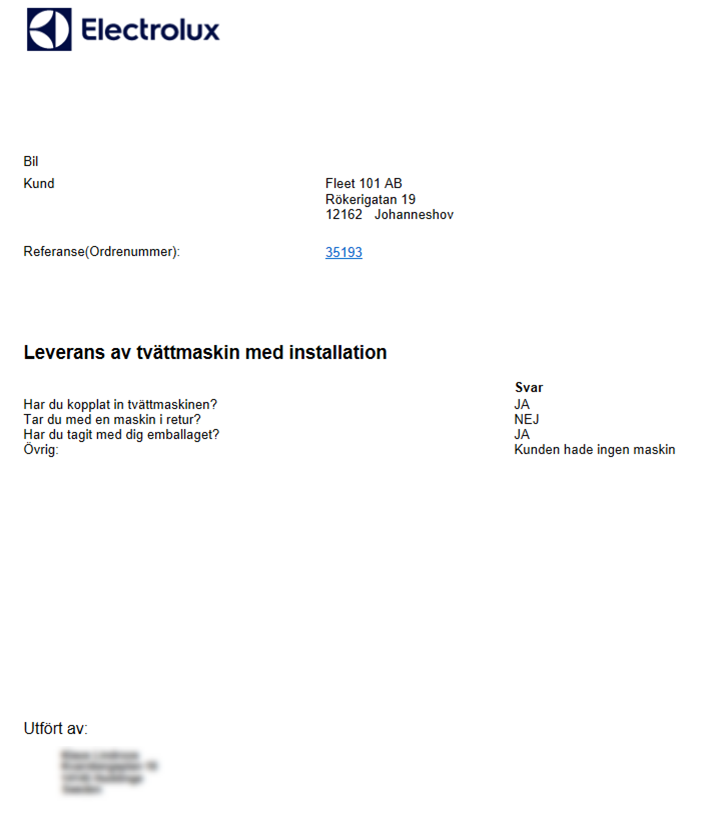
If you want to send a notification to a signaller or another specific address when the checklist has been completed, enter the email address in the Send notification to field. Multiple addresses are separated by a semicolon (;), comma (,) or space. You must have selected a report in the Email to operator on complete checklist field on the Reports tab in the office settings, otherwise the email will read "QuerySet Complete (report missing)". The Freight bill and parcel labels are sent as attachments to the email. You can select the report, but it is not possible to deactivate the attachments.
You don't have to attach the Freight bill or the parcel labels even if the fields are Freight bill design and Package label design. For example, you can create a report containing the checklist itself and the driver's answers if you want it as a PDF, although the standard report for the email itself already contains the questions and answers.
The customer can also receive a notification when the checklist has been completed. Select the method in Notify customer when complete and a notification will be created on the order. You must select a notification recipient (1), or enter an email address/telephone number (2), on the notification in Order reception. Otherwise it won't go away. For more information, see Notifications (order reception).

Remove checklists
It is only possible to delete checklists that are not used on any order. If you try to delete a checklist that is in use, a message will appear stating that the checklist is in use and therefore cannot be deleted.
Set up a standard checklist for a customer
A default checklist can be set up for each customer. The default checklist is then automatically used on orders for that customer. Proceed as follows:
-
Click on Register > Customers > Default values.
-
Search for the customer for whom to set up a default checklist.
-
Select a checklist from the Check list drop-down list.
-
Click on Save to save all changes.
The default checklist is automatically activated when you select the customer on a new order in Order reception and on the web portals, but you can remove it from the order or switch to another checklist.
If there is a checklist on an order, the driver is required to fill it in Opter Driver. The checklist is displayed in Opter Driver when the driver finishes the scan during loading and/or unloading.
Checklists in Order reception
To manage checklists in Order reception, you need to view the group Check lists. For more information, see Organising the groups in Order reception.
Adding, removing or changing a checklist
It is possible to add to or edit a checklist on an order in order reception. Even if a default checklist has been set up for customer, an exception can be made and a different checklist can be used on an individual order. Proceed as follows:
-
Open the order in order reception.
-
Click on the tab where the Check lists group is located and select the desired checklist from the drop-down menu Check list. If you want to remove the checklist from the order entirely, select [None].
-
Click on Save to save all changes.
The driver is required to fill in the checklist in Opter Driver upon pickup and/or delivery. The checklist is displayed in Opter Driver when the driver finishes the scan during loading and/or unloading.
Checklists on the web portals
The checklists can be viewed in the order form and in the list on the main page and the search page.
Order form
In order for the user to see if there is a checklist on an order, and to add, delete or change the checklist, you need to display the group Checklist selection. Proceed as follows:
-
Click on Settings > Internet > Internet order settings.
-
Select a portal in the list on the left and go to the tab Fields on the order page.
-
Search for Checklists in the list Excluded and double-click to move to the list Included.
-
Go to the General tab and select Enable checklists on web order under Settings for new orders.
-
Even if you have set up a default checklist for a customer, the customer themselves (or the resources) can switch to a different checklist, or remove the checklist completely, on individual orders.
-
All checklists are displayed in the drop-down menu on the portal. For example, if you have customer-specific checklists, all customers can see the names of the other checklists on the customer web, but the questions themselves are not visible.
-
If a checklist is selected on the order, the driver must fill it in.
Main page and search page
The name of the checklist is displayed in the column Check list and under Information in the preview of the order.
-
Click on Settings > Internet > Internet order settings.
-
Select a portal in the list on the left and go to the tab Columns in the lists and fields in the detail view.
-
Search for Check list under Excluded and double-click to move to Included.
-
Click on Save to save all changes.
Checklists in Opter Driver
To view the checklists in Opter Driver, you need to set the Mobile data settings QueryPermission to "true". The checklist is displayed when the status is switched to Picked up/Delivered, both manually and when scanning, and is mandatory to fill in. If the driver registers a POD that changes status, the checklist is displayed at the same time.
For more information on how to add Mobile data settings, see Mobile data settings (window).
Users who are logged in to the app when the changes are saved in Opter must log out and then log back in to the app to see the changes.