Internet order settings (window)
Last updated: 24 June 2026
![]() Settings > Internet > Internet order settings
Settings > Internet > Internet order settings
In this article
The appearance of the customer web, the resource webs and Track & Trace, as well as the menu options and functions which should be enabled on the various webs, can be managed in the Internet order settings window. When Opter is installed, there is a configuration both for the customer web and for each of the different resource webs. More configurations can be created and used for different customers and resources.
“Resource webs” refers to the supplier web, subcontractor web, driver web, vehicle web and terminal web.
General
|
Function |
Description |
|---|---|
|
Name |
Used for identification. The name is shown in the list on the left when a new configuration is saved. |
|
Description |
Free text field for internal notes. The description is not displayed anywhere else but here. |
|
Email address on creation |
When a new order has been created on the web, an email is sent from the office email address to all the email addresses entered here. (The office email address can be found in the Email field on the General tab of the office settings). If more than one email address is entered, then separate the email addresses with semicolons. |
|
Notification to entire office on creation |
|
|
Style sheet |
CSS file used to format the web portal. For more information, see Customising the appearance of the customer web. [Default]: The setting on the Internet tab in the office settings is used. |
|
Ordering message |
To ensure that the person who placed an order receives a message on the web, such as “Thank you for your order” or “Your order has been received”. |
|
Max. number of orders/shipments displayed on the main page and the search page |
The maximum number of orders (on the customer web) or shipments (on the resource webs) that a search on the search page should be able to return. The higher the value, the more the performance of the system is affected.
To work with more than 10,000 orders, split the search into different date ranges, for example by year. |
Settings
|
Function |
Description |
|---|---|
|
Show invoice payment status |
|
|
Show price including tax |
|
|
Show price including fuel extra |
|
|
Show price including currency extra |
|
|
Show estimated CO2 emissions |
For more information, see Show CO2 emissions for customers and resources.
|
|
Show calculated CO2 emissions |
For more information, see Show CO2 emissions for customers and resources.
|
|
Show attachments |
|
|
Show freight bill |
|
|
Show package labels |
|
|
Activate download for reports |
If the web is run in an IFRAME, problems may be encountered when downloading reports such as freight bills, package labels and invoices. Select this checkbox to avoid the problem.
|
|
Show notifications |
Clicking on Save on the order page will open a preview, showing (among other things) the notifications that have been created. Once the order has been created, the notifications that have been created can be viewed and edited by clicking on Edit in the detail view. For more information, see Notifications when ordering on the customer web.
|
|
The total price, VAT, pricing weight and distance of the order are displayed at the top of the order page on the web portals.
You can hide prices for individual customers (see Reference (window)) and supplier references (see Supplier reference (window)).
|
|
|
Show price rows |
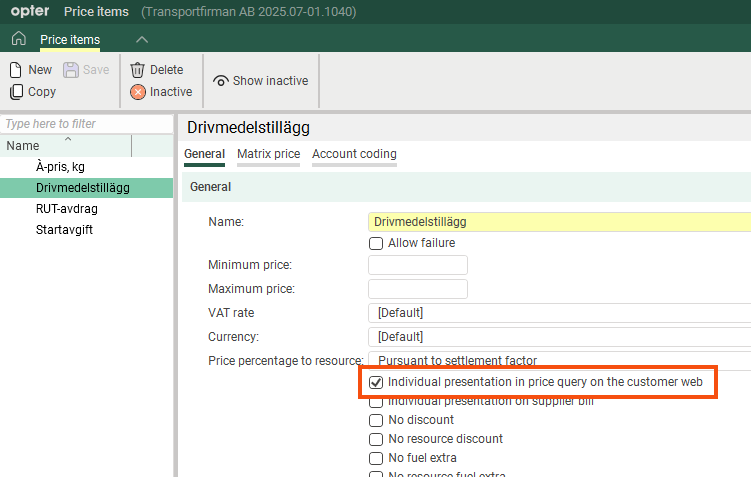
Only valid if Show prices above is selected. The user can get more information on how the price was calculated by clicking on it. Individual presentation in price query on the customer web must be marked in the Price item register on the items to be displayed on the web portals. If not all Price items are shown, the sum of the items will not match the total price of the order.
|
|
Show shipment addresses |
Shows/hides Shipment addresses in the detail view. Any route, arrival time and information is displayed at the addresses. |
|
Show times |
No longer used and will be removed. |
|
Do not show anything on the main page |
|
|
Show package dimensions in centimetres |
|
|
Show tracking log from Track & Trace in the detail view (only customer web) |
Only applies to the customer web.
|
|
Show follow order |
|
|
Generate customer number (create customer) |
|
|
Copy number to code (create customer) |
|
|
Use order templates |
For more information, see The order form on the customer web. and in similar articles for all the resource webs, such as The order form on the supplier web. |


Enable changes for order that are
You can define whether or not orders booked on the web can be modified on the web as well. With this, it is possible to prevent orders that have reached a certain status from being changed so that the conditions for a shipment are not changed if, for example, it has already been assigned. The orders that can be modified are set using five checkboxes. For more information and examples, see Changes to orders registered on the customer web.
Settings for new orders
In this box, default settings can be made for new orders created on the web order page.
|
Function |
Description |
|---|---|
|
Convert to capital letter |
|
|
Create package rows automatically |
|
|
New orders are created with a new package row |
|
|
The setting must be combined with making at least one field under Price items mandatory to fill in. You can do this on the tab Fields on the order page. If you do not make any field mandatory, it is possible to save the order without Price item even if this checkbox is ticked.
|
|
|
Generate freight bill number |
|
|
Generate package id |
|
|
Show terminal addresses |
|
|
Show resource |
|
|
Show secondary resource |
|
|
Customer as sender on creation |
|
|
Show route suggestions |
|
|
Open freight bill window automatically |
|
|
Open package label window automatically |
|
|
Manual order date |
|
|
Send confirmation on order create |
For more information, see the Approve Internet order (email) message in Messages (window). To change the text, click on the report (template) in the Reports window and then click on Display Editor. For more information, see Reports (window).
|
|
Skip order preview |
|
|
Edit customer projects |
You also need to click on the Fields on the order page tab and add Customer project to the Included list, then the Customer project field will appear in the Info section on the order page of the web.
|
|
Allow registration of orders before todays date |
|
|
Use earliest pickup date as the order date |
|
|
Lock dates from service (past dates) |
If the order date comes from the service, you can choose whether or not the ordering party should be able to change the order date to a date in the past, as follows:
The Allow registration of orders before todays date checkbox must be selected, see above. |
|
Enable checklists on web order |
Shows/hides the Checklist selection group in the order form, where the user can select a checklist for the order. The checklist must be completed by the driver in connection with the POD. For the group to appear, you must also include Checklists on the Fields on the order page tab. For more information, see Check lists. |
|
Enable add attachments on internet orders |
|
|
Disable editing on package types |
|
|
Prevent internet orders without prices from being saved |
|
|
Validate internet orders in order reception |
|
Menu alternatives and functions
Use this tab to specify which menu options and features should be available to users of the web portals. The options under The customer web apply to the customer web and the options under The resource webs apply to the supplier web, subcontractor web, driver web, vehicle web and terminal web.
The customer web
These settings can be overridden for individual ordering parties in the Reference window, see Reference (window).
|
Function |
Description |
|---|---|
|
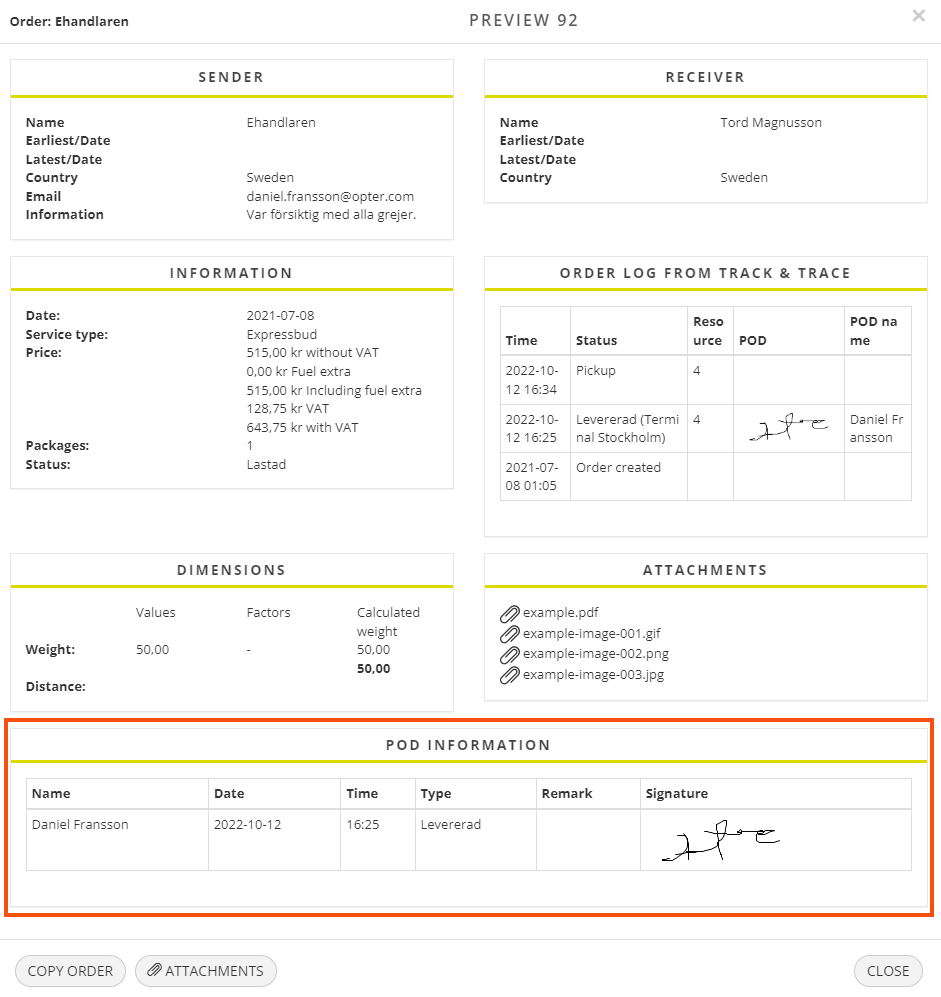
Search for POD |
In addition, the POD Information section is displayed in the detail view if the order has a proof of delivery.
|
|
Search for orders |
|
|
Create orders |
|
|
Change orders |
Under Enable changes for order that are on the General tab, it is possible to define that only orders with a certain status can be modified. For more information, see Changes to orders registered on the customer web.
|
|
Show incoming/outgoing orders (other customer pays) |
|
|
Create multi-orders |
|
|
Shows/hides the Price option in the customer portal menu. The users can calculate total price, VAT, pricing weight and distance for an order without starting an ordering process. If the price is acceptable and the Reference wishes to place the order, the details of the price calculation are included in the order form. |
|
|
Add and amend addresses |
|
|
Show invoices |
|
|
Show vehicle on map |
|
|
Change default settings for new orders |
|
|
Add, delete and edit internet users |
The above only applies if the Add, delete and edit other internet users checkbox is selected for the logged-in customer reference. The checkbox is located in the Reference window on the Internet tab. For more information, see User accounts for the customer web. If the user clicks on Users in the menu, a list of all the customer's user accounts is displayed, where users can define access rights and account information for other users.
|
The resource webs
|
Function |
Description |
|---|---|
|
Show shipments that have not yet been approved in dispatch |
Show/hide shipments that have not yet been approved in dispatch. Shipments that are not approved are displayed in a separate list at the top of the main page (Internet orders waiting to be accepted). |
|
Show shipments delivered before current date |
Show/hide shipments with status Delivered earlier than today's date, based on the status of the shipment or order:
Example: If an order is split into several shipments, the shipments will be displayed on the resource webs until all included shipments have the status Delivered. This can be confusing for a haulier who may only have one of the shipments on the order and has already delivered it.
|
|
Show all a supplier’s shipments (not just the logged in resource’s shipments) |
All shipments assigned to the same supplier are displayed in the lists, not just the shipments assigned to the resource that is logged in. All the supplier’s shipments are also displayed on the driver and vehicle web. |
|
Show detail view |
|
|
Show customer information |
|
|
Change status |
|
|
Assign shipments (subcontractor, terminal and supplier webs) |
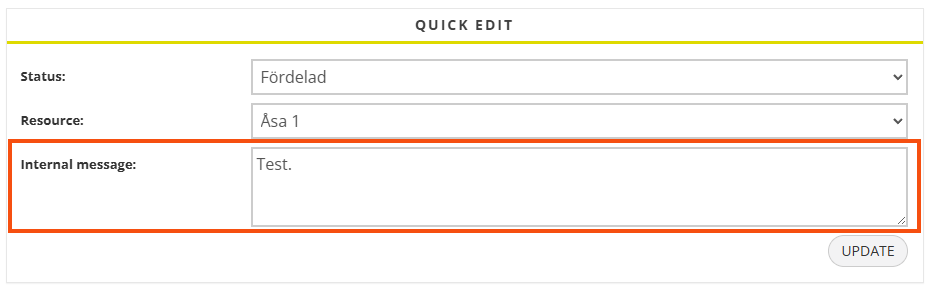
Applies to the subcontractor, terminal and supplier webs. The Quick edit section is displayed in the detail view when a shipment is opened on the main page. In it the user can assign the shipment to another resource. If the supplier should to be required to enter a resource when creating the order, make the Resource field in the order form mandatory. This means that you do not have to allocate the shipment to the driver in the dispatch. For more information, see Activating the assignment of shipments on the supplier web. |
|
The user can edit and add internal messages to the order. Only applies to the supplier web and the subcontractor web.
|
|
|
Show tracking log from Track & Trace in the detail view |
Allow a resource to view log information for shipments. The resource sees the same log as the one displayed on Track & Trace. |
|
Show statistics (not supplier web) |
Does not apply to the supplier web. Shows/hides the Statistics menu option. The user can see a summary of completed shipments there. |
|
Register proof of delivery (POD) |
Allow a resource to look up orders with a proof of delivery (POD) and change proofs of delivery. |
|
Search for shipments |
Shows/hides the Search shipments menu option. |
|
Show shipments that are not to be credited on the search page |
Also include shipments that should not be credited in the search results on the search page. Shipments not to be credited are always displayed on the main page and in the statistics. This setting only applies to the search page. |
|
Check boxes to mark shipments as checked on the main page |
Shows/hides checkboxes on the far left of each shipment in the lists on the main page. For example, the checkboxes can be used to indicate that the shipment has been changed or checked. |
|
Create orders |
Users can create new orders. It can be set so that orders created on the web have to be approved in order reception before they are ready for dispatch. Select Validate internet orders in order reception on the General tab. |
|
Change orders |
Users can change orders. Create orders (see above) must be selected so that orders can be changed. On the General tab, in the Enable changes for order that are box, it is possible to define that only orders with a certain status can be changed. For more information, see : |
|
Add new customers |
Users can add new customers. |
|
Change existing customers |
Users can change the information about existing customers. |
|
Assign shipments automatically to the resource that creates the order (not the terminal and supplier webs) |
Only applies to the subcontractor, vehicle and driver webs. The shipment created is automatically assigned to the resource creating the order. |
|
Logged in resource is added to price items on new orders (only vehicle, driver and subcontractor webs) |
Applies to the vehicle, driver and subcontractor webs. The logged-in resource is placed on the price item rows when a new order is created. Only applies when new orders with price items are created, not if a price item is added to an existing order. |
|
Show vehicle on the map (only supplier web) |
Only applies to the supplier web. The map with the position of the vehicles is displayed on the supplier web. |
|
Show summary for vehicle (only supplier web) |
Only applies to the supplier web. The menu Vehicles is displayed where the user can get an overview of the shipments that have been allocated to the vehicles assigned to the driver. For more information, see Setting which shipments are displayed on the supplier web. |
|
Show summary for driver (only supplier web) |
Only applies to the supplier web. Select the checkbox to allow the resource that is logged in to the supplier web to view driver statistics. Shipments that have been assigned to drivers linked to the supplier are displayed. For more information, see Setting which shipments are displayed on the supplier web. |
|
Show supplier bills (only supplier and subcontractor webs) |
Show/hide Supplier bills in the menu of the supplier web/subcontractor web. Only supplier bills in closed supplier bill periods are displayed. |
Columns in the lists and fields in the detail view
Which columns should appear in the lists on the main page and in the search results on the search pages can be defined on this tab.
Put the columns you want to display in the list Included. Double-click on a column to move it between the lists. You can move several columns at once by Ctrl-clicking or Shift-clicking them and then pressing Enter.
In the text fields above the lists, it is possible to search for the name of a column.
You decide the order of the columns by dragging and dropping them up and down the list.

|
Column |
Description |
|---|---|
|
Never scanned |
Number of packages on the order that have never been scanned. |
|
Arrival scan |
The column shows whether the order has undergone arrival scanning at the current terminal. In other words, if at least one of the packages in the order has been scanned on arrival. The column shows one of the following values:
The Arrival scan column is only relevant to the terminal web. |
|
Price item name |
Price item name on the order. The column shows the name of the price item. |
|
Supplier bills |
The column shows the supplier bill number, if there are any supplier bills on the shipment or order. This column is not shown on the customer web, even if it is in the Included list, but it it shown on the resource webs. |
|
Sender |
The shipment’s sender. It is more relevant to display this column on the terminal web, for example, than on the customer web. |
|
Sender (order) |
The order’s sender. The name of the column is shown as Sender, not Sender (order), on the webs. |
|
Sender reference |
The order’s sender reference. |
|
Distance |
The order’s driving distance in kilometres. |
|
Checklist |
If there is a checklist on the order, its name is displayed here. For more information, see Check lists. |
|
CO2 emissions, calculated (g) |
The calculated CO2 emissions for the order, in grams.For more information, see CO2 emissions, overview. |
|
CO2 emissions, estimated (g) |
The estimated CO2 emissions for the order, in grams.For more information, see CO2 emissions, overview. |
|
Direct expense |
Direct expenses are expenses that are not to be included in the turnover. Direct expenses are always inclusive of VAT. Not displayed on the terminal web. |
|
Dimensions |
Displays the Weight column in the lists on the main page and in the search results. In the detail view, the Dimensions section is displayed if there is a value for any dimension on the order, and is not displayed if there is no value. So this setting does not control the Dimensions section in the detail view. |
|
ETA |
Estimated order delivery time. |
|
ETP |
Estimated order pickup time. |
|
External message |
If the order has an external message, it is displayed here. |
|
Invoice number |
The order’s invoice number. |
|
Invoice status |
The invoice status of the order, for example Invoiced, To be invoiced, Only crediting or NOT to be invoiced. |
|
Wrong location |
Number of packages on the order that are misplaced. |
|
Categories for attachments |
Shows the type(s) of attachment(s) that the order may have, for example Image, Deviation, Freight bill or Customs document. |
|
Consolidation number Consolidation number (sub-order) |
These two columns allow you to see which sub-orders belong to which consolidation orders. Consolidation number shows the number of the consolidation order. Consolidation number (sub-order) shows the Order numbers included in the consolidation order. |
|
Load metre |
The estimated number of load metres in the order. |
|
Vehicle type |
The type of vehicle used for the shipment. |
|
Freight bill |
The order’s freight bill number. |
|
Freight bill printed |
This column shows whether the freight bill has been printed or not.
|
|
From terminal |
The column shows which terminal the shipment starts at. This column can be displayed on the customer web, but it does not contain any information because it is not relevant to the customer web. |
|
Picked up (actual time) Delivered (actual time) |
Shows the date and time when the status of the order was changed to Picked up and Delivered, i.e. when the goods were actually collected from the sender and delivered to the recipient. The columns on the web portals are Pickup time (actual) and Delivery time (actual). |
|
Receiver |
The shipment’s receiver. It is more relevant to display this column on the terminal web, for example, than on the customer web. |
|
Receiver (order) |
The order’s receiver. The name of the column is shown as Receiver, not Receiver (order), on the webs. |
|
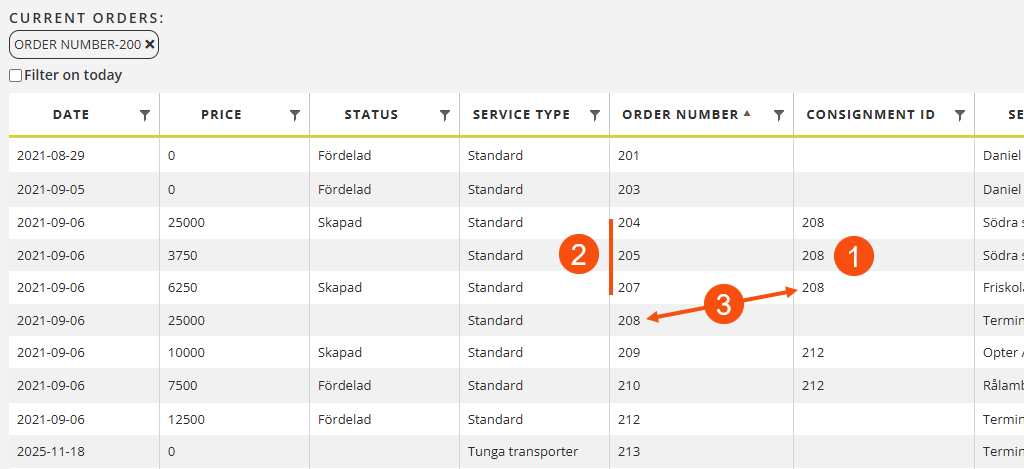
Consignment ID |
The order number for the consignment (1). Can be used in conjunction with column Order number to see which orders have been consigned (2). The consolidated consignment order itself is also displayed as a standard order on a separate line, showing the price and other details (3). Only consignment orders to be invoiced to the logged-in customer are displayed on the customer portal. If the consignment order is not to be invoiced, or if it is to be invoiced to a different customer, it will not be displayed.
|
|
Options |
Options on the order, such as ‘cooling’ or ‘heating’. |
|
To terminal |
The column shows which terminal the shipment ends at. This column can be displayed on the customer web, but it does not contain any information because it is not relevant to the customer web. |
Fields on the order page
On this tab, you specify the fields to be displayed in the order form. The fields are displayed alphabetically in the list, but in a different sequence in the order form. It is not possible to change their order.
The Excluded list contains the fields that can be displayed in the window. The Included list contains the fields that are currently displayed. Double-click the fields to be displayed in the list on the left, and they will be added to the Included list. To delete columns, double-click on them in the list on the right and they will be moved to Excluded.
In the text fields above the lists, it is possible to search for the names of the fields.
Below the table is a tick box Mandatory. This allows you to make the fields mandatory when the user places an order. Mandatory fields are highlighted in yellow both in this list and on the web portals. If the reference does not fill in a field marked in yellow, the order cannot be saved.
The fields in the table
|
The internet order settings |
The order form |
|---|---|
|
Unit price (price item) |
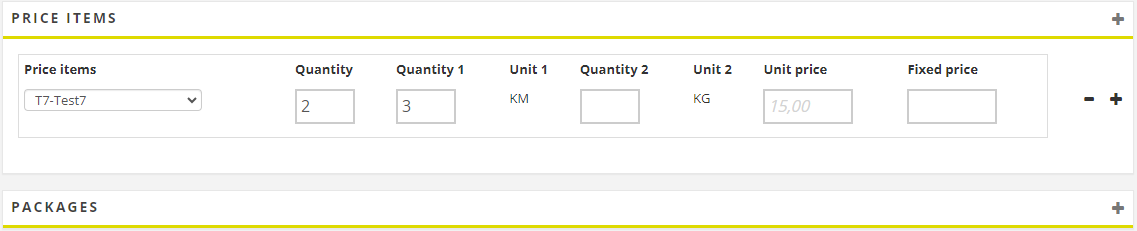
Unit price under Price items. Retrieves the price of the price item from the price list, if the price is a unit price. The user can overwrite the price from the price list with a manual price. If this field is included, Quantity (price item), Quantity unit 1 (price items), Quantity unit 2 (price items), Unit 1 (price items) and Unit 2 (price items) should also be included, as they work together. The unit price is multiplied by the number of units. That sum is in turn multiplied by the quantity of the price item (Quantity). The total price of the price item in the example below is 3 × 15 × 2 = 90. Price items must be included; otherwise, this field will not be displayed as it is located within that section.
|
|
Quantity (price item) |
Quantity under Price items. The number (quantity) of a price item on the order. The number is multiplied by the price of the price item and gives a total price for the price item. If this field is included, Fixed price (price item) or Quantity unit 1 (price items), Quantity unit 2 (price items), Unit 1 (price items) and Unit 2 (price items) should also be included, as they work together. The unit price is multiplied by the number of units. That sum is in turn multiplied by the quantity of the price item. If you use a fixed price, it is multiplied by the quantity of the price item. In that case, it does not matter if the user enters something in the Quantity 1 and Quantity 2 fields, as they are related to Unit price. Price items must be included; otherwise, this field will not be displayed as it is located within that section. |
|
Quantity unit 1 (price items) Quantity unit 2 (price items) |
Quantity 1 and Quantity 2 under Price items. Works in conjunction with Unit price (price item). The unit price is multiplied by the number of units. That sum is in turn multiplied by the quantity of the price item (Quantity). Price items must be included; otherwise, this field will not be displayed as it is located within that section. |
|
Price items |
Show/hide the group Price items. The fields you can display under Price items are listed as “xxxxxx (price item)”. It is not possible to make the entire section compulsory, but you can set it so that there must be at least one item line on the order by selecting Order requires price item on the General tab (under Settings for new orders). See above.
|
|
Checklists |
Shows/hides the Checklist selection group, where the user can select a checklist for the order. The checklist must be completed by the driver at the time of the POD. For the group to be displayed, you must also tick Enable checklists on web order on the tab General. |
|
Unit 1 (price items) Unit 2 (price items) |
The unit of measurement for the price item (for example, ‘KG’ and ‘KM’) under Price items. Retrieved from the price item and cannot be changed on the web portals. What becomes unit 1 and unit 2 is determined by the order in which the price units were added to the price item in the price item registry. Price items must be included; otherwise, this field will not be displayed as it is located within that section. |
|
Extra ID1 (price items)–ExtraID5 (price item) |
Extra ID 1–Extra ID 5 under Price items. A free-text field that can be used to add additional information about the price item. The text is visible in the order reception area. Price items must be included; otherwise, this field will not be displayed as it is located within that section. |
|
Extra message |
Shows/hides block Extra message, which is a free-text field. Any information entered into the web portal is displayed in Internal extra message in the order reception system. |
|
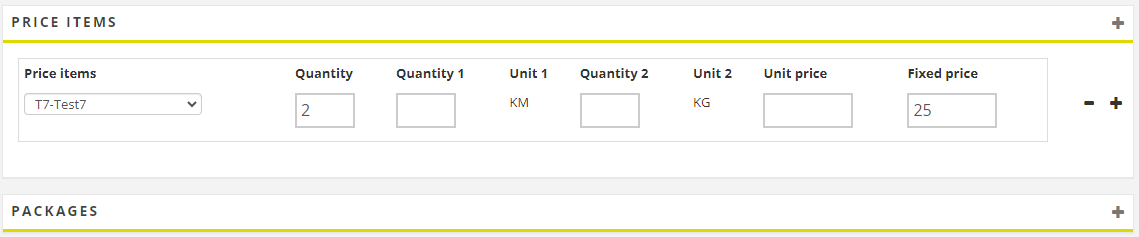
Fixed price (price item) |
Fixed price under Price items. Retrieves the price of the price item from the price list, if the price is a fixed price. The price from the price list can be overwritten with a manual price. If this field is included, Quantity (price item) should also be included, as they work together. The fixed price is multiplied by the quantity of the price item (Quantity). The total price of the price item in the example below is 2 × 25 = 50. Price items must be included; otherwise, this field will not be displayed as it is located within that section.
|
|
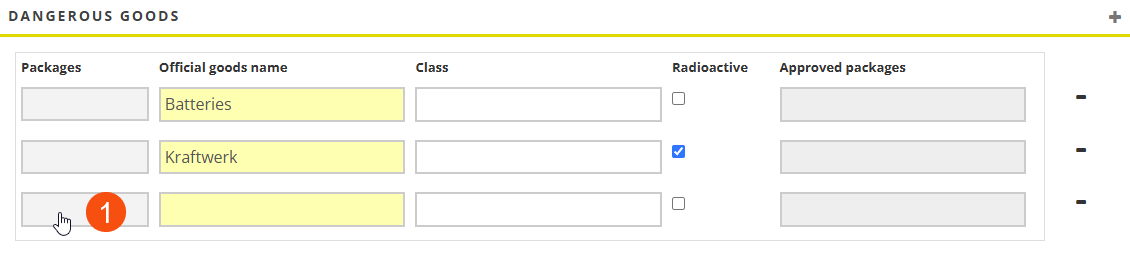
Shows/hides block Dangerous goods in the order form. These fields can be made compulsory to complete when placing an order (tick Mandatory), which may be necessary to comply with applicable legal requirements. The reference selects which parcels in the order contain dangerous goods by clicking on the grey button (1) and selecting one of the parcels they have added to the order. Dangerous goods are also shown in the detail view.
The same fields as in order reception. Filter the lists by ‘dangerous goods’ to see which fields are included in the block.
|
|
|
Packages (group) |
Shows/hides block Packages in the order form. These fields can be made compulsory when placing an order (tick Mandatory) Filter the lists by ‘(package)’ to see which fields are included in the block.
|
|
Shows/hides block Message, which is a free-text field. The information entered into the web portal is displayed in Internal message and External message in the order reception system. The reason is that Internal message is not displayed on the web portals, but users should still be able to see what they have entered. On the customer portal, the Message field is filled in automatically if you have a pre-set message for the reference. See also Reference (window). |
Track & Trace
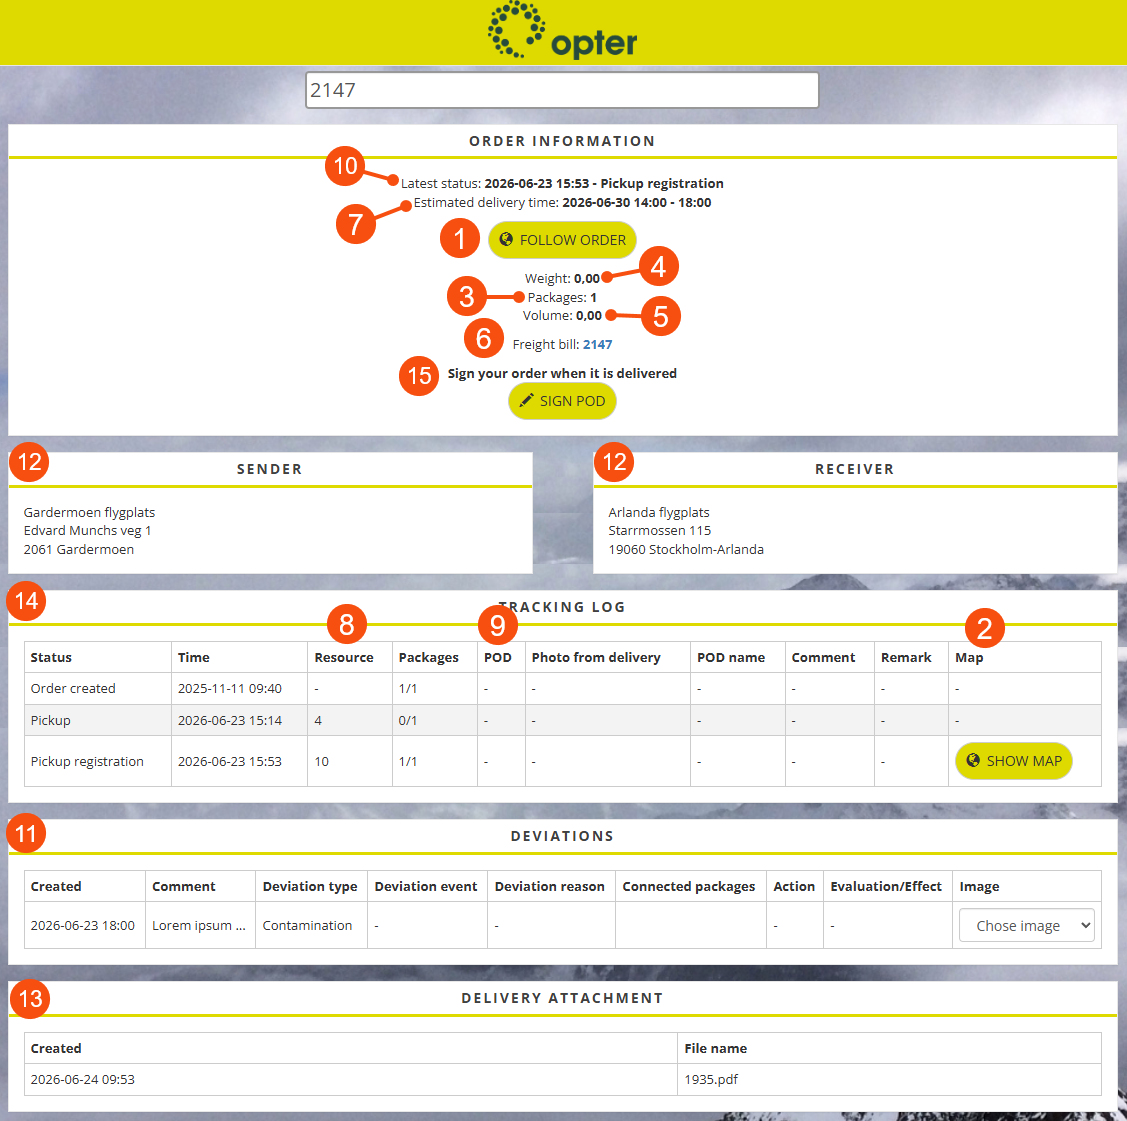
Track & Trace is designed to enable recipients to see what is happening with their order and when it will be delivered.
Fields on Track & Trace
Here you can set which information is to be displayed about orders on Track & Trace.
|
Function |
Description |
|---|---|
|
Show map (1) |
shows/hides the Follow order tab. It opens a map where the user can see where the order has changed status or been scanned. The shipment must be loaded and the vehicle must be in a specific position for the button to appear. |
|
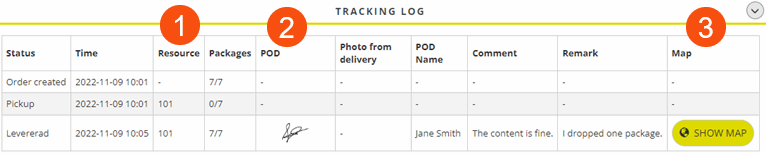
Show position for scanning (2) |
Shows/hides column Map in the tracking log. In that column, you can open a map and see where the status change or scan took place. For more information, see Tracking log on Track & Trace. You can show or hide the entire tracking log (14) using the Show tracking log option below. |
|
Show packages (3) |
Shows/hides the number of packages in the order. |
|
Show weight (4) |
Shows/hides the total weight of the order (the sum of the weights of all parcels). |
|
Show volume (5) |
Shows/hides the total order volume (the sum of the volumes of all packages). |
|
Shows/hides a link to the freight bill so that the recipient can download it as a PDF. If the order does not have a freight bill number, the order number is displayed as a link to the freight bill. |
|
|
Shows the estimated delivery time for the order (date and time slot) following the initial route optimisation. Show time must be ticked for the delivery time to be displayed (see below). If the estimated delivery time is updated in a new route optimisation, the old time is still shown to the receiver on Track & Trace. See also Show automatically updated ETA below. |
|
|
Show automatically updated ETA (7) |
Shows the order’s current estimated delivery time (date and time slot) based on the latest route optimisation. If a new route optimisation is made, the time is updated on Track & Trace. Show time must be ticked for the delivery time to be displayed (see below). It is possible to allow receivers to choose a date and time slot for home deliveries in Track & Trace. For more information, see Choosing a delivery date and time in Track & Trace. |
|
Show resource (8) |
Shows/hides column Resource in the tracking log. This column shows the number of the resource that has carried out that particular step in the supply chain. For more information, see Tracking log on Track & Trace. You can show or hide the entire tracking log (14) using the Show tracking log option below. |
|
Show time (7) |
The earliest and latest delivery times from the order reception are shown as a time slot for the estimated delivery time on Track & Trace, for example “14:00–18:00”. It is possible to allow receivers to choose a date and time slot for home deliveries in Track & Trace. For more information, see Choosing a delivery date and time in Track & Trace. |
|
Show POD (9) |
Shows/hides column POD in the tracking log. Once the proof of delivery has been signed, the recipient’s signature appears in the column. For more information, see Tracking log on Track & Trace. You can show or hide the entire tracking log (14) using the Show tracking log option below. |
|
Show latest status (10) |
Shows/hides the status, as well as the date and time of the last status change. |
|
Show deviations (11) |
Shows/hides any deviations on the order. |
|
Show addresses after order is delivered (12) |
Shows/hides the sender’s and recipient’s addresses on Track & Trace once the order has been delivered. You can hide the recipient’s address, regardless of the order status, by ticking Hide receiver further down the page. It might be useful if you allow searches by order number. The order number is then displayed in plain text on Track & Trace, which makes it possible to work out other order numbers. If someone happens to search for the wrong number and is shown an order other than their own, the delivery address for that order will not be visible. |
|
Show addresses (12) |
Shows/hides the sender’s and recipient’s addresses on Track & Trace. It may be useful to hide the addresses if you allow searches by order number. The order number is then displayed in plain text on Track & Trace, which makes it possible to work out other order numbers. If someone happens to search for the wrong number and is shown an order other than their own, it will not be clear between which addresses the goods are being transported. You can replace the sender’s address with the customer’s logo by selecting Customer’s logo instead of address further down. You can hide just the recipient’s address by ticking Hide receiver further down. |
|
Show attachments (13) |
Shows/hides attachments on the order. The files can be opened on Track & Trace. |
|
Shows/hides the tracking log on Track & Trace. The following three settings above control the columns in the tracking log.
For more information, see Tracking log on Track & Trace.
|
|
|
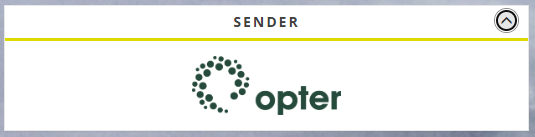
Customer’s logo instead of address |
Displays the customer’s online image (usually their logo) instead of the sender’s address. The image is retrieved from the Internet image field in the customer register (the tab Internet). If you don’t want to reveal the sender’s address to the recipient, this is one way of hiding it.
|
| Show number of stops left
|
Shows/hides how many other deliveries remain before the delivery van arrives at the recipient’s address. It is mainly used for home deliveries and requires route optimisation to have been carried out. Shown under Order information. |
|
Allow POD from T&T customer (15) |
Enable the recipient to sign the POD on Track & Trace, so that they do not need to do so on the driver’s mobile phone. The driver can send a link directly to the order via Track & Trace. When this option is enabled, the recipient can sign the proof of delivery regardless of the order’s status, i.e. even before it has been delivered. For more information, see Activating signing of POD on Track & Trace and Signing the proof of delivery in Track & Trace. |
|
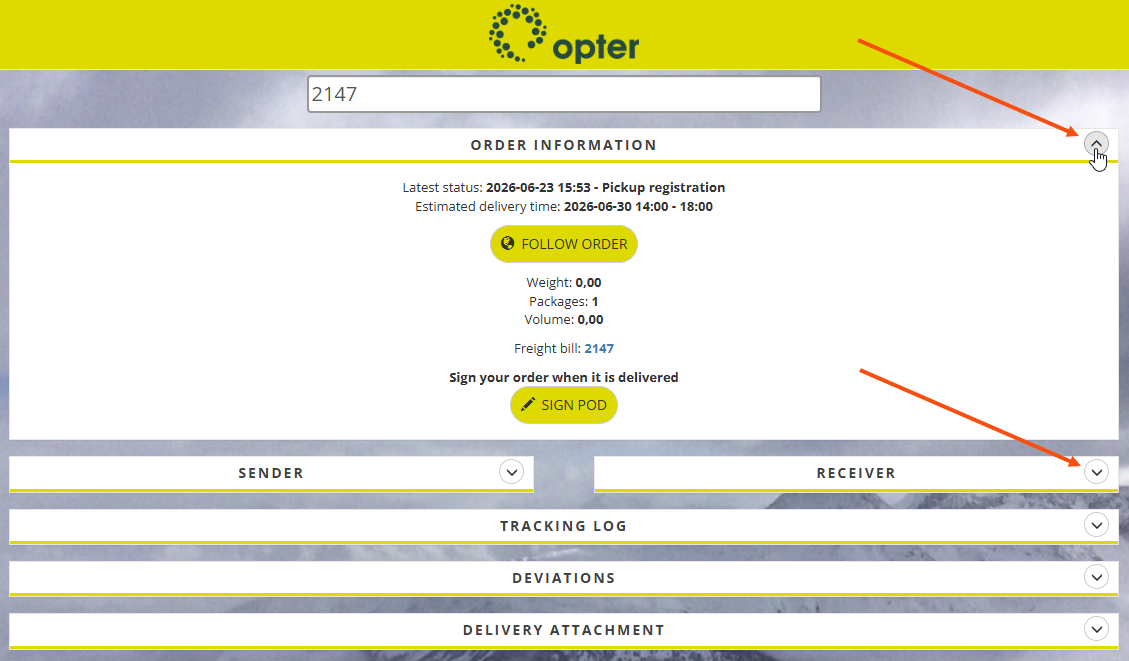
Activate minimised view |
All blocks are minimised. Click
|
|
Hide receiver (12) |
Shows/hides the recipient’s name and address on Track & Trace. It might be useful if you allow searches by order number. If you know your own order number, you can work out other order numbers and search for them. If someone accidentally searches for the wrong number and is shown an order other than their own, the delivery address for that order will not be visible. Encrypted search has nothing to do with this setting, even though it says so. |
|
Number of days order is searchable after delivery |
Enter the number of days an order should remain searchable on Track & Trace after delivery. |
Search options
Specify here what it is possible to search for on the Track & Trace search bar.
-
Encrypted search should always be enabled.
-
You can enter text in the search box as a suggestion for what to search for, for example, ‘Search by order number’. Enter the text in the Text in Track & Trace search field field on the Internet tab in the Office settings. For more information, see Tooltip in the Track & Trace search bar.

|
Function |
Description |
|---|---|
|
Search by order number |
It is possible to search by order number. If you enable this option and provide users with the order numbers, they can easily work out other order numbers and search for them, as the order numbers follow a sequence. Waybill numbers and parcel numbers are not as easy to guess, as they are often not generated in numerical order. If you enable this option and wish to prevent, for example, addresses from being displayed when the wrong order number is searched for, you can restrict what is shown on Track & Trace using the settings under Fields on Track & Trace. |
|
Search by freight bill number |
It is possible to search by freight bill number. |
|
Search by package ID number |
It is possible to search by package number. |
|
Search by sender reference |
It is possible to search on the name of the sender reference. |
|
Search by receiver reference |
It is possible to search on the name of the receiver reference. |
|
Encrypted search |
This feature has nothing to do with encryption or searching; rather, it is about ‘searching by GUID’. It is used to enable the order’s GUID to be included in links to Track & Trace in notifications, invoices and supplier bills. Instead of the order number being displayed in plain text in the link, the order’s GUID is displayed (for example, https://transportfirman.opter.cloud/TT?keyword=f70c9a5d-cd7b-4915-ace1-6aad0d354976). In practice, this makes it impossible to guess other order numbers and search for them. Further information on how to link to Track & Trace can be found in Notifications with links to Track & Trace and Link to Track & Trace on invoices and supplier bills.
|
|
Extra ID search |
You can search for information in the additional fields that you have added on the Terminology tab in the office settings. They are shown under Data on the order. |