Tracking log on Track & Trace
Last updated: 23 June 2026
In this article
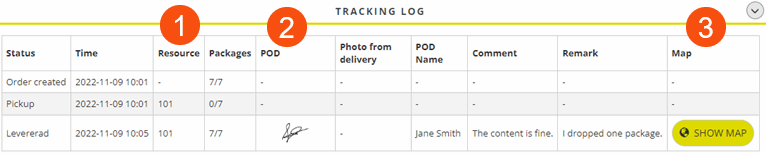
You can set the log to be displayed using the Show tracking log option on the Track & Trace tab in the internet order setting. You can then choose whether the following three columns should be displayed in the log.
- Resource: tick Show resource in the internet order setting.
-
POD: tick Show POD in the internet order setting.
-
Map: tick Show position for scanning in the internet order setting.
The rest of the columns are always displayed in the tracking log.
If you click on a row, a new window will open showing the control numbers. You can then see which parcel numbers have been scanned or delivered. Click on the Order created row to see the package IDs that were available when the order was created. If you click on the status line Delivered in the tracking log, it might look like this, for example. The list shows which parcel numbers have been delivered, when they were delivered (date and time) and the recipient’s signature on the pod.
Columns
|
Function |
Description |
|---|---|
|
Status |
Shows the status of the order. |
|
Time |
Shows the date and time when the status was set on the order. |
|
Resource |
Shows which resource changed the status of the order, so you can see which resource delivered the order, for example. Shown/hidden using the tick box Show resource under Fields on Track & Trace on the Track & Trace tab in the internet order setting. |
|
Packages |
Shows the number of packages out of the total number of packages that have been scanned or delivered, for example. For example, if the Packages column on the Delivered status bar indicates “2/3”, it means that two packages out of three have been delivered. |
|
POD |
Show the receiver’s signature on the proof of delivery. Shown/hidden using the tick box Show POD under Fields on Track & Trace on the Track & Trace tab in the internet order setting. |
|
Photo from delivery |
Shows a delivery photo if available. The photo can be enlarged by clicking on it. |
|
POD name |
Shows the name of the receiver on the proof of delivery. |
|
Comment |
Shows any comments on the proof of delivery. |
|
Remark |
Shows any remarks on the proof of delivery. |
|
Map |
Once the order has been scanned or delivered, the user can see on a map where the scans and the delivery took place. If you want the Map column to be displayed in the tracking log, select the Show map checkbox in the Fields on Track & Trace box on the Track & Trace tab in the internet order settings. Shown/hidden using the tick box Show resource under Fields on Track & Trace on the Track & Trace tab in the internet order setting. |