The order form on the customer web
Last updated: 9 June 2026
In this article
To enable users to place an order via the web portal, tick Create orders on the Menu alternatives and functions tab in the internet order setting. The menu option Order will then appear on the web portal. You then decide which fields should appear on the order form, and which ones should be mandatory on the tab Fields on the order page.
Set the layout of the form
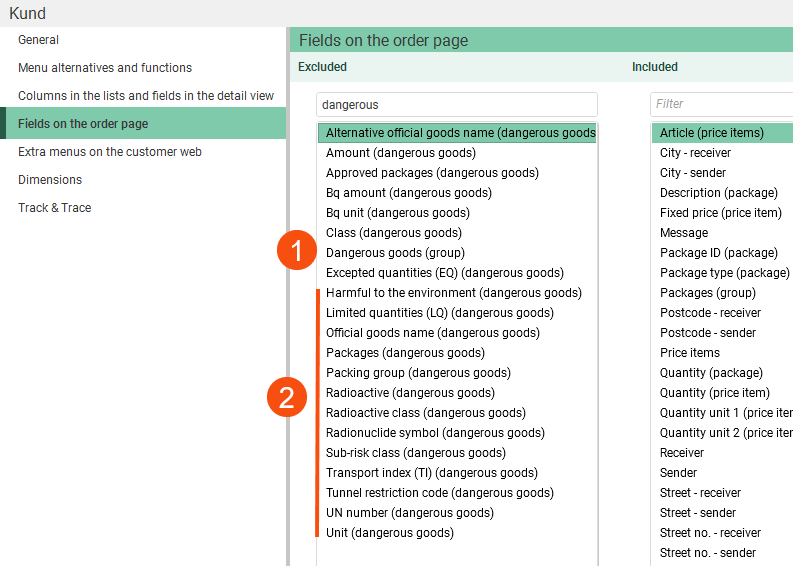
Click on Settings > Internet > Internet order settings and go to the Fields on the order page tab. Here, you can choose which blocks and fields to display on the order form by dragging them into the list Included. You cannot change the order of the fields; the layout is fixed.
Items in the list marked with “(group)” will show or hide the entire block in the order form. You can then show or hide individual fields in that block containing other entries, such as those marked ‘(dangerous goods)’ in brackets.
-
Show/hide the entire block Dangerous goods.
-
Shows/hides individual fields in the block Dangerous goods.
You can hide an entire block simply by removing the group entry from the list Included. You don’t need to delete every single field. That way, you can easily restore it using the same field later on, should you wish to do so.
If you want a field to be mandatory, tick the box at Mandatory the bottom right. It will then be highlighted in yellow on the order form, and the order cannot be saved until the user has filled it in.
You can see the changes immediately by saving the settings and then refreshing the order page in your browser. That way, you can easily try things out.
See also Internet order settings (window).
Example
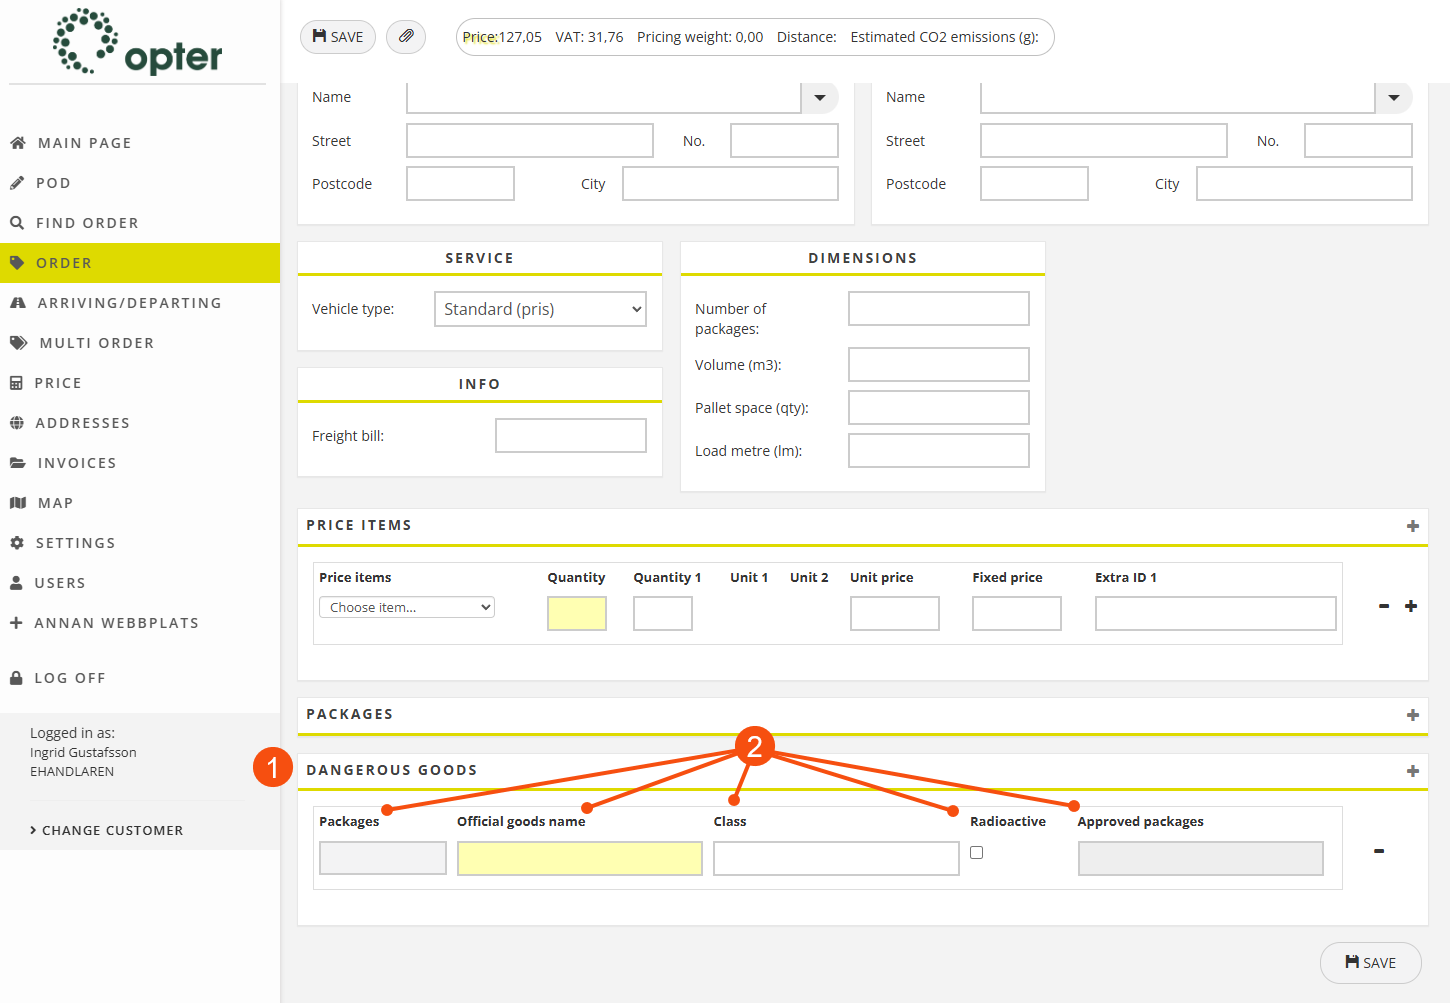
If you add Dangerous goods (group) to Included, the entire block Dangerous goods will be displayed (1). You can then select which fields are to be displayed under Dangerous goods using the fields followed by “(dangerous goods)” in brackets (2). In the example below, Mandatory has been marked for Official goods name (dangerous goods) and must be filled in (highlighted in yellow).
Order templates
If there are users who often book similar orders, you can let them create templates that can then be used as a basis for the orders. Templates for web orders can be created both on the web portal and in Order reception, and saved per customer.
Activate the function
In order to create templates on the web, the function must be enabled in the internet order settings. This can be done as follows:
-
Click on Settings > Internet > Internet order settings.
-
Select the correct set of internet order settings in the list on the left.
-
Select the Use order templates checkbox on the General tab.
A tick box to create templates and a drop-down box to select a template are now displayed on the order page of the web portals.
Creating templates in order reception
For information about how to create and use templates on the customer web, see Creating order templates on the customer web.
A template can be created in order reception and made available for web orders for the customer specified on the order. The order is given an order number, but is not displayed in dispatch or in the statistics, and only serves as a template. The next time an order is placed on the web, the user can select the template from the Choose existing template drop-down list on the order page.
This can be done as follows:
- Create a new order and fill in the details you want to be included in the template.
-
Select the Internet template checkbox in the Template box.
-
Give the template a name in the Template name field. The name will be displayed in the list of templates on the web for the customer you have specified on the order.
- Save the order.
Once the template has been saved, you can open it again and enter the order number in the template name so that it is easy to find the template if it needs to be modified or deleted, as the template name is displayed in the list on the web.
Dates in order templates
The order date entered when creating a template on the web is saved in the template. An order date does not have to be specified when creating the template unless it is mandatory for internet orders according to the internet order settings (Mandatory checkbox on the Fields on the order page tab).
If a template with a pre-filled order date is used, the following applies:
-
If the date in the template is in the future, that date will be used for the order that is created.
-
If the date in the template has already passed, the current date is set for the order that is created.
-
If Manual order date is selected in the internet order settings, a date must be entered manually on the order that is created, regardless of whether the date in the template is in the future or not.
-
If Manual order date is deselected in the internet order settings, but selected under Settings on the customer web, a date must be manually entered on orders created on the customer web.
-
If Manual order date is deselected both in the internet order settings and under Settings on the customer web, the current date is entered on the order.
The Manual order date setting under Settings on the customer web can also be controlled from the Reference window in Opter.
Deleting web order templates
Users cannot delete order templates themselves on the web; this must be done by you in order reception, by deselecting the Internet template checkbox on the order that should no longer be a template. If the internet template is created in order reception, the order becomes a standard order so that also needs to be cancelled to ensure it does not appear in dispatch and the statistics. If the template is created on the web, it does not need to be cancelled as it is then counted as a scheduled order but is not used to generate scheduled copies.
It is not possible to search only for internet templates, but in the order check it is possible to select the Schedule templates search option, so that internet templates also appear in the list. The search can then be refined by entering, for example, the customer to find the right order.