Pods (POD) in Opter Driver
Last updated: 30 June 2026
Applies to Opter Driver for iOS and Opter Driver Labs for Android.
In this article
When the status of a shipment is changed, it may be necessary to register a proof of delivery. It is also possible to choose to register a proof of delivery by clicking on the Proof of delivery menu option or the proof of delivery type name, for example Nobody home.
Depending on the settings made by your transport manager or system administrator, the app works in different ways when registering pods. For example, it could look like this.
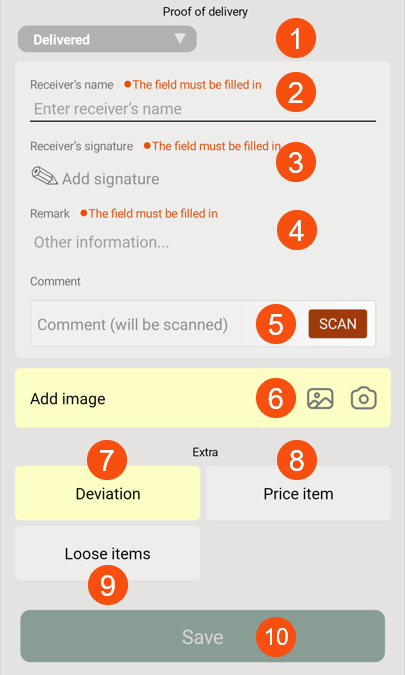
In the image above, select the type of proof of delivery (1), enter the receiver's name (2), add the signature (3), remark (4), possible comment (5), image (6), deviation (7), possible price items (8) and loose items (9), and then save the proof of delivery (10).
In the image above, the button SCAN appears in the field Comment (5), this means that you can or must scan a comment (for example, scan a Freight bill). The Add image field (6) is yellow, which means an image has to be added. The Deviation field (7) is yellow, which means an deviation has to be added. The Price item (8) and Loose items (9) buttons are grey, which means price items and loose items can be added if desired, but this is not mandatory. The Save button (10) is dimmed, which means that the proof of delivery cannot be saved until all the mandatory information has been filled in.
Registering a proof of delivery
To do this, go to Proof of delivery:
-
Enter everything you need to enter:
-
If a field has the text The field must be filled in, for example the recipient's signature, that field must be filled in.
-
If a button is yellow, you need to press it and enter loose items, for example.
You cannot save the pod until all the required fields are filled in.
Buttons and fields are described below.
-
-
Enter anything else you want to specify:
-
If a field does not have the text The field must be filled in, it is optional to fill in the field.
-
If a button is grey, it is optional to press it and, for example, enter loose items.
-
If a button is green, it means that you have done everything necessary, such as adding deviations. If you want, you can press the button again, for example to add more deviations.
-
-
Tap Save when finished.
Check freight bill number
If the field Check freight bill numberis already filled in, compare the freight bill number in the app with the one on the package or freight bill and make sure they match.
If the consignment note number is incorrect or not pre-filled, enter it manually in the field or scan it. To scan, go to SCAN and scan the number on the parcel or Freight bill. When you have finished, click on SCAN again. For more information, see Checking the freight bill number in Opter Driver.
Checklists
If there is a checklist on the shipment, you must fill it in. For example, if the delivery is a washing machine, the questions could be "Have you installed the new washing machine?" and "Have you taken the old washing machine for recycling?".
Answer the questions by clicking on Yes (1), No (2) or typing in your answer (3).
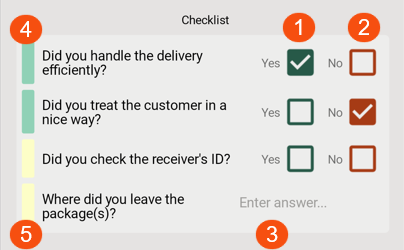
Green colour for question (4) means that it has been answered. You can change the answer until you click on Save at the bottom of the page. Yellow (5) means that you must answer the question before you can save the proof of delivery.
Proof of delivery type
Select the proof of delivery type, for example Delivered, Nobody home or New address.
Receiver’s name
Enter the name of the recipient in the field Receiver’s name.
Receiver’s signature
To add a signature, tap Add signature and have the recipient write their signature on the screen using their finger or a pen designed for screens. Then tap Save signature.
If you want to delete a signature that went wrong, click on Clear. Then the receiver can write their signature again.
Remark
To add a remark, go to Other information and type in the remark.
Comment
Comments can be added in the following ways:
-
To scan the comment, go to SCAN and scan a barcode. When you are satisfied with the scan, press SCAN again.
To delete an incorrect scan, click on SCAN again and scan in the correct comment. The previous comment is then replaced by the new one.
-
Enter it in the field as usual.
Number of packages
Ange Number of packages. Click on the Number of packages field and enter the number of pods for which the pod is valid. You can also press the plus and minus buttons to change the value in the field.
Add image
Choose whether you want to add one or more photos that you already have on your mobile device (1) or take a new photo (2). For more information, see Adding images to Opter Driver.

If the Add image field is light grey, it means you can add images if you wish.
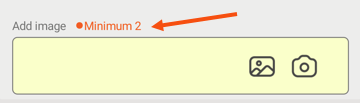
If the Add image field is yellow, it means you must add at least one image. For example, if the text “Minimum 2” appears, you must add at least two images.
If the field is green, it means you’ve done everything you need to, but you can add more images if you like. You can add as many as you like.
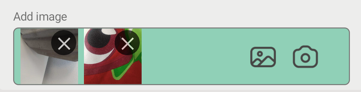
If you want to delete an image, click on the cross on the image. Once you have saved the proof of delivery, you will no longer be able to delete images.
If you have added lots of images, you can scroll through them by swiping your finger sideways across the images in the field Add image.
Only one image can be attached per POD. If you want to add more images to the shipment, you can do so via the menu in the detail view. For more information, see Adding images to Opter Driver.
Delay reason
Enter the reason for the delay and the delay comment. If the Select reason for delay drop-down box appears, you must select a delay reason and enter a delay comment in the Comment field.
Deviations
Go to Deviations to register a new deviation. Select the deviation type, and possibly the event and cause. Write a comment and add pictures. Some fields may be mandatory to fill in. It depends on the settings made by the traffic controller.
Once Save has been tapped, it is no longer possible to change the deviation in the app.
If a picture is added, it will be displayed at the bottom of the detail view, under Attached files. For more information, see Adding images to Opter Driver.
The button Deviations can have different colours. The different colours mean the following:
-
Yellow: You must register a deviation.
-
Grey: You don't have to do anything, but you can register deviations if you wish.
-
Green: You have done everything necessary, but if you want you can add new deviations.
Loose items
To register new and modify existing loose items, go to Loose items. Tap Save when finished.
The different colours mean the following:
-
Yellow: There are loose items registered on the order and you need to specify the quantity.
For example, if you deliver a shipment where there is 1 pallet and 4 straps recorded at the start, you must record how many pallets and straps there are at the end of the transport.
-
Grey: No loose objects are recorded. You don't have to do anything, but you can register loose items if you wish.
-
Green: You have done everything necessary, but if you wish, you can add new and modify existing loose items.
Price item
The button Price item can have different colours. The different colours mean the following:
-
Yellow: You need to add a Price item.
-
Grey: You can add Price items if you wish.
-
Green: You have added one or more Price items. If you want, you can add more.
Depending on the settings made by your system administrator, you may be able to do the following:
-
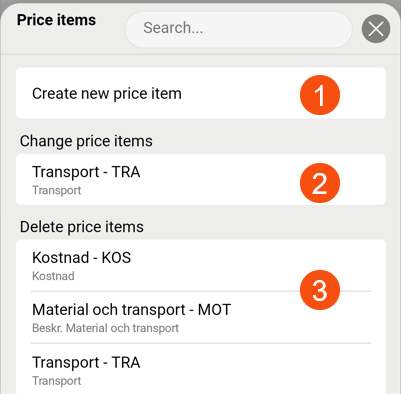
Add price items, for example if carrying out an extra service in connection with the delivery. (See 1 in the picture below.)
The Price items you add yourself are listed under Delete price items (3).
-
Change in Price items (2) that are already on the shipment from before.
-
Remove Price items (3) that you have added yourself to the pod.
If you have added a new item to the pod, but then change your mind and want to remove it, click on the Price item at Delete price items. The Price item is removed immediately.
Once you have saved the pod, you can no longer delete Price items.
You cannot change Price items that you have added to the pod yourself. Instead, delete the one that is incorrect, and create a new one as you want it.
Changes
You can make changes to the shipments if, for example, the number of parcels or the driving time is not correct. Go to Changes, make your changes and then click on Save in the top right-hand corner. (However, the changes are not saved until the entire proof of delivery has been completed and Save at the bottom of the proof of delivery page has been tapped).
More detailed instructions are available in Changing orders in Opter Driver.

The different colours of the button mean the following:
-
Yellow: You must make at least one change.

-
Grey: You can make changes if you wish.
-
Green: You have made one or more changes. If you want, you can make more changes.
SMS signature
The receiver can sign the proof of delivery in Track & Trace. This way, the recipient does not have to touch the driver's device. To make it easier for the recipient to find the order, you can send an SMS with a link directly to the order on Track & Trace.
For more information, see Sending an SMS with a link to Track & Trace.
Smart locks
If you are picking up or delivering to an address with a smart lock, Unlock {0} will appear in the POD view when you change the status to Picked up or Delivered. Selecting this option opens the smart lock app where you can manage the lock.
Warning regarding early collection
If you manually change the status of a shipment to Picked up earlier than the earliest pick-up time specified on the order, a warning may appear. You can still change the status to Picked up if you wish.
The warning is displayed in a pop-up window with the text Earliest pickup time is {0}..
If the early pick-up warning appears, do the following:
-
Close the pop-up window with the warning by pressing
 .
. -
Select one of the following:
-
Continue to change the status to Picked up, even though it is too early to retrieve the shipment.
-
Please do not change your status to Picked up, as it is too early to retrieve the shipment.
-
Save
Once you have filled in everything, click on Save. The pod is saved, and the time and location are automatically recorded in the system.