Pages, tabs and menus in Opter Driver
Last updated: 28 November 2025
Applies to Opter Driver for iOS and Opter Driver Labs for Android.
In this article
Once you have logged into Opter Driver, the Shipments, Map, Scanner and Chat options are displayed at the bottom of the screen. Tap the different options to go to the shipment page, map, scanner or chat page. The red colour shows which page you are on. The image below shows the shipment page in the app.

Shipments
The Todo and Done tabs are located at the top of the shipment page. After logging in to the Opter Driver app, you will automatically be taken to the Todo tab, where you will see your Current shipments, new and cancelled shipments. Current shipments are shipments that you have confirmed and they can be in status Confirmed or Picked up, for example. The number next to Todo shows how many shipments you have, i.e. the current shipments you have to carry out, and the new and revoked shipments you need to confirm. The number next to Done shows how many shipments you have completed.
Drag your finger up and down the screen to see the full mission list.
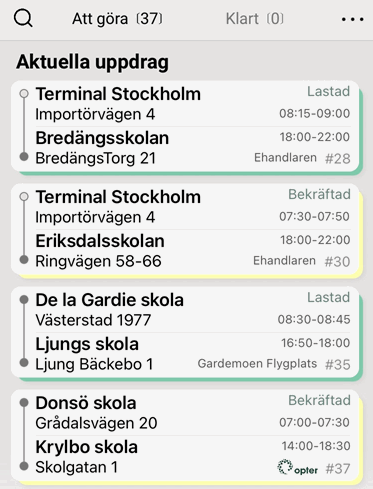
If you want to find out more about a shipment, tap on it in the shipment list to open the detail view. You can also long-press on a shipment in the shipment list and it will open both the detail view and the menu, or just the detail view, depending on the settings your dispatcher has made. More information on the detail view and the menu in the detail view is available below.
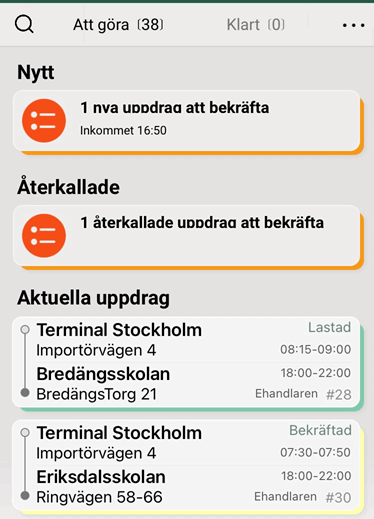
New and Revoked
If you have new shipments (New) or Revoked shipments, they are displayed above Current shipments.
Todo
The information displayed for each shipment depends on the settings applied by the dispatcher or system administrator. For example, it might look like this:
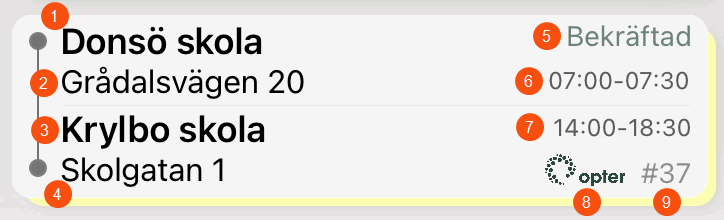
The numbers in the above image indicate:
-
Sender’s name, for example, a company name or a private individual.
-
The street name and number of the pickup address.
-
Receiver’s name, for example, a company name or a private individual.
-
The street name and number of the delivery address.
-
The shipment status.
-
The earliest and latest pickup time, time of day.
-
The earliest and latest delivery time, time of day.
-
The customer’s logo or name.
-
Order number.
Consignments
 Consignments in the shipment list
If working with consignments, they can be displayed grouped in the shipment list depending on the settings made by your system administrator. If consignments are displayed grouped, a section is then displayed for each consignment, in which the included original shipments or the consignment shipment are displayed with pickup and delivery addresses.
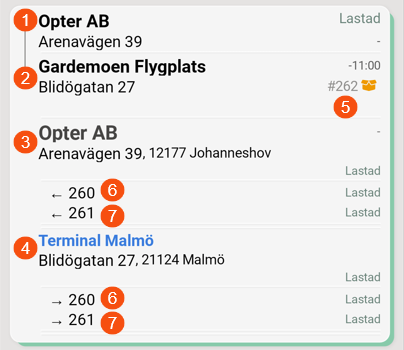
The image above shows a consignment order (number 262) that contains two original orders (numbers 260 and 261). For consignments, the start address (1) and end address (2) of the consignment order are always shown. The start address (3) and end address (4) of the consignment shipment that is to be carried out by the driver are shown below.
The text at (4) is blue to show that the address is linked to a ferry line (i.e. a port or terminal). The shipment after the current shipment is thus a ferry connection.
The image also shows the consignment order number (5) and the original order numbers (6) and (7).
If you want to see more information about the linked shipments, you can click on the consignment in the shipment list. A list of the connected shipments is then displayed. Tap on a shipment to open it.
The colours of the circles
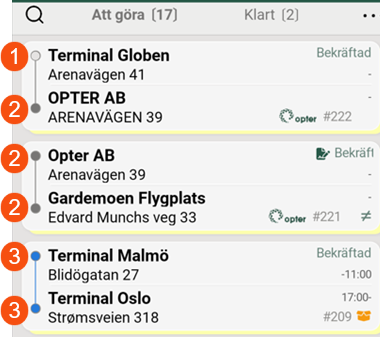
The colours of the circle at the far left indicate whether the stop is a terminal (1), a normal address (2), or a ferry line (3) (i.e. a port or terminal).
-
The light grey circle indicates that the stop is a terminal, but not a terminal that is part of a ferry line.
-
The dark grey circle indicates that the stop is a normal address, i.e. no terminal and no ferry line.
-
The blue circle indicates that the stop is a ferry line (i.e. a port or terminal).
Ranking number
The order number can be displayed on none, one, several or all shipments in the shipment list. In the image below, four shipments are shown with the order numbers 1-4.
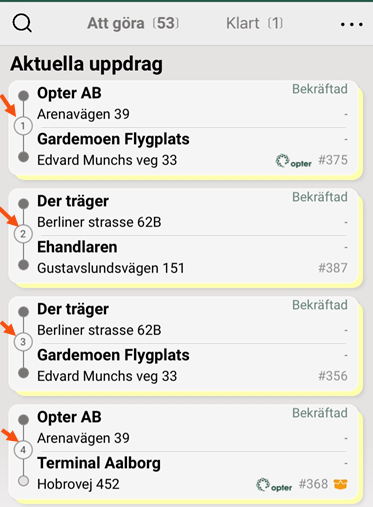
Shipments can be given an order number in two different ways:
-
The traffic controller has done a route optimisation in Opter.
-
The driver has manually assigned shipment numbers in Opter Driver.
For more information, see Manually sort the route sequence in Opter Driver.
Icons
If the system administrator has chosen to show icons in the shipment list, these can be used to quickly get an overview of which shipments are special. For example, you can see if shipments have deviations, pods, loose items, price items, extras, packages, and attached images and/or files. The image below shows what it might look like in the shipment list for a shipment that has attached images and/or files (1), deviations (2), packages (3) and price items (4).
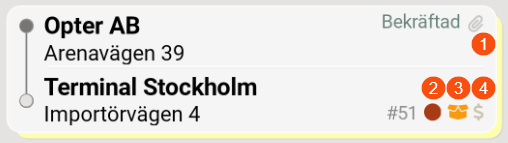
The list below shows the icons and what they mean.
|
Icon |
Description |
|---|---|
|
|
Deviations. The deviation icon is displayed on shipments that have one or more deviations. |
|
|
Attached files. The attachment icon is displayed on shipments that have images or other files attached. |
|
|
Collin. The package icon is displayed on shipments that have one or more packages. |
|
|
Proof of delivery. The proof of delivery icon is shown for shipments that have one or more proofs of delivery. |
|
|
Loose objects. The loose items icon is shown for shipments that have one or more loose items. |
|
|
Price articles. The price item icon is shown for shipments that have one or more price items. |
|
|
Surcharges. The extras icon is shown for shipments that have one or more extras. |
|
|
Authorised to deliver even if the recipient is not at home. If the icon appears on a shipment, it means that the recipient authorises the delivery of the shipment even if they are not at home. |


Locked shipments
The dispatcher can define that shipments are to be locked as long as the previous shipment on the order has not yet been unloaded. Locked shipments are shown with a dark grey background colour in the shipment list, see image below.
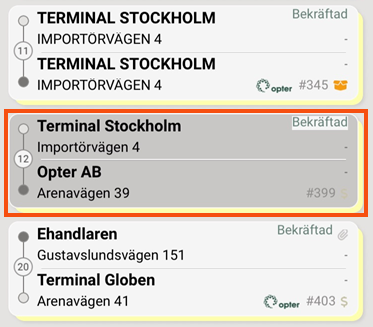
(If the system administrator has created a custom design for the app (in App.OpterDriver.Design) and given the shipments a custom background colour in the shipment list, locked shipments will be displayed in the same background colour as regular shipments).
If you do not want locked shipments to appear in the shipment list, go to the Settings page and select Hide locked shipments. See Settings in Opter Driver.
If locked shipments are displayed in the shipment list, you can change the status of the shipments even if they are locked.
The search function
There is a search function at the top left of the shipment page. It is possible to search among shipments for a specific address or a specific sender or receiver, for example. You can also save searches, so you can quickly tap on the search terms further down the screen. The search field also contains the button SCANbutton, if you want to scan a Freight bill or parcel label to find out which shipment the goods belong to.
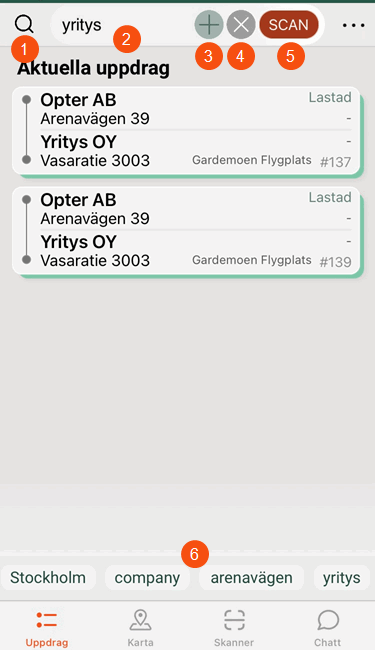
The image shows a search that matches two shipments.
Numbers in the image above:
-
Click on the icon to search the shipments in the list.
To end the search, tap the icon again.
-
The search bar is displayed once the icon (1) has been tapped. Type what you want to search for, such as a specific address. It is possible to search for one or multiple words, and the Boolean operators "AND" and "OR" can also be used. "AND" does not have to be typed, as it is the default between words if more than one word is typed with spaces between them.
For example, to search for all shipments that contain both the street names “Arenavägen” and “Importvägen”, simply type “Arenavägen Importvägen” (or “Arenavägen AND Importvägen”) in the search field. Instead, to search for all shipments containing either “Arenavägen” or “Importvägen”, or both street names, type “Arenavägen OR Importvägen” in the search field.
-
Tap the icon to save the search entered in the search bar (2). The search is then displayed further down the screen as a shortcut (6).
To delete a saved search, tap it (6) so that it is displayed in the search bar (2), then tap the same icon (3) as you did when saving the search.
-
Tap the icon to clear the search bar (2) and display all shipments.
-
To scan a Freight bill or parcel label and find out which shipment it belongs to, go to SCAN. If you want to end the scan, press SCAN again.
-
Saved searches are displayed here. If there are many, you can drag your finger sideways to see all the searches.
If you want to use a saved search, tap it. The search will then appear in the search bar (2) and the list below will show the shipments that the search matches.
To delete a saved search, tap it so that it appears in the search bar, then tap the same icon (3) as when you saved the search.
Menu options on the assignment page
You can open the menu by tapping  in the top right-hand corner. If some options are missing from the menu, this is due to settings made by the dispatcher or system administrator.
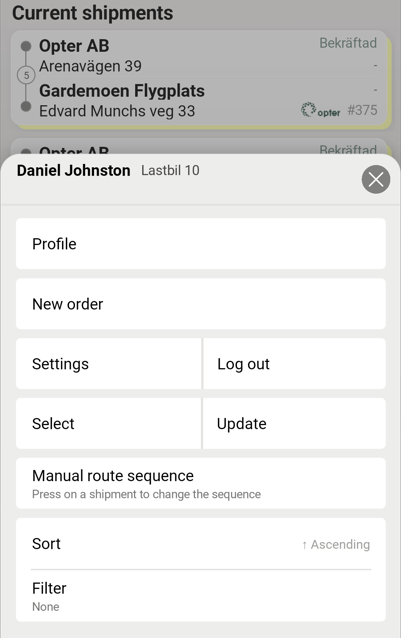
|
Function |
Description |
|---|---|
|
Profile |
Opens the profile page showing details of how you are logged in when you logged in. For more information, see Profile below. |
|
New order |
Creates a new order. |
|
Settings |
Opens the app’s general settings. For more information, see Settings in Opter Driver. |
|
Log out |
Log out of the app. |
|
Select |
Sets the task list to selection mode. Then select the shipments by tapping them in the list. You can then give them away, leave them at a terminal or change their status. For more information, see Changing the status of shipments in Opter Driver and Giving up shipments in Opter Driver. A shipment can also be selected by dragging it to the left. If you then want to select more shipments, simply drag them to the left or tap them in the shipment list. If you have selected a shipment but want to deselect it, tap it or swipe it to the left. |
|
Update |
Synchronises the task list with the server. Normally, the shipment list is automatically and continuously updated. It is also updated when the filtering or sorting options are changed, and when switching between tabs (Todo/Done). You can also refresh the list by scrolling down. |
|
Change the route sequence. Although the shipments have been assigned a route sequence based on route optimisation, it is possible to change the route sequence manually. For more information, see Manually sort the route sequence in Opter Driver. |
|
|
Sorts the shipments in the list. You can sort on one field first, and another field second. For more information, see Sorting shipments in Opter Driver. If you sort by both fixed fields (such as postcode and status) and also specify a manual route sequence for the shipments, the sort order based on the fixed fields takes precedence, followed by the manual route sequence. |
|
|
Filter |
Filters the task list. You can filter on Direct, Line haul, Pickup or Delivery. If you want to remove the filter, select None. |
Profile
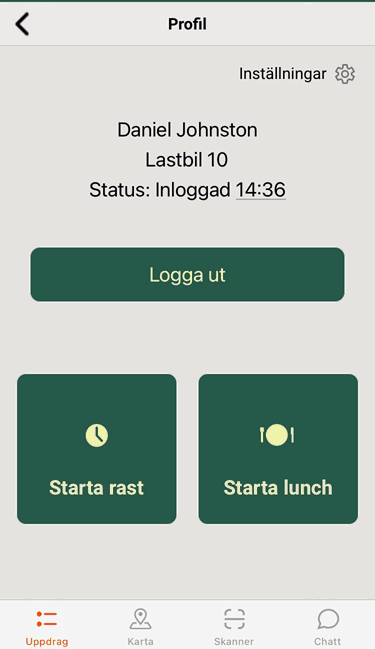
The following can be carried out on the profile page:
-
Tap Settings to configure settings for the app. For more information, seeSettings in Opter Driver.
-
See which vehicle and/or driver is logged in, and what time the login took place.
-
Log out by tapping Log out.
-
Notify dispatch that you are taking a break by tapping Start break or Start lunch. Your status is displayed in dispatch.
Start break: Breaks are included in working time.
Start lunch: Lunchtime is not included in working time. You can only have lunch once per working session.
When you are back from your break, tap End break or End lunch. Your status (i.e. on a break, at lunch or logged in) is displayed in dispatch.
Detail view
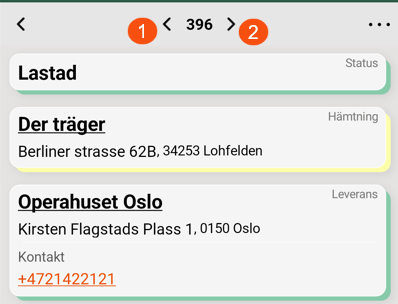
Tap the shipment on the shipment page to see detailed information about the shipment and the order. The detail view shows, for example, the current status, the next status and the route that may be used.
The information displayed in the detail view depends on the settings applied by the dispatcher or system administrator. The example below shows the status of the shipment, the time the status was set, information about the pickup, delivery, customer and order.
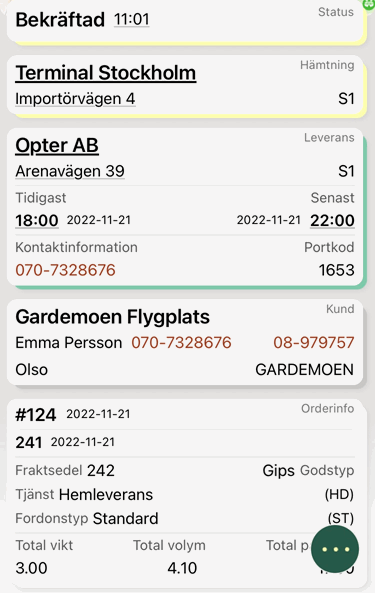
Drag your finger up and down the screen to see all the information.
To display the pickup or delivery address on the map, tap the address.
You can scroll through the shipments in the detail view by tapping Back (1) or Forward (2).
Consignments in the detail view
If working with consignments, status buttons, directional arrows and other icons can be shown, depending on the settings made by the system administrator. These buttons and icons have the following functions:
-
The
 and
and  buttons show whether the shipment has been handled or not, and the driver can press the status button to change the status of the shipment.
 -
The
 and X icons indicate whether or not the shipment is managed by the driver.
 -
The direction arrows show whether the address is a pickup or delivery address.
|
Pickup address |
Delivery address |
|---|---|
|
For the status buttons, if the address is a pickup address the following applies:
|
For the status buttons, if the address is a delivery address the following applies:
|
|
For the
|
For the
|
|
An arrow to the left means that the address above is a pickup address. |
An arrow to the right means that the address above is a delivery address. |
 and
and  means that the status of the shipment is
 The menu in the detail view
The menu ( ) in the top-right corner of the detail view contains options for managing the shipment in various ways. If some options are missing from the menu, this is due to settings made by the dispatcher or system administrator.
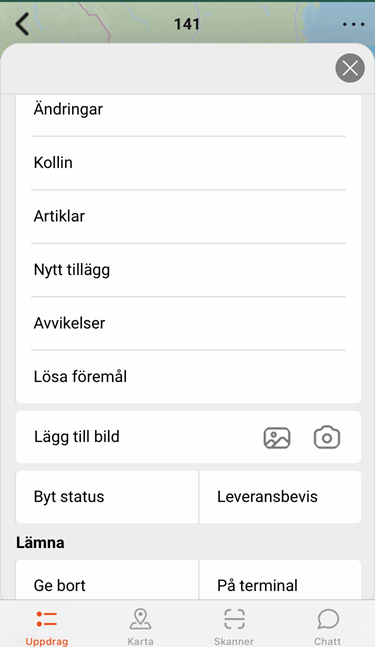
|
Function |
Description |
|---|---|
|
Changes |
Change, for example, the weight and volume. For more information, see Changing orders in Opter Driver. |
|
Packages |
Add new parcels and edit existing ones. Tap Save when finished. It is possible to search for existing packages using the package ID. You can only amend existing packages in Opter Driver if there are package lines in the order reception. |
|
Price items |
Add new price items and edit existing ones. Tap Save when finished. |
|
New extra |
Register a new extra by selecting the type and quantity and adding a description. Tap Save when finished. |
|
Deviations |
Record any deviations, add a comment and attach photos. Some fields may be compulsory. If a picture is added, it will be displayed at the bottom of the detail view, under Attached files. For more information, see Adding images to Opter Driver. Once Save has been tapped, it is no longer possible to change the deviation in the app. |
|
Loose items |
Register new loose items and amend existing ones. Tap Save when finished. |
|
Show connected shipments |
Displays a list of the original shipments linked to the current shipment via consignment. You can open the original tasks by tapping on them in the list. |
|
Add image |
Adding photos to the shipment. You can add existing images or take a new one. For more information, see Adding images to Opter Driver. |
|
Opens the freight bill or parcel labels in PDF format. For more information, see View and print freight bills and parcel labels in Opter Driver. |
|
|
Reject |
Decline a shipment that you have been given but are unable to carry out. Even rejected shipments are displayed on the tab Done. |
|
Give away |
Assign the shipment to another driver. For more information, see Giving up shipments in Opter Driver. |
|
Leave at terminal |
Please drop it off at the terminal if you are unable to deliver it. Select a terminal from the list that appears. |
|
Change status |
Change the status of the shipment. For more information, see Changing the status of shipments in Opter Driver. |
|
Proof of delivery |
Register a proof of delivery (POD). For more information, see Proof of Delivery (POD) in Opter Driver. If you add an image to the proof of delivery, it will appear at the bottom of the detail view, below Attached files. For more information, see Adding images to Opter Driver. |
|
Shortcuts POD |
Shortcuts to specific POD-types. The system administrator configures which shortcuts are displayed. |
Done
This tab displays a list of completed shipments. Tap on a shipment to view detailed information about the shipment and the order.
Map
The map shows your current position and your current shipments. Open the map by tapping Map at the bottom of the screen.
The buttons at the top of the map page have the following functions:
-
You centres the map on your current position.
-
All shows your shipments, and zooms in or out so that all your stops fit into the view. See image below.
-
Near zooms in so that what fits into the view is your current position and your next stop/shipment. The shipment’s detail view is also displayed.
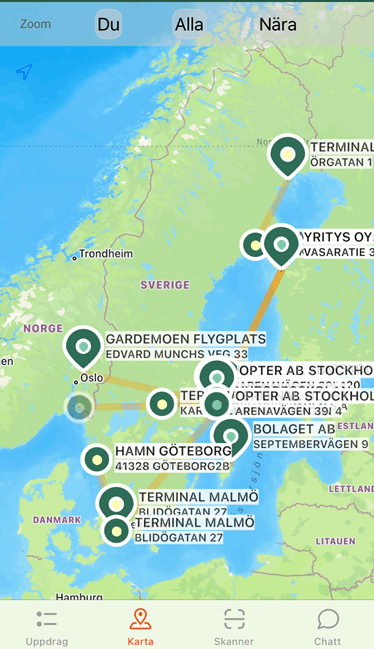
You can zoom in or out on the map by dragging two fingers towards or away from each other on the screen. To zoom in on a point on the map, “double-click” with your finger on the point on the screen.
If you tap a shipment on the map, information about the shipment is displayed.
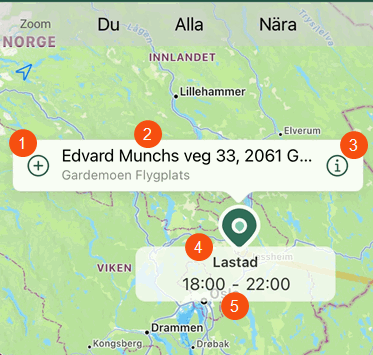
Numbers in the image above:
-
Tap the icon to create a proof of delivery (POD).
-
Displays the address.
-
Tap the icon to access the shipment’s detail view.
-
Show the status of the shipment.
-
Displays the earliest and latest pickup time/delivery time.
If you don’t want the maps to be displayed in the app, tap the menu () in the top right corner of the shipment page, select Settings and tap Hide maps. Then tap Save.
Scanner
Freight bills and package labels can be scanned with Opter Driver. For more information, see Scan using Opter Driver.
Chat
On the chat page of Opter Driver, drivers can write messages to and get answers from the dispatcher. Type your message in the field at the bottom and then press the send button (1).
When you receive a message from the traffic controller, the button with the tick (2) appears. Press the button (2) if you want the traffic controller to know that you have seen the message.
If the button with the handset (3) is green, you can also call the dispatcher by pressing the button.
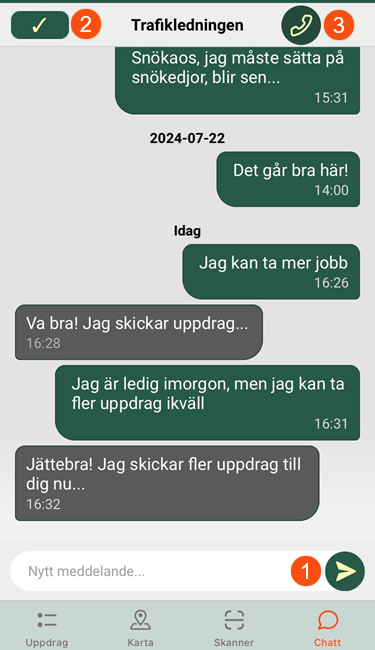
If the button (3) is grey, it is not possible to call the dispatch from the chat page in Opter Driver, because the system administrator has not entered a number for the dispatch in Opter.

