Adding parcels with scanning in Opter Driver
Last updated: 1 October 2025
Applies to Opter Driver for iOS and Opter Driver Labs for Android version 2.4.25 and later.
In this article
By default, you cannot add packages to orders by scanning them, but your system administrator may have set the app to allow you to do so. If the menu item Add package with scanner is displayed, you can add parcels by scanning them.
Areas of use:
-
If you have received a shipment where you do not know in advance how many packages the shipment has and what the package numbers are.
-
If you create a new order in the app and then want to scan all the parcels included.
The function Add package with scanner works:
-
If the Opter Driver Labs app for Android has been installed directly on a scanner, such as a Zebra.
-
If you are using a standalone Bluetooth scanner (rather than your mobile phone’s built-in camera). For more information, see Settings in Opter Driver.
-
If you scan with your mobile phone's built-in camera.
-
You can also enter the parcel number manually in the scanning view.
Add parcels with scans to an existing shipment
-
In Opter Driver, tap on the shipment in the shipment list. The detail view opens.
-
Click on the menu (
 ) at the top right (1) and select Packages (2).
 -
See Add package with scanner (3).
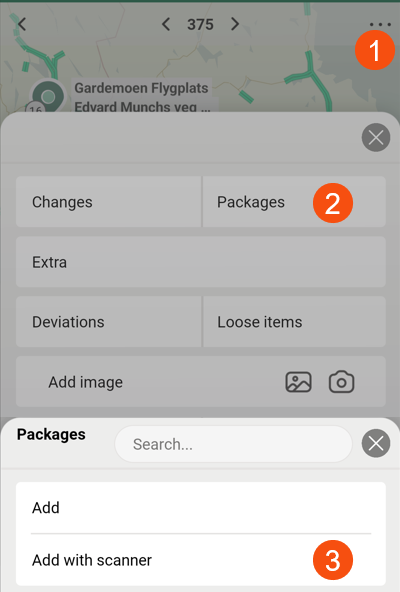
If the menu item Add package with scanner is not displayed, this is due to settings made by your system administrator.
-
Scan the parcel label (A) or enter the parcel number manually (B).
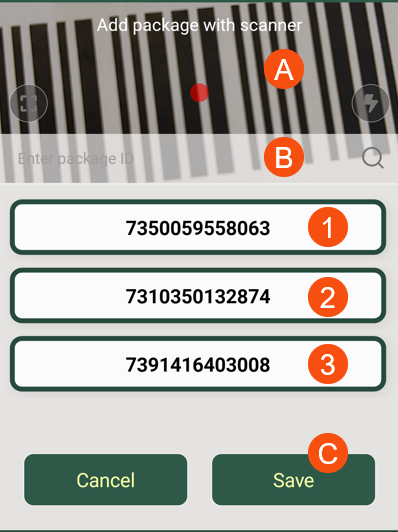
The image shows what the scan list might look like if you have scanned three package labels to add packages (1, 2, 3) to the shipment/order.
Alternative:
-
To undo a scan, drag the scan to the right and release when the text Remove appears.
-
If you want to add more parcels to the same shipment/order, continue scanning parcel labels until you are done.
-
If you want to enter dimensions for the collit, then tap it in the scan list.
For example, enter Weight, Volume and Package type, and then click on Save in the top right-hand corner. You will now be returned to the scan list.
-
-
When you have finished, click on Save (C).
Create new order and add packages with scanning
-
In Opter Driver, click on the menu (
) at the top right of the task list and select New order.If the menu item New order is not displayed, this is due to settings made by your system administrator.
-
Enter Customer code, References, Sender and Receiver and more. Tap Save.
The new order/assignment is now in the list of shipments to confirm, (at the top of the assignment list).
-
Memorise the Order number and then confirm the order/shipment.
-
Search for the order/shipment by entering the order number in the search field at the top of the shipment list and clicking on
 .
. -
Click on the order/shipment to open the detail view.
-
Follow the instructions in Add parcels with scans to an existing shipment above.