Last updated: 2024-11-22
Opter 2024.06.00
In this article
Opter
Settlement exports to file (type XmlSerializer) can now also contain the amounts in the currency of the resource, if different from the default currency in Opter. In the XSLT file, add "_Customer" to the field with the amount you want to export, for example YearlySummaryInvoicedAmount_Customer for the total amount credited so far this year in the currency of the resource.
Please contact edi@opter.com if you want to adjust your existing settlement exports.
More information:
It is now possible to choose whether or not to create new resource values when adjusting customer prices on Price items that have no resource values already. Previously, if you set different adjustment percentages for the customer price and the resource value, a new resource value was automatically created.
Select/deselect Create resource values if they do not exist in the Adjust prices/New price generation window.
Only works if the percentage of the adjustment is different for the customer price and the resource value.
More information:
Opter can be connected to (integrated with) the Heeros accounting system. Invoices can then be exported from Opter to Heeros.
More information:
It is now possible to add a link directly to the order on Track & Trace in PDF invoices and PDF supplier bills.
More information:
The function for calculating CO2 emissions has been further developed. For example, you can now choose whether the CO2 emissions calculation should take into account the pricing weight. If working with consignments, it is also possible to select how the CO2 emissions calculated for the consignment order are to be distributed between the original shipments.
More information:
A new checkbox has been extrased in the internet order settings, allowing you to choose whether or not to display customer names on the resource webs. The checkbox is called Show customer name with order details and is located on the Menu alternatives and functions tab in the The resource webs box. (In Opter version 2024.12.00, the checkbox is instead named Show customer information, and applies to both customer name and customer code.)
More information:
If you want the status to be displayed for senders and recipients, on shipments/orders in the dispatch, you can now add the columns S. State/County, S. State/County (auto), S. State/County (order) for senders and the columns R. State/County, R. State/County (auto), R. State/County (order) for recipients. The setting is made in the window Dispatch settings, on the tab Tabs, on the tab Columns.
More information:
The Freight bill can now be downloaded from Track & Trace even if the order does not have a waybill number.
More information:
It is now possible to export statistical reports both with and without formatting/ If the statistics contain numerous rows, it may take a long time to export the information with formatting, and in some cases it may not be possible to perform the export at all. In such cases, try exporting without formatting.

More information:
Now you can set which alerts to display in the pop-up window in the Route optimisation window. This can be useful if you have a workflow where some alerts are relevant to display, and other alerts are not relevant to display.
6 new checkboxes have been added to the Route optimisation settings window on the General tab, for example Issue warning if shipments have poor positional accuracy and Issue warning if resources have zero capacity.
More information:
If a statutory VAT rate changes, it must also be updated in Opter.
The function to change a VAT rate as of a certain date is now clearer. You enter the new VAT rate and the date from which it applies. Note that it is not possible to schedule a VAT rate change to a future date. You can only change the VAT rate from today's date, or from a date in the past.
More information:
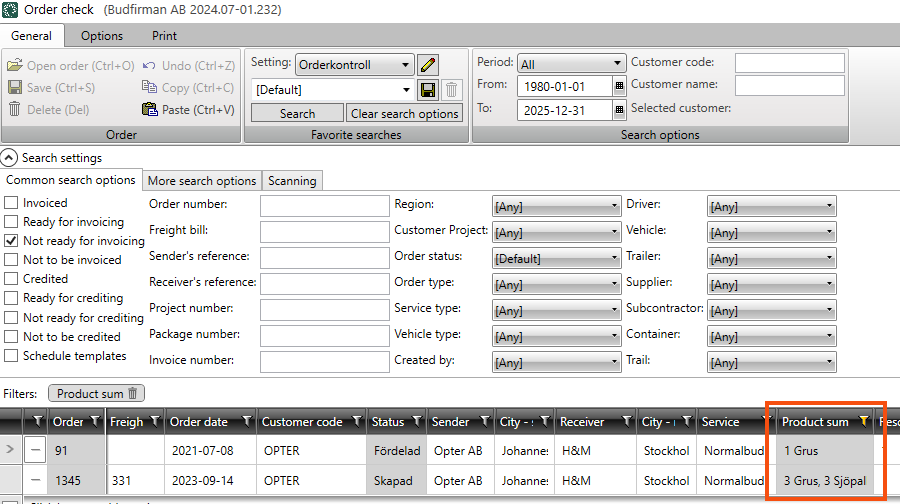
It is now possible to display the product summary on supplier bills with the tag Delivery.ProductSummary.
More information:
It is now possible to adjust the route sequence manually by entering a number in the Order column of the route optimisation. Then sort the list so that the numbers are in order. The function is activated by selecting Edit route sequence in the route optimisation settings.
More information:
The columns ExtraID1-ExtraID5 can be added to the address list in the route optimisation.
More information:
The values from the following fields in the vehicle register (tab Capacity) are now included in the class Statistics.Vehicles:
-
Weight (weight)
-
Volume (volume)
-
Load metre (loadMeter)
-
Pallet space (palletSpaces)
-
Extra dimension1-Extra dimension5 (extraDimension1-extraDimension5)
More information:
OCR numbers are now included when you export the invoice journal to Excel.
More information:
The values of Ready for invoicing/crediting (readyForInvoicing) and Not to be invoiced (notToBeInvoiced) are now included in the class Statistics.Delivery.
More information:
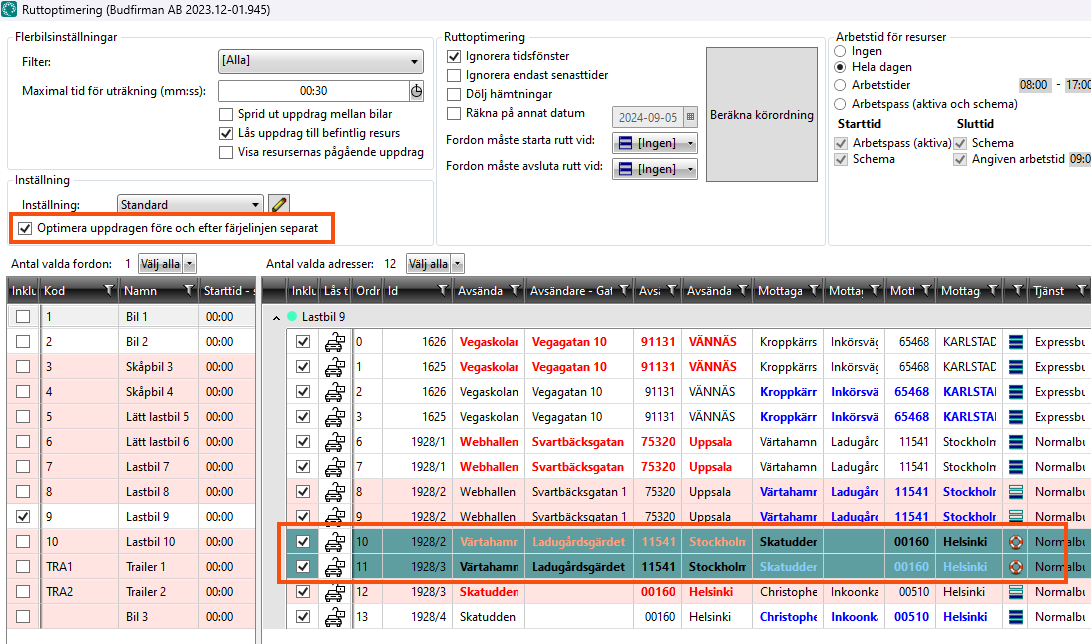
It is now possible to lock which shipments will run before and after the ferry lines in the route optimisation, so that the ferries are correctly routed.
When you route optimise shipments that include ferry lines, the Optimise the shipments before and after the ferry line separately checkbox appears in the Route optimisation window. Select it. Ferry mission addresses are highlighted in green in the list. Then select the shipments that should be before or after the ferry line, right-click and select Selected shipments are carried out before the ferry line or Selected shipments are carried out after the ferry line. Then calculate the route sequence for the other stops as usual.
As the shipments before and after the ferry are geographically grouped, it may be easiest to mark the shipments on the map.
More information:
It is now possible to select addresses on the map in the Route optimisation window and then drag and drop them to a new location in the address list. This can be useful if you want to mark stops that are geographically close to each other, e.g. all stops before or after a ferry line. Hold down shift and drag your mouse to highlight the addresses on the map.
If you use multiple vehicle optimization, you can also assign the shipments to another vehicle (Ctrl + M).
More information:
It is now possible to select and move several addresses at the same time in the address list in the route optimiser by holding down the Ctrl or Shift key and clicking.
More information:
It is now possible to display the country and country code of supplier bills with the following tags in the supplier bill report
Country on the order (command="Deliveries"):
-
Sender's country/country code: DEL_COU_Name_From/DEL_COU_Code_From
-
Recipient country/country code: DEL_COU_Name_To/DEL_COU_Code_To
Country on shipment (command="Shipments"):
-
Sender's country/country code: SHI_COU_Name_From/SHI_COU_Code_From
-
Recipient country/country code: SHI_COU_Name_To/SHI_COU_Code_To
If you get incorrect distances/positions in the Order reception, it may be due to old address information that is no longer current. To solve this, you can clear the distance cache and/or the address position cache.
More information:
Normally, when original consignments are consigned and new addresses are thus added to the consignment, the new addresses are added second or third to last in the list of all addresses of the consignment. If a ferry mission is first or last in the list, the new address is now added first or last instead, so that the start and end address of the ferry mission are kept together in the list. (The list of consignments (see Text tags in App.OpterDriver.Design) is available in the Order reception, on the tab Shipments, in the box Addresses.)
More information on consignments on ferries:
Now you can also retrieve data on which orders have changed during a period, using Opter's statistics API.
More information:
Consolidation type is now available as a search option in the order checker on the tab General, under Search settings, on the tab More search options.
You can filter on Consolidation type in the same way as you can filter on, for example, Consignment type.
More information:
It is now possible to allocate the costs of a consignment shipment according to the distance of the original shipment. This can be useful, for example, if you want the costs to reflect the CO2 emissions of the original missions. Select Relative distance in the drop-down menu Cost split for shipments grouped in a consignment (statistics) on the consignment type.
More information:
Now you can access more information about the vehicle used for each shipment via EDI export. Information on vehicle type, environmental class, CO2 emissions (g/km), fuel and fuel consumption (per 100 km) is now available. (Information on vehicle number, vehicle name and registration number is already available).
You must first enter the information for each vehicle in the vehicle register in Opter, before you can get the information out via EDI export.
More information:
It is now possible to calculate an optimal route sequence for stops on a consignment. Open the consignment order in Order reception and go to the address list (located by default on the Shipments tab). Then click on Calculate route sequence.

More information:
It is now possible to set the status of the original order to be reset to the first in the life cycle, and the resource to be removed from the original order, when you release a shipment from a consignment order (in Order reception or Dispatch). Select Reset status when original shipments are released from consignment orders on the consignment type.
More information:
If, in the Consignment types window, you have selected Create new addresses if no matching addresses when consigning and All consignment shipments have the same resource, the following applies:
Previously, the All consignment shipments have the same resource function was only used when a resource was allocated to a shipment on the consignment and then put the same resource on all shipments in the consignment.
Now the function All consignment shipments have the same resource is also used when a consignment shipment is created because the function Create new addresses if no matching addresses when consigning is activated. Thus, when a shipment is consigned, the first resource found by Opter (in the consignment) is allocated to the new shipment.
More information:
It is now possible to take into account the bearing capacity class of roads when calculating the distance between addresses on an order.
More information:
It is now possible to select the currency of hauliers, subcontractors and supplier bill adjustments, and then credit in that currency instead of the default currency.
If you choose a currency other than the default currency, you must have an exchange rate against the default currency for the amount on the supplier bill to be correct.
More information:
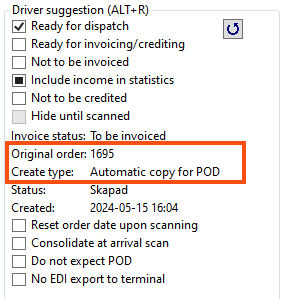
It is now possible to display the original Order number and Order type on invoices with the following tags
-
DEL_Id_SpawnParent: original Order number.
-
DCT_Nameorder type.
-
DCT_Id: Can be used as a condition to show only certain info for orders with a specific order type. For example condition="DCT_Id=8" shows the info conditionally only if the order type is Automatic copy for POD.
-
1 = Scheduled
-
2 = Order reception
-
3 = Internet customer
-
4 = Correction
-
5 = Mobile device
-
6 = EDI
-
7 = Internet supplier
-
8 = Automatic copy for POD
-
9 = Automatic copy for scan
-
10 = Internet driver
-
11 = Internet vehicle
-
12 = Internet subcontractor
-
13 = Internet terminal
-
More information:
-
(ordermottagningen)
It is now possible to export invoices to Dinero via API.
More information:
It is already possible to display the column Consignment ID (consignment Order number) on the resource webs. It is now possible to display this column on the customer web as well, but the consignment's Order number is only displayed for consignments that are to be invoiced to the logged-in customer.
More information:
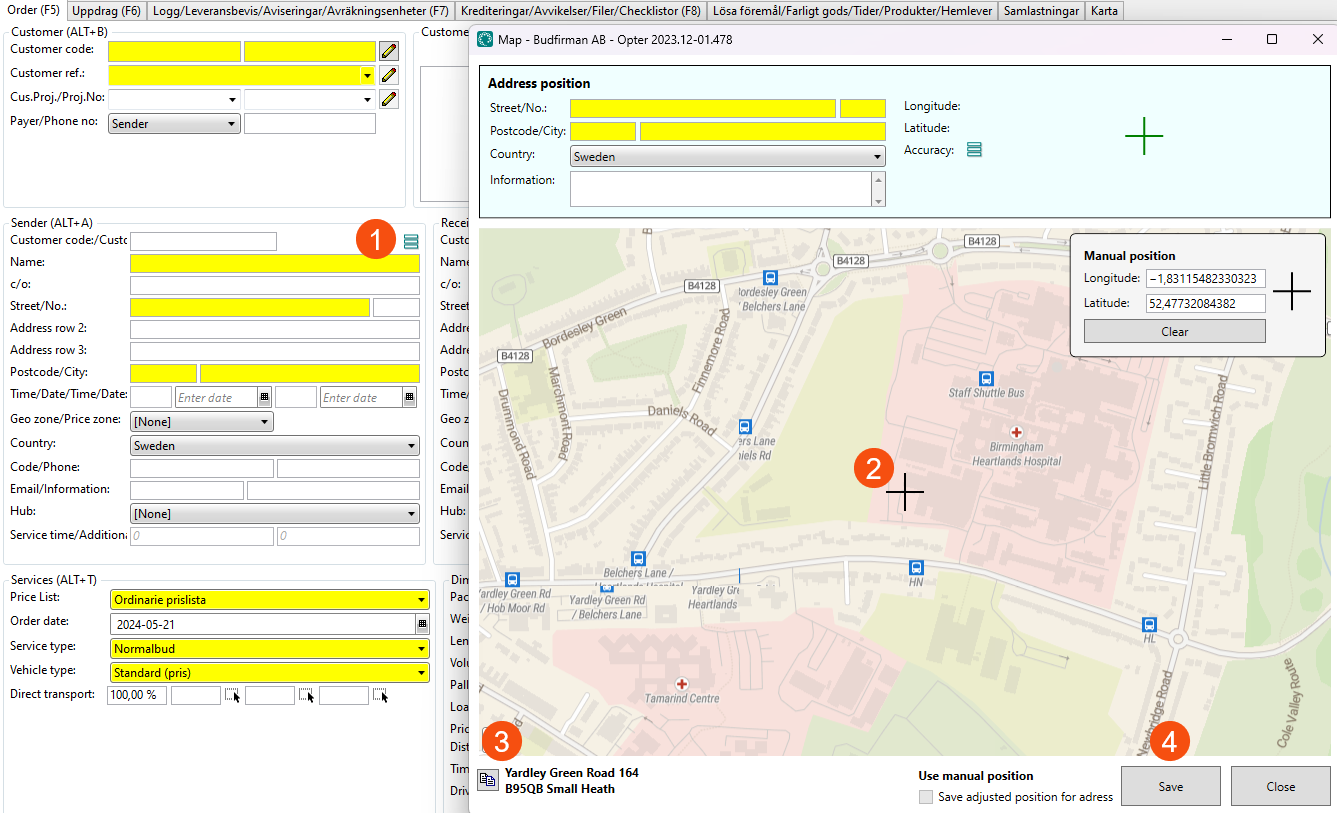
You can now click on the map and download the address for the order.
Open the map by clicking on the position icon ) under Sender or Receiver and then click on the position you want to use. Copy the address ) at the bottom left of the window and click on Save and that address will be added to the order.
More information:
It is now possible to show the estimated CO2 emissions of the order to the customer when they place an order. Opter then also calculates the CO2 emissions of the order per shipment. A statistical report can be created that shows the amount of CO2 emissions calculated to have been generated by the transport operations over a given period.
More information:
Opter Driver
Some features of Opter Driver may require a specific version of Opter.
In the menu in the detail view, you can now choose to display Freight bill or parcel labels in PDF format. This also allows you to print Freight bills and parcel labels, but this is done outside the app.
More information:
The driver can be given the option to add a deviation if not all parcels on the shipment have been scanned. (This feature has been previously available in Opter Driver (classic) for Android, and is now extras in Opter Driver for iOS and Opter Driver Labs for Android 2.4.15).
More information:
Improvements in Opter Driver for iOS and Opter Driver Labs for Android:
You can set it up so that the scan is blocked or the driver receives a warning in Opter Driver if they try to depart or pick up a shipment that is not scheduled on that resource. Previously both messages could be displayed at the same time, now the message that the scan has been blocked is prioritised (as it works in Opter Driver (classic) for Android). In addition, the resource to which the shipment was allocated is now also shown and the text has been changed to red to make it more visible.
More information:
It is now possible to display the comment from the last scan in both the scan list and the detail view in Opter Driver. This can be useful if, for example, there is information about the location of different parcels in the Terminal when the driver is about to scan an order. Include Comment (scanning) [PACKAGE.SCANCOMMENT] in the tabs Scanning view and/or Scanning - detail view in the window Design field for mobile.
More information:
The scan list shows all packages on the shipment, including those that have not been scanned. For each package, it is possible to add deviations, change dimensions, and undo scans. Select packages by pressing the magic wand icon and pointing the scanner at the package label, or via the menu that appears when you drag the shipment to the left.
Delete failed scans or undo all collision scans for a shipment by dragging the shipment to the right.
More information:
Drivers can already make changes to shipments in Opter Driver by selecting the Changes menu item in the detail view. They can now also make changes by clicking on the Changes button on the delivery confirmation page.
More information:
In Opter Driver, you can display different designs for certain customers, certain services and/or certain price vehicle types. You do this by using different conditions for different designs in the XML file App.OpterDriver.Design.
More information:
It is now possible to specify "contains" as an operator in conditions in App.OpterDriver.Design. Type ":" (colon) to indicate "contains" as a condition instead of, for example, "=" (equal to). In the following example, the text "DeliveryOption K" is displayed in the app if the order has an option with the code "K":
-
<item itemname="'DeliveryOption K'" condition="DELIVERYOPTIONS : K" />
More information:
Opter Driver and Opter Terminal can now be installed on Datalogic Memor 11.
More information:
Opter Driver and Opter Terminal can now be installed on Honeywell CT45 and Newland NFT10.
More information:
Mobile data settings LooseItemForceSetValue are extras for Opter Driver for iOS.
More information:
In the field Comment on the pod, the driver can enter a comment manually or scan a barcode, for example. It can be set so that the driver can or must provide a comment. It is also possible to specify whether the driver should enter a comment manually or scan in a comment.
More information:
It is now possible to set the driver to indicate the reason for delay in the POD view, if the delivery is delayed.
More information:
Now you can set it up so that the driver has to enter or scan a scan comment when the driver picks up or drops off goods at a Terminal, at the sender or at the recipient. The scan comment can be, for example, a QR code or a barcode on the wall inside a cold store. The reason for doing this is to ensure that the driver leaves the goods in the cold store and not outside it.
More information:
There are now more settings for how drivers can change the status of shipments in Opter Driver. For example, you can set it up so that drivers can only change to the status Picked up and/or Delivered by scanning.
More information:
Drivers can now fill in checklists in Opter Driver for pick-ups and/or deliveries.
More information:
Opter Terminal
Some features of Opter Terminal may require a specific version of Opter.
Opter Driver and Opter Terminal can now be installed on Datalogic Memor 11.
More information:
Opter Driver and Opter Terminal can now be installed on Honeywell CT45 and Newland NFT10.
More information: