Using ferries in dispatch
Last updated: 24 May 2024
In this article
A ferry in Opter is not a resource. Choose whether a ferry consists of two terminals and the distance between them, with the terminals being the ports between which the ferry travels, or whether a ferry only consists of shipments placed on the route the ferry travels. A ferry in Opter only has one direction. More information about ferries is available in Ferry lines.
Conditions
In order to be able to use ferries in dispatch, you first need to create the ferries and enter the departure time, arrival time and timetable. For instructions, see Ferry lines.
Using ferries in dispatch
All parts of the Ferries window in dispatch are described in Ferries (panel). To use ferries in dispatch, proceed as follows:
-
Assign the shipment to a resource, i.e. a driver, a vehicle, or a trailer. For instructions, see Assigning shipments to resources in dispatch.
-
If you cannot see the Ferries window in dispatch yet, click on View at the top of dispatch, and then click on Ferries.
-
Add the shipment to the ferry booking (ferry box) by selecting the shipment in dispatch and dragging and dropping it onto the ferry box in the Ferries window.
The image shows five ferry bookings (ferry boxes).
(If you want, you can add the resource to the ferry booking (ferry box) instead by selecting the resource box and dragging and dropping it onto the ferry box in the Ferries window.)
A window then appears in which you can see which shipments match the ferry times. The shipments (rows) in which the checkbox is selected match the ferry times. The resources to which these shipments are assigned are also included in the ferry booking, which is shown in the lower list by the resource checkboxes being selected.
If Opter has not selected the checkbox for a shipment, this means that the shipment does not match the ferry times, but the checkbox for a shipment can be selected manually if desired. In this case, the resources assigned to the shipment will also be linked to the ferry booking.
Click on Ok when finished.
-
If this was the first shipment added to the ferry booking, the ferry box changed colour from grey to green, and the status became Planned. For more information about the status and colours of ferry bookings, see Ferries (panel).
The arrow in the image points to the numbers showing how many resources and shipments are booked on the ferry, in this case there are three shipments and one resource booked on the ferry.
-
To see which shipments are on the ferry booking, select the ferry and click on Show shipments at the bottom of the Ferries window in dispatch.
Clicking on Show shipments displays the list of shipments included in the ferry booking.

The red box in the image shows the list of shipments included in the ferry booking.
The resources (i.e. Vehicle, Employee and Trailer) shown in the list in the Shipments box are the resources to which the shipments are assigned, but this does not automatically mean that those resources are included in the ferry booking.
The resources shown as resource boxes in the Resources box are included in the ferry booking, but this does not automatically mean that they have been jointly assigned all the shipments booked on the ferry.
The red box in the image shows the list of shipments included in the ferry booking. The arrow in the image points to the resources included in the ferry booking.
For more information, see Ferries (panel).
Shipment without resource
If a shipment is added to a ferry without a resource, an error message appears.
Consignments on ferries
Consignments can be booked on ferries.
Conditions
-
If you cannot see the Ferries window in dispatch yet, click on View at the top of dispatch, and then click on Ferries. (All parts of the Ferries window in dispatch are described in Ferries (panel)).
-
It is easier to work with consignments on ferries in dispatch if all the consignment shipments in the consignment order can be seen. We therefore recommend checking the following dispatch settings (on the Tabs tab > Lists tab):
-
The Expand to show shipments in the consignment checkbox.
-
The Show consignment shipments (cannot be grouped) checkbox.
-
The Show shipments that are only on consignment orders (cannot be grouped) checkbox.
-
The Also show extra shipments for consignments checkbox.
For more information about the checkboxes, see Dispatch settings (window). For more information about consignments, see Consignment, overview.
-
Booking consignments on a ferry
There are different ways of booking a consignment on a ferry, depending on whether the consignment order has one or more consignment shipments. The number of consignment shipments in a consignment order can be seen under Shipments in order reception. It can also be seen there which shipments are ferry shipments. They are marked with a life belt icon ![]() .
.
Proceed as follows:
-
Assign the consignment shipment to a resource, i.e. a driver, a vehicle or a trailer. For instructions, see Assigning shipments to resources in dispatch.
-
Add the consignment shipment to the ferry booking (ferry box) by selecting the consignment shipment in dispatch and dragging and dropping it onto the ferry box in the Ferries window in dispatch.
One of the following now happens:
-
If the start and end addresses of the consignment shipment are different from the start and end addresses of the ferry line, Opter splits the consignment shipment and adds a ferry shipment.
-
If the start or end addresses of the consignment shipment are the same as the start or end addresses of the ferry line, Opter adds the missing ferry terminal to create a new shipment (a ferry shipment). The consignment shipment is divided up.
-
If the start and end addresses of the consignment shipment are the same as the start and end addresses of the ferry line, Opter just adds a ferry shipment (which then has the same addresses as the consignment shipment). An order is displayed on the Shipments tab in order reception. The shipment is marked with
 .
.
-
-
Identify which of the consignment shipments extends across the ferry line.
This can be done in dispatch or order reception (on the Shipments tab) by looking at the start and end addresses of the consignment shipments, and possibly by looking at the map to see where the ferry lines go.
-
Allocate the consignment shipment (which extends across the ferry line) to one resource. For instructions, see Assigning shipments to resources in dispatch.
-
Add the consignment shipment to the ferry booking (ferry box) by selecting the consignment shipment in dispatch and dragging and dropping it onto the ferry box in the Ferries window in dispatch.
One of the following now happens:
-
If the start and end addresses of the consignment shipment are different from the start and end addresses of the ferry line, Opter splits the consignment shipment and adds a ferry shipment.
-
If the start or end addresses of the consignment shipment are the same as the start or end addresses of the ferry line, Opter adds the missing ferry terminal to create a new shipment (a ferry shipment). The consignment shipment is divided up.
-
If the start and end addresses of the consignment shipment are the same as the start and end addresses of the ferry line, Opter just adds a ferry shipment (which then has the same addresses as the consignment shipment). An order is displayed on the Shipments tab in order reception. The shipment is marked with
.
-
View which consignments are booked on a ferry
To view which consignments are booked on a ferry, proceed as follows:
-
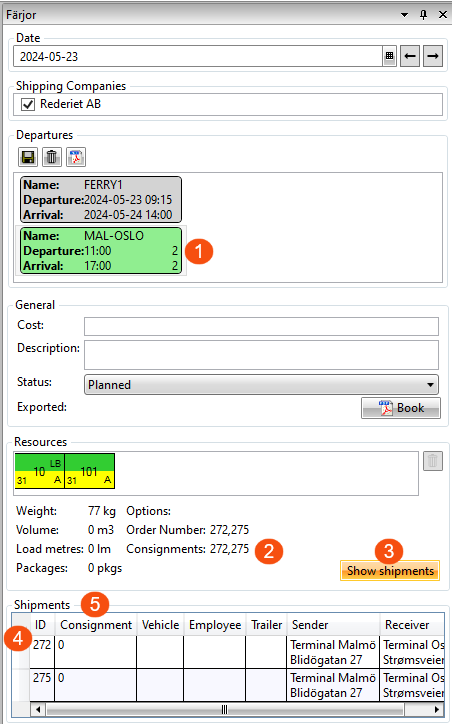
Select the ferry (1) in the Ferries window in dispatch.
In the Resources box, the order numbers (2) of the consignments booked on the ferry are displayed.
-
To see the shipments, click on Show shipments (3).
The table shows the shipments, one shipment per row. The ID column (4) shows the order numbers (for normal orders and for consignment orders).
If the shipment is part of a consignment, the consignment order number is displayed in the Consignment column (5).
(If a zero ("0") is displayed in the Consignment column, it means that the shipment is a consignment shipment or a shipment not linked to any consignment).
Removing shipments from a ferry booking
To delete a shipment from a ferry, proceed as follows:
-
In dispatch in the Ferries window, select the ferry booking (ferry box).
-
Click on Show shipments.
-
Select the shipment to delete from the list, and press the Delete key.
Removing a resource from a ferry booking
To delete a resource from a ferry booking, proceed as follows:
-
In dispatch in the Ferries window, select the ferry booking (ferry box).
-
In the Resources box, select the resource box and click on
 at the far right of the window.
-
If the resource you want to delete has shipments on the ferry booking, you will receive a message indicating that if you delete the resource you will leave one or more shipments without a resource on the ferry. You will be asked whether you want to delete these shipments from the ferry. Answer Yes or No.
If you answered Yes, the shipments are now under Created in dispatch.
If you answered No, the shipments are now on the ferry without a resource.
Ferry lines on the map in dispatch
Ferry lines are indicated on the map by a dashed line and a life belt symbol ![]() . For more information, see Map in the dispatch centre and Explanation of symbols – map.
. For more information, see Map in the dispatch centre and Explanation of symbols – map.