Last updated: 23.05.2024
Ferries (panel in dispatch)
Order > Order dispatching
In this article
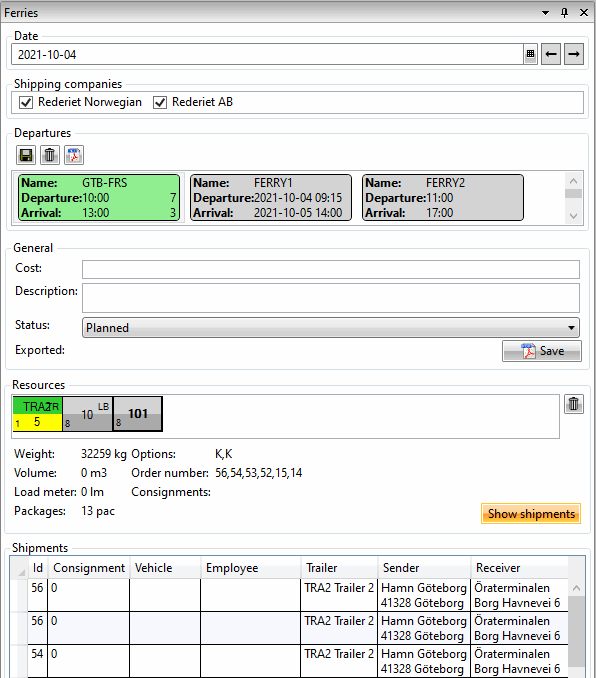
Use this window to manage ferry bookings. For more information about ferries, see Ferry linesand Using ferries in dispatch.
The Ferries panel (window) is now displayed on the right-hand side in dispatch. If the Ferries panel is not displayed in dispatch, add it by clicking on the View menu tab at the top of dispatch and then selecting Ferries.

Date
| Function | Explanation |
|---|---|
|
Date |
Select the date for which ferry bookings are to be managed. Use the arrows to go forward or back one day. |
Shipping Companies
| Function | Explanation |
|---|---|
| Shipping Companies |
A list of the shipping companies with which the ferries in the Departures box are associated is shown here. If the checkbox is selected, this means that at least one of the shipping company’s ferries is listed in the Departures box. If there is a shipping company that you do not want to use, deselect the checkbox for that shipping company. When you deselect the checkbox for a shipping company, the company’s ferries are no longer displayed in the Departures box for the date you selected at the top of the Ferries window in dispatch. |
Departures
The ferry departures that are available for the date you have selected at the top can be seen here.
| Function | Explanation |
|---|---|
|
Save |
Saves the bookings for the selected ferry. |
|
Delete |
Deletes all the bookings on the selected ferry. |
| Book |
Creates a PDF file with a list showing all the bookings on the selected ferry. The PDF file can then be sent to the shipping company to book the ferry, for example. There is no preset report, but you can create one yourself. To create a ferry booking report, click on Settings > Reports. Give the report a name, for example “Swedish Ferry Booking”. Select the file type, i.e. normal, text or HTML. Select the uses for which the report should be available. Click on Save to save all changes. Click on Settings > Offices, click on the Reports tab. In the Ferry booking drop-down list, select the report you created. Click on Save to save all changes. For more information, see Reports (window). If you need help, contact support. |
| Name (in the ferry box) |
The name of the ferry. The name of the ferry can be changed under Register > Ferries. |
| Departure (in the ferry box) |
The ferry’s departure time. If the departure time and arrival time are on different dates, both the time and date are displayed. If the departure time and arrival time are on the same date, only the time is displayed. The date is the Date you selected at the top of the Ferries window. The ferry’s departure time can be changed under Register > Ferries. |
| Arrival (in the ferry box) |
The ferry’s arrival time. If the departure time and arrival time are on different dates, both the time and date are displayed. If the departure time and arrival time are on the same date, only the time is displayed. The date is the Date you selected at the top of the Ferries window. The ferry’s arrival time can be changed under Register > Ferries. |
| The number at the top right of the ferry box |
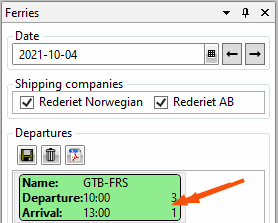
The number shows the number of shipments booked on the ferry. See image below. |
| The number at the bottom right of the ferry box |
The number shows the number of resources booked on the ferry. See image below. |

The image shows the upper part of the Ferries window in dispatch. The arrow points to the numbers showing the number of resources and shipments booked on the ferry. In this example there is one resource and three shipments booked on the ferry. To see the shipments, select the ferry and click on Show shipments at the bottom of the Ferries window in dispatch. To see which resources are on the ferry, select the ferry to display the resource boxes in the Resources box further down in the Ferries window. For more information, seeUsing ferries in dispatch
General
| Function | Explanation |
|---|---|
| Cost |
Free text field. If desired, the cost of the ferry booking can be entered. |
| Description |
Free text field. If desired, notes about the ferry booking can be made here. |
| Status |
Status of the ferry booking. Some statuses are set automatically and some can be set manually. The ferry box shows the status of the ferry booking using the following colours:
It is possible to put shipments on a ferry regardless of the status of the ferry booking. This means that even if you have set the ferry to the Cancelled status, for example, it is still possible to put shipments on the ferry. |
| Exported |
Shows the last time a PDF file with the ferry booking was created for the selected ferry. |
| Book |
Creates a PDF file with a list showing the booking on the selected ferry. The PDF file can then be sent to the shipping company to book the ferry, for example. There is no preset report, but you can create one yourself. To create a ferry booking report, click on Settings > Reports. Give the report a name, for example “Swedish Ferry Booking”. Select the file type, i.e. normal, text or HTML. Select the uses for which the report should be available. Click on Save to save all changes. Click on Settings > Offices, click on the Reports tab. In the Ferry booking drop-down list, select the report you created. Click on Save to save all changes. For more information, see Reports (window). If you need help, contact support. |
Resources
| Function | Explanation |
|---|---|
| Fields for resource boxes |
The field shows an overview of the resources booked on the selected ferry. The resources shown as resource boxes here are included in the ferry booking, but this does not automatically mean that they have been jointly assigned all the shipments booked on the ferry. To delete a resource from the ferry, right-click on the resource box and click on |
| Weight |
The sum of the weight of all the shipments booked on the selected ferry. The weight is displayed in kilograms (kg). |
| Volume |
The sum of the volume of all the shipments booked on the ferry. The volume is displayed in cubic metres (m3). |
| Load metres |
The sum of the number of load metres for all the shipments booked on the ferry. The number is displayed in load metres (lm). |
| Packages |
The sum of the number of packages in all the shipments booked on the ferry. The number is displayed in packages (pac). |
| Options |
Options such as Refrigeration (R), Heating (H) or Sack truck (ST) for shipments booked on the selected ferry. |
| Order number |
The order numbers of the shipments booked on the selected ferry. |
| Consignments |
If there are consignments booked on the selected ferry, the consignment order numbers are displayed here. |
| Show shipments |
Click on Show shipments to display the list of shipments booked on the selected ferry. |
Shipments
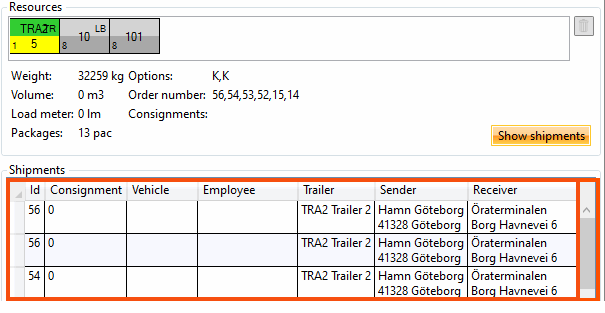
This box displays a list of the shipments booked on the selected ferry. This box is only visible after you have chosen to display the shipments by clicking on Show shipments in the Resources box.

The resources (i.e. Vehicle, Employee and Trailer) shown in the list are the resources to which the shipments are assigned, but this does not automatically mean that those resources are included in the ferry booking.
The resources shown as resource boxes in the Resources box are included in the ferry booking, but this does not automatically mean that they have been jointly assigned all the shipments booked on the ferry.
| Function | Explanation |
|---|---|
| ID |
Order number. |
| Consignment |
Consignment order number. If the shipment is part of a consignment, the consignment order number is displayed here. (If the shipment is a consignment shipment, a zero (“0”) is displayed in this column). |
| Vehicle |
The vehicle to which the shipment is assigned. |
| Employee |
The employee to whom the shipment is assigned. |
| Trailer |
The trailer to which the shipment is assigned. |
| Sender |
The shipment’s pickup address. |
| Receiver |
The shipment’s delivery address. |