Last updated: 23.11.2022
Activating and grouping the queue in dispatch
In this article
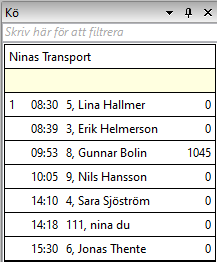
In dispatch you can display a queue of vehicles/resources that currently have no shipments. The vehicle that has been without any shipments longest is at the top of the list, i.e. first in the queue. If a shipment is assigned to the vehicle/resource, it will disappear from the queue list.

It is possible to choose whether or not to group the queue. If the queue is to be grouped, choose whether to group the queue by vehicle type, zone and/or region:
-
Group by vehicle type: Type of vehicle.
-
Group by zone: The geographical zone the vehicle is in according to the last position indication.
In order to group the queue by zone, a geographical description of the zones must be provided. This cannot be done in the Opter interface. Contact for more information.
-
Group by region: Vehicle’s region.
If a driver has forgotten to mark their last shipment as unloaded on time, the idle time can be entered manually in dispatch. For more information, see Enter the idle time manually below.
Step 1: Activate the queue function and select grouping
For example, if you choose to group the queue by region, the vehicle that became idle earliest in a region will be displayed at the top of the list for that region.
It is not necessary to select a grouping. If the queue is not grouped in any way, the vehicle that became idle earliest is shown at the top of the list, i.e. first in the queue.
Proceed as follows to activate the queue and define the grouping for the queue list, if applicable:
-
Click on Settings > Offices. Click on the Dispatching tab.
-
In the Queue/schedule box, tick the Enable queue checkbox.
Selecting the Enable queue checkbox means that the queue will be updated when new positions or status updates are received.
-
To group the queue list in dispatch, select one or more of the following checkboxes:
-
Group by vehicle type: Type of vehicle.
The vehicle type is set under Register > Vehicles, on the General tab, in the Vehicle type drop-down list.
In order to group the queue by vehicle type, the primary resource must be vehicles, because employees/drivers do not have a vehicle type.
-
Group by zone: The geographical zone the vehicle is in according to the last position indication.
In order to group the queue by zone, a geographical description of the zones must be provided. This cannot be done in the Opter interface. Contact for more information.
-
Group by region: Vehicle’s region.
The vehicle’s region is set under Register > Vehicles, on the General tab, in the Region drop-down list.
-
-
If the Group by zone checkbox has been selected and a collection of geographical zones is to be used, this can be set in the Collection of geographic zones for queue drop-down list.
-
Click on Save to save all changes.
It may be necessary to restart the dispatch window for the new queue settings to be applied.
Step 2: Display the Queue panel in dispatch
-
If the Queue panel is not displayed in dispatch, add it by clicking on the View menu tab at the top of dispatch and then selecting Queue.
The Queue panel is now displayed on the right-hand side in dispatch. The Queue panel displays the queue according to the settings made in Step 1: Activate the queue function and select grouping above.
Enter the idle time manually
The idle time is the time when the vehicle became idle. If the queue has been activated, Opter automatically registers the vehicle’s idle time when the last shipment is unloaded. An idle time can be manually entered in dispatch, for example if a driver has forgotten to mark their last shipment as unloaded in a timely way.
To manually enter the idle time for a resource, proceed as follows:
-
Select the resource row in the queue list in the Queue panel in dispatch.

-
Right-click on the resource row and select Enter manual idle time.
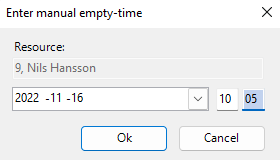
The Enter manual idle time window opens.

-
Select the date and time when the resource/vehicle became idle. Click on Ok when finished.
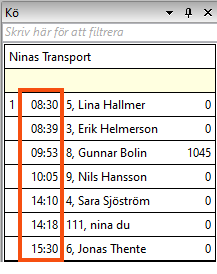
The idle time is displayed to the left of the resource number and name in the queue list in dispatch.

For more information on the columns in the queue list, see Queue (panel in dispatch).