Alternative layouts in Opter Driver (classic)
Last updated: 16 June 2025
In this article
You can customise how shipments are displayed in Opter Driver by creating an alternative design in App.Design, and then setting conditions on that design so that it only applies to orders with a specific customer, service and/or price vehicle type. The design is decided at the order level, not for example at the mission or driver level. It is therefore the customer, service and/or price vehicle type of the order that determines how the shipments are displayed in Opter Driver.
You can change the layout in the assignment list (<summaryrows>), the assignment view (<expandedrows>) and the POD view (<podrows>). The scanning views always use the standard design (<scanrows> and <scandetailrows>).
Basic information about App.Design can be found in App.Design.
Create an alternative design
The layout is edited in an XML editor, which is opened as follows:
-
Click on Settings > Mobile data > Settings mobile data.
-
Click on Edit, next to App.Design.
The Layout - apps window opens.
-
Starting from the default design, check that it has the name "Default" and that default="true" on line 3 of the XML editor:
For more information on editing the default design, see App.Design.
-
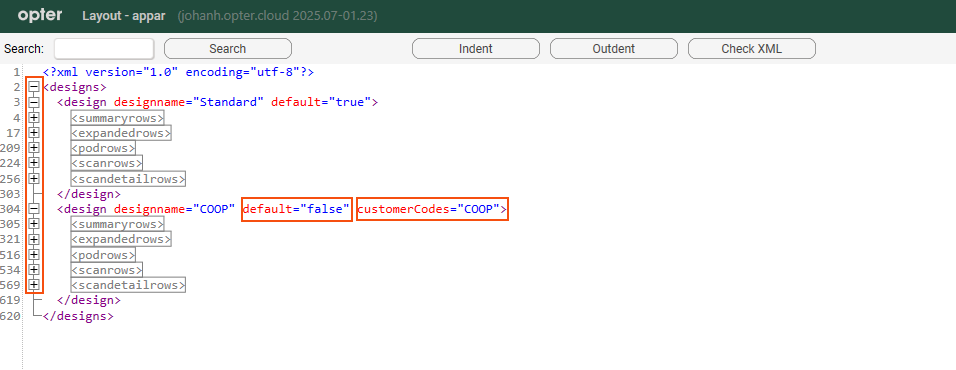
Copy the default design and paste the copy after the closing </design> tag. You can click on
 on the far left to minimise the various sections. See lines 304-619 in the image below.
 -
Here we have started to add a new design for orders with the customer code "COOP" by adding the following to the design tag (line 304)
<design designname="COOP" default="false" customerCodes=COOP">
It is important to set default to false, otherwise the customised design will be used for all shipments.
-
You can only make changes in three of the sections, <summaryrows> (the task list), <expandedrows> (the detail view) and <podrows> (the POD view). <scanrows> and <scandetailrows> always use the default design. In our example, we have added a line in the <summaryrows> section that shows the delivery instructions in the order list (1).
Remove the sections that you are not making changes to from the new design, in our case <expandedrows> and <podrows>. Then changes you make to the default design in those sections will be reflected in both the default and alternative designs. If you still have the sections in the alternative design, you will need to make the same changes there to apply also to orders with the customer code "COOP" (2).

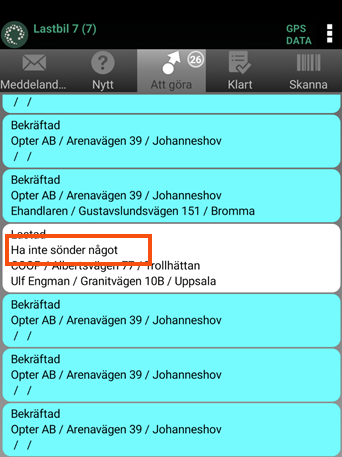
Here's how the delivery instructions are displayed in the order list in the app.
-
Close Layout - apps and click Save in the Mobile data settings window. For the changes to be visible in the app, the driver must log out and back in again.
Several conditions
You can control which design to use on an order with three different conditions, customer code, service and price vehicle type. You can also enter several different customer codes, for example All conditions must be met for the design to be used.
Enter only the conditions you want to control. If a design is to apply to all customers but only one service, do not enter customerCodes in the design tag.
Customer code (customerCodes)
Add customerCodes to the design tag and enter the customer codes for which the design will be used. Separate the customer codes with commas. Example:
<design designname="Design1" xmargin="3" ymargin="3" default="false" customerCodes="FLEET101, FLEET102, FLEET103">
Service (serviceTypeCodes)
Add serviceTypeCodes to the design tag and enter the service codes for which the design will be used. Separate the service codes with commas. Example:
<design designname="Design1" xmargin="3" ymargin="3" default="false" serviceTypeCodes="XPRESS, N, PANIC">
Price vehicle type (vehicleTypeCodes)
Add vehicleTypeCodes to the design tag and enter the codes of the price vehicle types for which the design should be used. Separate the codes with commas. Example:
<design designname="Design1" xmargin="3" ymargin="3" default="false" vehicleTypeCodes="BIL, F1, LB, TLB">
Example
Multiple customer codes
The order will be displayed with this design if the customer code is "IKEA" or "HM" or "COOP".
Several conditions
<design designname="Design1" default="false" customerCodes="IKEA,HM" serviceTypeCodes="PG" vehicleTypeCodes="TB">The order will be displayed with this design if the customer code is "IKEA" or "HM" and if the service code is "PG" and if the price vehicle type code is "TB". If the order has a different value for any of those fields, the default design is used instead.
Alternative designs with overlapping terms
If an order matches several different designs, the design with the most matching conditions is used.
The courier company has the following two alternative designs. One for the customer code "IKEA" ("Design1") and one for the customer code "IKEA" and the service code "XPRESS" ("Design2").
<design designname="Design1" default="false" customerCodes="IKEA">
<summaryrows>
...
</summaryrows>
<design designname="Design2" default="false" customerCodes="IKEA" serviceTypeCodes="XPRESS">
<summaryrows>
...
</summaryrows>-
Orders with the customer code "IKEA" and the service code "XPRESS" thus fulfil the conditions of both designs. Then "Design2" is used because that design has the most matching conditions.
-
Orders with the customer code "IKEA" and the service code "NO" are assigned "Design1" because they do not fulfil the service condition for "Design2".
-
Orders with customer codes other than "IKEA" will receive the standard design.