Exporting sales ledgers to Visma.net
Last updated: 16.04.2024
In this article
Opter integrates with several different Visma systems, each of which has different functions. Check which system you are using:
-
Visma.net, (see Exporting sales ledgers to Visma.net).
-
Visma e-conomic, (see Exporting invoices to Visma e-conomic and Supplier bill export to Visma e-conomic).
-
Spiris, (see Accounting data export to Spiris (formerly eEkonomi)).
Sales ledger items can be created in Visma.net based on invoices created in Opter. Customers that are invoiced in Opter are added to Visma.net (if they are not already available there) or updated (if there are more recent changes to them in Opter than in Visma.net).
You need to know your Visma company ID to configure the invoice export. Contact Visma for more information.
More information is also available in the Visma API documentation.
Getting started with the integration
In order to connect Opter and Visma.net, a tenant ID must be added to the invoice export. Proceed as follows:
-
Contact and ask for an invitation to Visma.net. Opter creates an invitation and sends it to you.
-
When you receive the invitation email, log in to the Visma App Store, use the invitation code and accept the terms and conditions for the integration. Opter then receives a message that a tenant ID can be retrieved.
-
Once you have accepted the terms and conditions, Opter adds the ID to the Password field in the invoice export. It is not shown as plain text, but only as points. This tenant ID is used to authenticate the integration between systems and is not a personal password.
Create an invoice export in Opter
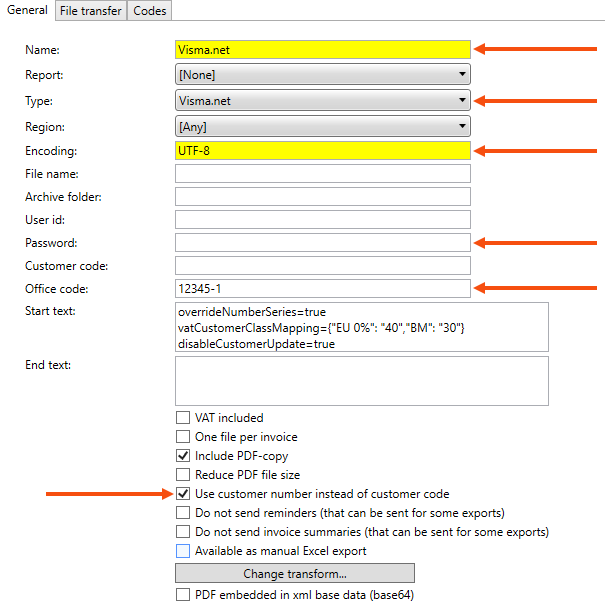
Click Economy > Invoices > Invoice export and create a new invoice export by clicking New.
The following fields must be filled in on the General tab:
-
Name: for example, “Visma.net”.
-
Type: Visma.net.
-
Encoding: UTF-8.
-
Password: Added by Opter (see Getting started with the integration above). Displayed only as points.
-
Office code: <Företags-ID>-<avdelnings-ID> (if used), for example "12345" Företags-ID only) or "12345-1" (Företags-ID and avdelnings-ID).
-
Use customer number instead of customer code
 : customers in Opter must be matched with the customers in Visma.net via the sales ledger number instead of the customer code.
The following settings can also be configured:
-
Include PDF-copy
: a PDF copy of the invoice is attached in the invoice export and becomes an attachment to the invoice in Visma.net. -
Reduce PDF file size: if it is desirable or necessary to reduce the size of the PDF file, it is possible to select this checkbox. The file size is reduced by removing all text formatting (bold, italic, underlined), and by changing the font to Trebuchet MS which uses less storage space. How much the file size is reduced depends, among other things, on how much formatting it contains.
-
Start text: this field can be used to specify that various settings should be applied in Visma.net when the invoice is imported. Enter each setting to be configured on a separate line. The settings configured here override any settings defined in Visma.net. If no settings are configured here, the settings defined in Visma.net will be used.
Setting
Explanation
overrideNumberSeries=true/false
true: Opter’s invoice number is used in Visma.net.
false: The invoice number from Visma.net is used in Visma.net.
If the ARINVOICE number series is used in Visma.net and you want to use the Opter invoice number, the following applies:
-
Select the Manual invoicing checkbox in Visma.net. It’s not necessary then to set this setting to “true”.
-
Select the Allow manual numbering on import checkbox in Visma.net and set this setting to “true”.
disableCustomerExport=true/false
true: the customer information is not sent from Opter to Visma.net. It can be useful if the customer requires some settings which cannot be controlled from Opter. The customer must then first be created manually in Visma.net. If the customer is not in Visma.net, an error message is displayed when the invoice is exported from Opter.
false: the customer information is sent from Opter to Visma.net and the customer is created in Visma.net.
disableCustomerUpdate=true/false
true: if the customer already exists in Visma.net, Opter does not update the existing customer information. This can be useful if there are other integrations that also update the information in Visma.net and that information should not be changed. If the customer does not exist at all in Visma.net, it is created as usual (unless disableCustomerExport = true, see above).
false: Opter updates the customer information in Visma.net.
dontEmail=true/false
true: the invoice is not sent by email after import from Opter.
false: the invoice is sent by email after import from Opter.
dontPrint=true/false
true: the invoice is not printed after being imported from Opter.
false: the invoice is printed after being imported from Opter.
sendToAutoInvoice=true/false
true: invoices imported from Opter are forwarded to Visma Auto Invoice.
false: invoices imported from Opter are not forwarded to Visma Auto Invoice.
paymentMethodId=ID of the payment method from Visma.net
The ID of the payment method in Visma.net with which the invoice imported from Opter is to be paid. For example, different OCR numbers for invoices created directly in Visma.net and invoices imported from Opter.
useCustomerClass=true/false
true: the customer category from the customer registry in Opter is used as the customer class in Visma.net.
false: the customer class specified in Visma.net is used. (Produces the same results as omitting the setting in Start text.)
periodDateSource=CreateDate/AccountingDate
Specify the accounting period to which the invoices should belong in Visma.net.
CreateDate: the date on which the invoice period was created in Opter.
AccountingDate: the date on which the invoices were booked in the accounts in Opter, i.e. the accounting date/transaction date.
includeExchangeRate=true/false
true: the exchange rate between the invoice currency and the system currency in Opter is sent to and used in Visma.net. This means that the amounts in the different currencies will match in Opter and Visma.net.
false: the exchange rate is not sent to Visma.net. If it differs between systems, the amounts in the different currencies may differ between Opter and Visma.net. This can be useful if payments are not recorded in Opter and differences between systems do not need to be taken into account.
vatCustomerClassMapping
Used to map VAT codes/rates in Opter to customer classes in Visma.net. It can be decided that customers with a certain VAT rate (Pricing tab in the customer registry) should have a certain customer class in Visma.net. See Visma.net for the customer classes.
Syntax (JSON):
vatCustomerClassMapping={“VAT code in Opter”: “customer class in Visma.net”,“VAT code in Opter”: “customer class in Visma.net“}
Example:
vatCustomerClassMapping={"25%": "10","12%": "10","6%": "10","CV": "10","EU": "20","0%": "30"}

-
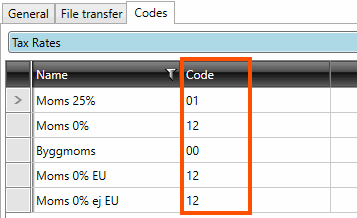
VAT codes
Visma.net has a fixed set of VAT codes that cannot be changed. The VAT codes in Opter must therefore be translated into the VAT codes used in Visma.net.
Go to the Codes tab and select Tax rates from the drop-down list. Then enter the VAT codes from Visma.net in the Code column for each of the VAT rates available in Opter. The VAT code must be entered exactly as it appears in Visma.net. If the VAT code in Visma.net is “01”, the Code column must read “01”. Using “1” does not work.
Exporting the sales ledger to Visma.net
Click on Economy > Invoices > Invoice export settings and select “Visma.net” (or the name you gave the invoice export) for the settings that will generate an export to Visma.net. Since all invoices are to be recorded, you should select the export for all export settings.
The invoice information can be exported from Opter when closing an invoice period, or subsequently when choosing whether to export entire invoice periods or individual invoices.
-
If the customer on the invoice being exported does not exist in Visma.net, Opter tries to create the customer in Visma.net.
The customer export can be disabled by entering ”disableCustomerExport=true” in Start text which is useful for ensuring that Opter is prevented from modifying customer information in Visma.net. An error message is displayed if the customer is not in Visma.net and the customer export has been disabled.
-
The account numbers, payment terms, economic units, currencies and customer categories that are in Opter must be in Visma.net. If an account number is missing, an error message will be displayed with information about what is missing.
-
Error message: The user details were not accepted by Visma.net (tenant id: {0})
Contact and ask them to add the password on the invoice export again.
Further adaptations
The appearance of the invoice rows in Visma.net can be customised using an XSLT transformation. Contact for more information.