Invoice export to Fortnox
Last updated: 18 June 2026
In this article
Opter can be connected to the Fortnox accounting system, www.fortnox.se. You can then do the following:
-
Export invoices from Opter to Fortnox.
-
Import payments from Fortnox to Opter. For more information, see Payment import from Fortnox.
-
Export supplier bills from Opter to Fortnox. For more information, see Supplier bill export to Fortnox.
Each time invoices are exported, Fortnox checks whether there is anything to update in the invoices or customers. Only invoices that have not yet been posted in Fortnox will be updated.
Opter sends a summary of each unique account combination. This means that Opter sends one invoice per combination of accounting account and economic unit.
Conditions
Integration licence and invoicing licence
To be able to connect (integrate) Opter to Fortnox, you need an integration licence. You also need to have a software licence for invoicing in Fortnox. These licences (also called "programs" and "add-ons") can be ordered in the Fortnox program. Contact Fortnox if you need more information about your licences.
Payment imports require the software licences for invoicing and accounting in Fortnox.
Settlement export and invoice export require the software licence for invoicing in Fortnox.
Web browser
In order to export to Fortnox, it is important that you use a modern standard browser, such as Edge, Firefox or Chrome.
Default currency
For the export of invoices and supplier bills to Fortnox, and the import of payments from Fortnox to Opter, to work, the default currency in Opter must be Swedish kronor (SEK).
If your Opter account has a default currency other than SEK, you will receive an error message when you try to export invoices to Fortnox.
Do not change the default currency as that would cause major problems in the system. If your default currency is not the Swedish krona, you will not be able to export invoices and supplier bills to Fortnox, or import payments from Fortnox.
Currency codes
Fortnox only accepts three-letter currency codes, such as “DKK”, “SEK”, “GBP” and “EUR”.
Exchange rates
It is important that you always use exactly the same exchange rates in Fortnox and Opter, to avoid issues such as exchange rate losses and payments that do not match the invoice in Opter exactly and are therefore recorded as advance payments.
To always have the same exchange rates in Fortnox and Opter, proceed as follows:
-
In Fortnox: Go to Invoicing > Currency and set Automatic exchange rates to “NO”.
-
Set exactly the same exchange rates in Fortnox and Opter. When updating an exchange rate, change the exchange rate at the same time in both Fortnox and Opter. In Opter, exchange rates are set under Economy > Currencies> Currency rates tab.
Customer number and sales ledger number
Fortnox requires all customers to have a number. To ensure that Fortnox and Opter work well together, check that the Fortnox customer number is the same number as the one in the Sales ledger number field under Register > Customers in Opter.
If customers are to be exported from Opter to Fortnox, make sure that all the customers in Opter have a number in the Sales ledger number field in the customer registry before exporting the invoices. When the invoices are then exported, the customer associated with the invoice is automatically downloaded from Opter to Fortnox.
Cost centre and project
In order for cost centres and projects to be transferred from Opter to Fortnox, you must write the names of the economic units as below on the Economy tab in the office settings (even if you have Opter in a language other than Swedish):
-
If cost centres are used, an economic unit must be called a “COST CENTRE”.
-
If projects are used, an economic unit must be called a “PROJECT”.

Also check that Name and Code for the economic units in Opter match with Name and Code for the cost centres in Fortnox. In Opter, you can find the economic units under Economy > Economic units.
Correcting an invoice, invoice number and number series of correction invoice
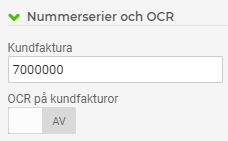
When a debit invoice recorded in Fortnox is corrected in Opter, Fortnox will create a correction invoice with an automatically generated invoice number. This invoice number may be the same as the number another invoice has or will have in Opter. To avoid this problem, go to Settings > Invoicing > Number Series and OCR in Fortnox, select a number series in the Customer Invoice field that will not clash with the invoice numbers in Opter, and click Save.
When exporting normal credit invoices, Fortnox does not allow you to decide the correction invoice number in Opter. If manual correction invoices are used, Fortnox accepts that the correction invoice number is determined in Opter, but the correction invoice will not be marked as the correction of another invoice and will lose the link to the original invoice.
Also note that even if correction invoices have previously been exported to Fortnox as normal correction invoices and a switch is then made to always exporting correction invoices as manual correction invoices, the number series will probably be interrupted.
If all the correction invoices should be treated as manual correction invoices when exporting invoices to Fortnox, select the Always manually export correction invoices checkbox on exports.
Correcting an invoice, OCR number
In Fortnox, under Settings > Invoicing > Number series and OCR, you can set OCR on customer invoices to OFF or ON.
When a debit invoice recorded in Fortnox is corrected in Opter, Opter generates an OCR number for the correction invoice. If you have chosen to set OCR on customer invoices to ON, Fortnox will also generate an OCR number. This OCR number may be the same as the OCR number another invoice has or will have in Opter. To avoid this problem, you can choose to set OCR on customer invoices to OFF and click on Save.
Interest invoices
In order for Fortnox and Opter to work well together, interest invoices are exported to Fortnox as normal invoices. Information specific to interest invoices is shown in a PDF copy, which Opter attaches to the invoice export to Fortnox if you have selected Include PDF-copy in the invoice export.
Selling invoices
If you sell your invoices, Fortnox would like you to sell the invoices that are in Fortnox. To include all the details (such as the sender, receiver, distance, weight, freight bill number, etc.), it is important to attach the Opter invoices as PDF files when exporting to Fortnox. This can be done by selecting Include PDF-copy in Step 2 below.
Step 1: Create a self-signed certificate
All computers that are to export invoices and supplier bills to Fortnox must have a self-signed certificate in order to be authenticated. You can create or renew the certificate using the PowerShell script below.
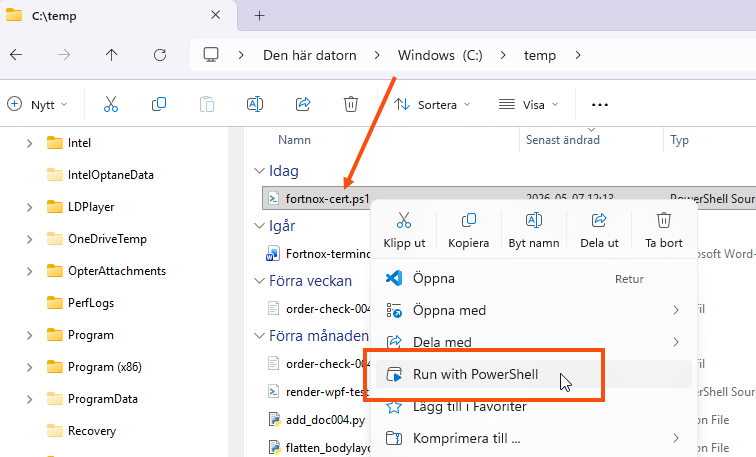
Copy and save the script below as fortnox-cert.ps1 on your computer.
Add-Type -AssemblyName System.Windows.Forms
Write-Host "Checking if the script is running as administrator..."
$isAdmin = ([Security.Principal.WindowsPrincipal][Security.Principal.WindowsIdentity]::GetCurrent()).IsInRole([Security.Principal.WindowsBuiltInRole]::Administrator)
if (-not $isAdmin)
{
Write-Host "Not running as administrator. Restarting as administrator..."
Start-Process powershell -ArgumentList "-NoProfile -ExecutionPolicy Bypass -File `"$PSCommandPath`"" -Verb RunAs
exit
}
Write-Host "Creating self-signed certificate..."
$certificate = New-SelfSignedCertificate -DnsName "localhost44301" -CertStoreLocation "cert:\LocalMachine\My" -NotAfter (Get-Date).AddYears(5) -FriendlyName "Opter Fortnox Certificate"
Write-Host "Certificate created with thumbprint: $($certificate.Thumbprint)"
Write-Host "Creating SSL certificate..."
$result = & netsh http add sslcert ipport=0.0.0.0:44301 appid='{ae7f1bed-891a-45a3-b0ac-37fe01e6b6cd}' certhash="$($certificate.Thumbprint)" 2>&1
if ($LASTEXITCODE -eq 0) {
[System.Windows.Forms.MessageBox]::Show($result)
exit
}
Write-Host "SSL certificate already exists. Removing existing certificate..."
& netsh http delete sslcert ipport=0.0.0.0:44301
Write-Host "Creating new SSL certificate..."
$result = & netsh http add sslcert ipport=0.0.0.0:44301 appid='{ae7f1bed-891a-45a3-b0ac-37fe01e6b6cd}' certhash="$($certificate.Thumbprint)" 2>&1
[System.Windows.Forms.MessageBox]::Show($result)What does the script do?
-
Lines 2–10: Checks that PowerShell is running as an administrator. Otherwise, PowerShell will restart and prompt for administrator mode.
-
Lines 11–14: Creates a new self-signed certificate.
-
Lines 16–22: Creates a new SSL certificate for port 44301.
-
Lines 24–28: If a certificate already exists, it will be removed and a new one created.
Run the script on each computer that needs to be able to export invoices and supplier bills to Fortnox by right-clicking on fortnox-cert.ps1 and selecting Run with PowerShell.
Save the script in a shared folder that you can access from all the computers on which you intend to run it.
Advance notices regarding certificates that are due to expire
When the certificate is about to expire, you may see the following messages when you export invoices:
-
The certificate will expire in {0} days. Follow the instructions at docs.opter.com to renew it.
Displayed if the certificate is due to expire within 30 days. Follow the instructions above to renew it.
-
The certificate is invalid or has expired. Follow the instructions at docs.opter.com to renew it.
Follow the instructions above to renew the certificate.
-
The certificate could not be found. Follow the instructions at docs.opter.com to create it.
Follow the instructions above to create the certificate.
Step 2: Create an invoice export for Fortnox in Opter
-
Click on Economy > Invoices > Invoice export. Click on
 and give the invoice export a name (for example “Fortnox”). The Type and Encoding fields must be filled in.
-
Type: Fortnox API
-
Encoding: UTF-8
-
Include PDF-copy:
 If you want the Opter invoice to be attached in PDF format.
In Fortnox there is no support for presenting all the details that should be included on a transport invoice, such as sender, receiver, distance, weight, freight bill number, etc. Therefore, the graphic invoice with all the details is created in Opter and sent to Fortnox as a PDF file. For more information, see Invoice customers from Fortnox or Opter.
In order for Fortnox and Opter to work well together, interest invoices are exported to Fortnox as normal invoices. The information specific to interest invoices is displayed in the PDF copy that Opter includes in the invoice export to Fortnox, if Include PDF-copy is selected.
-
-
To reduce the size of the PDF file, select Reduce PDF file size.
The file size is reduced by removing all text formatting (bold, italic, underlined), and by changing the font to Trebuchet MS which uses less storage space. How much the file size is reduced depends, among other things, on how much formatting it contains.
-
If all the correction invoices should be treated as manual correction invoices when exporting invoices to Fortnox, select the Always manually export correction invoices checkbox.
When exporting normal credit invoices, Fortnox does not allow you to decide the correction invoice number in Opter. If manual correction invoices are used, Fortnox accepts that the correction invoice number is determined in Opter, but the correction invoice will not be marked as the correction of another invoice and will lose the link to the original invoice.
Also note that even if correction invoices have previously been exported to Fortnox as normal correction invoices and a switch is then made to always exporting correction invoices as manual correction invoices, the number series will probably be interrupted.
-
If you wish to use a service account when exporting invoices, tick the boxes Use service account, For more information, see and Service account below.
-
Click on Save to save all changes.
Step 3: Add the invoice export in the invoice export settings
-
Click on Economy > Invoices > Invoice export settings.
-
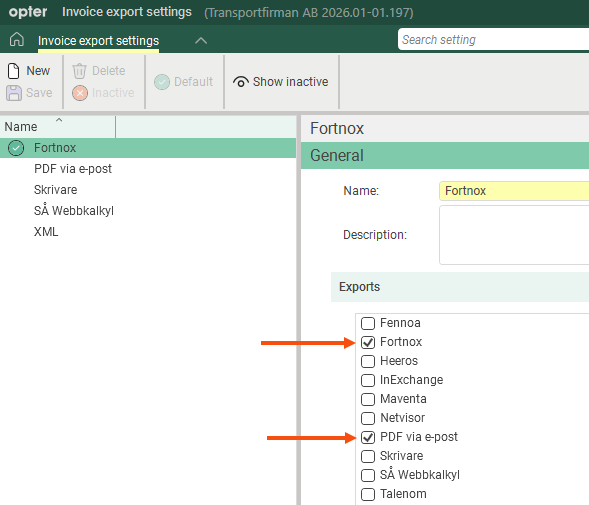
Click on New and give the export setting a name (for example “Fortnox”). Select “Fortnox" (or the name you gave the invoice export) under Exports.
-
Click on Save to save all changes.
-
Choose which invoice export should be the default. To select Fortnox as the default, select “Fortnox” from the list on the left and click on Default.
-
To ensure that all invoices are recorded in Fortnox, select the “Fortnox” export for all export settings.
-
Click on Save to save all changes.
If you send invoices to customers from Opter, you can also tick PDF by email so that the account coding is sent to Fortnox and the invoices are sent to customers with a single click when you export the invoices.
Step 4: Exporting invoices to Fortnox
The invoice information can be exported from Opter when closing an invoice period, or subsequently when choosing whether to export entire invoice periods or individual invoices.An invoice is created in Fortnox with invoice rows corresponding to the account coding in Opter.
-
Click on Economy > Invoices > Invoices.
-
Select the invoice or invoice period you want to export, right-click and select Export.
-
Click on Export and send.
If you are not already logged in to Fortnox, a new window will open where you can log in using your Fortnox username and password. If authentication is successful, the export will start.
You can close the browser window displaying the text “Close this window” whenever you like; it won’t interfere with the invoice export.
At the bottom of the Invoice export window in Opter, there is a progress indicator that turns completely green when the invoice export is complete. If the invoice export fails, the progress bar turns grey and there is a statement indicating that the export failed. (Troubleshooting tips are given below.)
If not all invoices are exported during the first attempt, click on Export and send again. There will be no more invoices if you export again. Each time an invoice is exported, Fortnox will update the invoice if it is not recorded in Fortnox.
Invoice customers from Fortnox or Opter
In Opter, you can create invoices that include all the details you require regarding your shipments. Fortnox does not support the display of all the information you might wish to include on a transport invoice, such as the sender, recipient, distance, weight, consignment note number and so on. On the invoice generated in Fortnox, Opter adds a reference (description) that includes the invoice number, order number and order date, for example “Invoice 100353, 4555, 4 September 2025”.
Depending on your requirements, you can send the invoices in such a way that customers receive the information they need on them.
This way, the customer receives an invoice containing all the information required on a transport invoice. This assumes that you also have a PDF invoice export and have added it to the invoice export setting. For more information, see Sending PDF invoices by email.
-
Export the invoices from Opter to Fortnox as usual. The invoices are then emailed to the customer.
-
In Fortnox, click on Invoicing, go to the Customer invoices tab and select the invoices you want to post.
-
Click on Book & send (1) in the bottom right-hand corner and select Book (2). Invoices are posted in Fortnox in accordance with the account coding in Opter.

This way, you can send invoices from Opter, whilst including all the information the customer needs. One drawback could be that it looks as though you have sent two invoices, one from Fortnox and one from Opter.
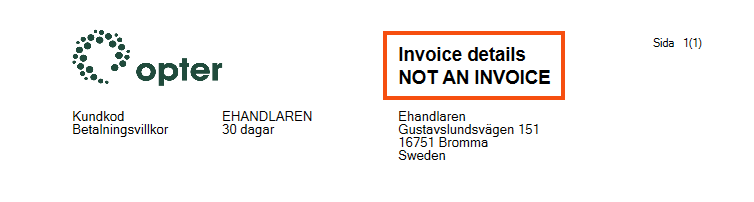
You could, for example, write ‘Invoice details’ instead of ‘Invoice’ at the top of the Opter invoice to avoid any confusion. Perhaps even add “NO INVOICE”. You can also remove the total amount to make it even clearer that the Fortnox invoice is the basis for payment.
Here, we have amended the text in the header (lines 17–18) and removed the information regarding the invoice number, invoice date and due date by commenting out lines 45–54.
<?xml version="1.0" encoding="UTF-8"?>
<template type="Invoice">
<!-- Fleet 101 standard Swedish report for Invoice -->
<dataset x="18" y="63" width="188" height="182" fontname="Microsoft Sans Serif" fontsize="10">
<!-- Page header/footer -->
<header x="0" y="0" source="object">
<!-- Company name and logo -->
<data name="OFF_NameInv" x="25" y="11" condition="!OFF_HasLargeImage" fontbold="true" fontsize="20" width="115" />
<image name="OFF_LargeImage" x="25" y="11" condition="OFF_HasLargeImage" width="40" height="20" />
<block x="112" fontbold="true" fontsize="14">
<item name="Fakturaspecifikation" y="15" condition="IsPeriodType[1]" width="60" />
<item name="EJ FAKTURA" y="21" condition="IsPeriodType[1]" width="60" />
<item name="Kreditfaktura" y="11" condition="IsPeriodType[2]" width="40" />
<item name="Räntefaktura" y="11" condition="IsPeriodType[3]" width="40" />
<item name="Faktura" y="11" condition="IsPeriodType[4]" width="40" />
<item name="Kreditfaktura" y="11" condition="IsPeriodType[5]" width="40" />
<item name="Kickbackfaktura" y="11" condition="IsPeriodType[6]" width="40" />
</block>
<!-- Customer Invoice Address -->
<block x="112" y="32" condition="!CPR_AddrLine1">
<data name="CUS_AddrLine1Inv" x="0" y="0" font="Microsoft Sans Serif" bold="False" size="10" width="80" align="left" />
<data name="CUS_CompanyInv" x="0" y="0" font="Microsoft Sans Serif" bold="False" size="10" width="80" align="left" condition="CUS_CompanyInv" positionbelow="true"/>
<data name="CUS_StreetInv,' ',CUS_StreetNoInv" x="0" y="0" font="Microsoft Sans Serif" bold="False" size="10" width="80" align="left" positionbelow="true"/>
<data name="CUS_ZipCodeInv,' ',CUS_CityInv" x="0" y="0" font="Microsoft Sans Serif" bold="False" size="10" width="60" align="left" positionbelow="true"/>
<data name="CUS_CountryInv" x="0" y="0" font="Microsoft Sans Serif" bold="False" size="10" width="60" align="left" positionbelow="true"/>
</block>
<!-- Customer Project Address -->
<block x="112" y="35" condition="CPR_AddrLine1">
<data name="CPR_AddrLine1" x="0" y="0" font="Microsoft Sans Serif" bold="False" size="10" width="80" align="left" />
<data name="CPR_Company" x="0" y="0" font="Microsoft Sans Serif" bold="False" size="10" width="80" align="left" condition="CPR_Company" positionbelow="true"/>
<data name="CPR_Street,' ',CPR_StreetNo" x="0" y="0" font="Microsoft Sans Serif" bold="False" size="10" width="80" align="left" positionbelow="true"/>
<data name="CPR_ZipCode,' ',CPR_City" x="0" y="0" font="Microsoft Sans Serif" bold="False" size="10" width="60" align="left" positionbelow="true"/>
<data name="CPR_Country" x="0" y="0" font="Microsoft Sans Serif" bold="False" size="10" width="60" align="left" positionbelow="true"/>
</block>
<!-- Invoice data -->
<!-- <block x="112" y="20" fontbold="true">
<item name="Fakturanummer" x="0" y="0" width="40" />
<item name="Fakturadatum" x="0" y="4" width="40" />
<item name="Förfallodatum" x="0" y="8" width="40" />
<block x="40" y="0">
<data name="INH_InvoiceNo" x="0" y="0" width="50" />
<data name="INH_InvoiceDate" x="0" y="4" width="50" format="d" />
<data name="INH_MaturityDate" x="0" y="8" width="50" format="d" />
</block>
</block>-->
Proceed as follows:
-
Select Include PDF-copy on the invoice export in Opter. The invoice, containing all the details, is generated in Opter and sent to Fortnox as a PDF file.
-
Export the invoices from Opter to Fortnox as usual.
-
In Fortnox, click on Invoicing, go to the Customer invoices tab and select the invoices you want to send to your customers.
-
Click on Book & send (1) in the bottom right-hand corner and select Send (3). Invoices are posted in Fortnox in accordance with the account coding in Opter and sent to customers from Fortnox. The invoice includes the PDF file from Opter as an attachment.
The customer receives one invoice from Fortnox. The downside is that the invoice does not contain the detailed information about the shipments that some customers want, but only the invoice number, order number and order date.
See also Interest invoices above.
-
Uncheck Include PDF-copy in the invoice export in Opter.
-
Export the invoices from Opter to Fortnox as usual.
-
In Fortnox, click on Invoicing, go to the Customer invoices tab and select the invoices you want to send to your customers.
-
Click on Book & send (1) in the bottom right-hand corner and select Send (3). Invoices are posted in Fortnox in accordance with the account coding in Opter and sent to customers from Fortnox.
Service account
The feature for using a service account is available in Opter 2025.06.85 and later versions.
If you wish to simplify access management, you can grant users limited access rights and create a service account with the necessary permissions for integration with Fortnox.
When users then export invoices or supplier bills to Fortnox, or import payments into Opter, it is the service account that is used in the background during the export or import process. In other words, the integration uses the service account.
You must be a system administrator to set up a service account in Fortnox.
Add a service account
-
In Opter, select Use service account for the invoice export, and the corresponding option for the settlement export/payment import. For more information, see Step 2: Create an invoice export for Fortnox in Opter above, Supplier bill export to Fortnox and Payment import from Fortnox.
-
When it is time to export invoices, you, as the system administrator, must carry out the first invoice export to create the service account in Fortnox. The system administrator must also perform the first settlement export and the first payment import.
-
Log in using your Fortnox user account.
-
Export the invoices from Opter (see Invoice export to Fortnox above). When you click on Export and send in Opter, a window opens in Fortnox. The window displays a list of the authorisations required for the service account. Click on Authorise. The service account is created.
You can close the browser window displaying the text “Close this window” whenever you like. This does not affect the creation of the service account or the export of invoices.
You may also see a message saying “this site can’t be reached”. Nor does it affect the creation of the service account or the export of invoices.
To check that the service account has been created correctly, click Office > Manage integrations in Fortnox. The service account is displayed in the list of users with the icon
 .
.Once the service account is set up, users with limited permissions can export invoices to Fortnox. The service account is used in the background during the export to Fortnox. However, users need authorisation to manage invoices in Opter.
-
Do the same for settlement exports and payment imports. For more information, see Supplier bill export to Fortnox and Payment import from Fortnox.
-
Delete the service account
Here’s how to remove a service account from Fortnox.
-
In Opter, deselect Use service account in the invoice export, and the corresponding option in the settlement export/payment import, then save the changes.
-
In Fortnox, click on Office > Manage integrations. The service account is displayed in the list of users with the icon
. Click Disconnect in the service account menu.
The service account will be deleted.
Troubleshooting, service accounts
If you receive the following three error messages in this order:
-
The user details were not accepted by the external system. (Click on Ok.)
-
The user could not be authorised by the external system, please check the assigned roles. (Click on Ok.)
-
Error creating invoice. Contact your system administrator.. (Click on Ok.)
This may be because Fortnox has removed the service account's token. To resolve this, the system administrator must add a new service account. See Add a service account above.
Troubleshooting
If the transfer to Fortnox does not work, an error message is displayed. Error messages are displayed in a pop-up window and are not saved anywhere.
If the export function is not working, this may be due to one of the following:
-
If you are exporting from several different computers, and it works on some computers but not on all of them, this may be because the computer is missing a self-signed certificate. All computers that will be capable of exporting invoices and supplier bills to Fortnox must have a self-signed certificate to be authenticated. See Step 1: Create a self-signed certificate above.
-
The certificate will expire in {0} days. Follow the instructions at docs.opter.com to renew it.
Displayed if the certificate is due to expire within 30 days. See Step 1: Create a self-signed certificate above.
-
The certificate is invalid or has expired. Follow the instructions at docs.opter.com to renew it.
See Step 1: Create a self-signed certificate above.
-
The certificate could not be found. Follow the instructions at docs.opter.com to create it.
See Step 1: Create a self-signed certificate above.
-
The user details were not accepted by the external system
If you are using an older version of Opter, you will not receive any advance warning that the certificate is about to expire. The certificate is valid for five years. If you receive this error message, it may be because the certificate has expired. See Step 1: Create a self-signed certificate above.
-
Your browser is too old or Internet Explorer opens by default. To ensure that exporting to Fortnox works properly, it is important that you use a modern, standard web browser, such as Edge, Firefox or Chrome.
-
The Fortnox web service is currently down.
-
You do not have a licence. See Integration licence and invoicing licence above.
-
The default currency has to be SEK to allow invoices to be exported to Fortnox. Current default currency is: {0}
See Default currency above.