Last updated: 26.01.2024
Exporting invoices to Visma e-conomic
Opter has integrations with three different Visma systems, which have different functions. Check which system you are using:
-
Visma.net, (see Exporting sales ledgers to Visma.net).
-
Visma e-conomic, (see Exporting invoices to Visma e-conomic and Supplier bill export to Visma e-conomic ).
-
Spiris, (see Accounting export to Spiris (eEconomy)).
Invoices are exported to Visma e-conomic via Visma’s API and there are two different ways of doing this, via an invoice or voucher. What is transferred from Opter depends on the method selected.
-
Invoice: the account coding is transferred as product rows, and an invoice object is created from them in Visma.
-
Voucher: the account coding and a PDF file of the invoice is transferred. No invoice object is created in Visma. The PDF file from Opter is linked to the voucher.
The purpose of the export is to keep the sales ledger in Visma e-conomic up to date with information from Opter. The invoices themselves must still be sent to the customer from Opter because the invoices in Visma e-conomic do not contain all the necessary information.
It is not possible to export economic units.
Supplier bills can also be exported to Visma e-conomic, see Supplier bill export to Visma e-conomic .
Step 1: Create product groups in Visma e-conomic
In order to allow the information to be transferred from Opter, there must be product groups in Visma e-conomic with the same names (numbers) as the sales accounts used in Opter. Contact the person responsible for the account coding in Opter to find out the names of the sales accounts. Then create those product groups in Visma e-conomic. If the export does not work, an error message is displayed with information about which product groups are missing, and which sales accounts are used in that particular export.
Step 2: Create an app token in Visma e-conomic
- Log into Visma e-conomic with the user account that will be used for the integration.
-
Open a new tab in the same browser and go to the following address:
- Follow the instructions and save the app token that was created in a safe place.
Step 3: Create an invoice export in Opter
Click on Economy > Invoices > Invoice export and create a new invoice export by clicking on ![]() .
.
The following fields must be filled in on the General tab:
-
Name: For example, “Visma e-conomic”.
-
Type: Visma e-conomic.
-
Encoding: “.” (full stop). This field must be filled in, but is basically not actually used.
-
Password: The app token created in step 1.
Click on Save to save all changes.
Free choice of settings
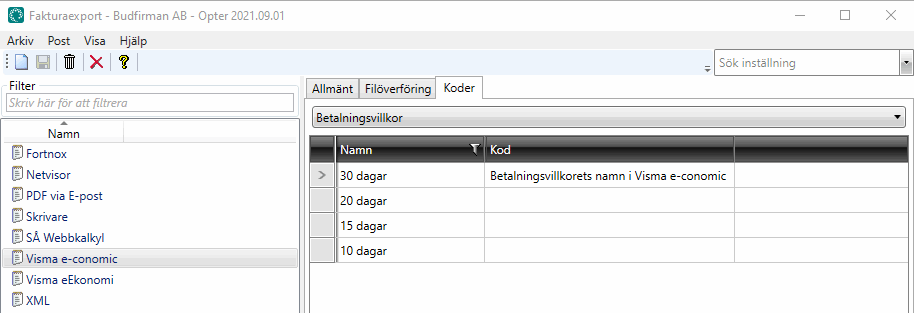
The payment conditions in Visma e-conomic are automatically matched with the payment conditions in Opter based on the number of due dates, but the payment terms can also be matched manually by name. Go to the Codes tab and select Payment Condition from the drop-down list. The Name column shows the payment conditions available in Opter. Enter the name of the corresponding payment conditions in Visma e-conomic in the Code column.

Step 4: Select the export method, invoice or voucher
Invoice
The invoice method of creating an invoice object in Visma is the default one. To use the invoice method, it is not necessary to define any further settings.
Voucher
To use the voucher method and send a PDF file from Opter, go to the General tab on the invoice export and enter the following in the Start text field:
exportMethod=voucher
journalNumber=1
“journalNumber” is the ID of the cash journal to which you want to link the invoices. The default is “1” (usually “Daily”).
Then go to the Codes tag, select Tax rates from the drop-down list and pair the VAT codes in Opter (the Name column) with the VAT codes in Visma e-conomic (the Code column).
Step 5: Add the invoice export in the invoice export settings
Click on Economy > Invoices > Invoice export settings and select “Visma e-conomic” (or the name you gave the invoice export) for the settings that will generate an export to Visma e-conomic. Since all invoices are to be recorded in the accounts, the export should be selected for all export settings.
Step 6: Export to Visma e-conomic
The invoice information can be exported from Opter when closing an invoice period, or subsequently when choosing whether to export entire invoice periods or individual invoices. An invoice is created in Visma e-conomic with invoice rows corresponding to the account coding in Opter.
The information about the customer and the transactions is transferred to the sales ledger in Visma e-conomic. If the customer does not exist in Visma e-conomic, it is created using the information in the exported invoices.
How to export invoices retrospectively:
-
Click on Economy > Invoices > Invoices.
-
Right-click on an invoice period or individual invoice and select Export.
-
Click on Export and send.
The number of invoices to be exported and the number of invoices exported are displayed, as well as a progress bar.
Ask a deployment consultant for assistance
If you have any questions or need help getting started, contact to make an appointment with an installation expert.