Accounting data export to Spiris (formerly eEkonomi)
Last updated: 4 August 2026
In this article
Opter integrates with several different Visma systems, each of which has different functions. Check which system you are using:
-
Visma.net, (see Exporting sales ledgers to Visma.net).
-
Visma e-conomic, (see Exporting invoices to Visma e-conomic and Supplier bill export to Visma e-conomic).
-
Spiris, (see Accounting data export to Spiris (formerly eEkonomi)).
You can transfer account codes for invoices from Opter to the Spiris accounting system and create accounting entries there. The import is done via API and the accounting records are automatically created in Spiris.
It is only possible to transfer invoice account coding; account coding for, for example, supplier bills or other types of account coding cannot be transferred.
The transfer takes place via an invoice export, but the PDF invoice that is transferred is only a placeholder for the actual account coding. No invoice records are created in Spiris. The reason why no invoice records are created is that it is not possible to control invoice numbers when invoices are imported via API calls. The invoice numbers would therefore not match between Opter and Spiris. As a consequence, it would not be possible to register payments for the imported invoices in SPIRIS.
Step 1: Check subscriptions and access rights
For the export function to work, you must have a Spiris subscription that includes integration support. In some levels it is included, whilst in others it is an add-on module. Log in to spiris.se and check which subscription you have. If you have a subscription that does not include integration support, please contact Visma Spiris and ask them to activate the “api_standard” extra. Here is an overview of the Spiris subscriptions, and which ones include the integration module at no extra cost: https://www.spiris.se/priser.
When the account coding is exported from Opter, a web page opens where you can log in to Spiris. The user account used to log in must have the following rights (scopes) in Spiris:
-
offline_access
-
ea:api
-
ea:sales
-
ea:accounting
Contact Visma if help with user rights is required.
Step 2: Create an invoice export
Click Economy > Invoices > Invoice export and create a new invoice export by clicking New. The following fields must be filled in on the General tab:
-
Name: For example, "Visma Spiris".
-
Type: Visma eAccounting/eEkonomi API
-
Encoding: UTF-8
No settings in the export other than the above are used in the API call and therefore have no meaning.
Step 3: Match the economic units
SPIRIS supports 3 economic units. If you use economic units in Opter, you can transfer economic units 1-3 by giving them the same name as they have in Spiris. However, they do not have to be in the same order in both systems. If the names don't match, an error message will appear when you export the account coding, informing you what is not matching.
The names of the economic units are defined in Opter on the Economy tab in the office settings. The following three fields must therefore match the names of the economic units in SPIRIS:
-
Name economic unit 1
-
Name economic unit 2
-
Name economic unit 3
If you want to use economic units in Opter, but not in Spiris, you must use economic units 4-5, and leave 1-3 blank in the office settings. Otherwise, the error message that the economic units do not match will appear every time you export.
Step 4: Add the export to the invoice export settings
Click Economy > Invoices > Invoice export settings and select “Visma Spiris” (or the name you gave the export) for the settings that will generate an export to Spiris.
Step 5: Create a self-signed certificate
All computers exporting account coding to SPIRIS must have a self-signed certificate in order to be authenticated. You can create or renew the certificate using the PowerShell script below.
Copy and save the script below as spiris-cert.ps1 on your computer.
Add-Type -AssemblyName System.Windows.Forms
Write-Host "Checking if the script is running as administrator..."
$isAdmin = ([Security.Principal.WindowsPrincipal][Security.Principal.WindowsIdentity]::GetCurrent()).IsInRole([Security.Principal.WindowsBuiltInRole]::Administrator)
if (-not $isAdmin)
{
Write-Host "Not running as administrator. Restarting as administrator..."
Start-Process powershell -ArgumentList "-NoProfile -ExecutionPolicy Bypass -File `"$PSCommandPath`"" -Verb RunAs
exit
}
Write-Host "Creating self-signed certificate..."
$certificate = New-SelfSignedCertificate -DnsName "localhost44301" -CertStoreLocation "cert:\LocalMachine\My" -NotAfter (Get-Date).AddYears(5) -FriendlyName "Opter Spiris Certificate"
Write-Host "Certificate created with thumbprint: $($certificate.Thumbprint)"
Write-Host "Creating SSL certificate..."
$result = & netsh http add sslcert ipport=0.0.0.0:44301 appid='{ae7f1bed-891a-45a3-b0ac-37fe01e6b6cd}' certhash="$($certificate.Thumbprint)" 2>&1
if ($LASTEXITCODE -eq 0) {
[System.Windows.Forms.MessageBox]::Show($result)
exit
}
Write-Host "SSL certificate already exists. Removing existing certificate..."
& netsh http delete sslcert ipport=0.0.0.0:44301
Write-Host "Creating new SSL certificate..."
$result = & netsh http add sslcert ipport=0.0.0.0:44301 appid='{ae7f1bed-891a-45a3-b0ac-37fe01e6b6cd}' certhash="$($certificate.Thumbprint)" 2>&1
[System.Windows.Forms.MessageBox]::Show($result)What does the script do?
-
Lines 2–10: Checks that PowerShell is running as an administrator. Otherwise, PowerShell will restart and prompt for administrator mode.
-
Lines 11–14: Creates a new self-signed certificate.
-
Lines 16–22: Creates a new SSL certificate for port 44301.
-
Lines 24–28: If a certificate already exists, it will be removed and a new one created.
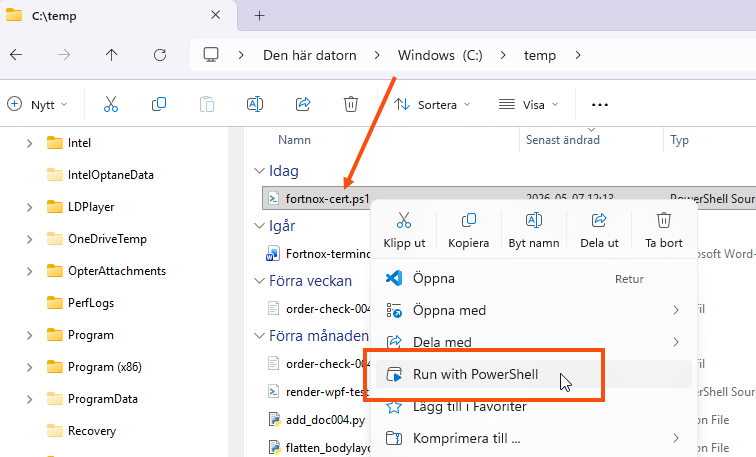
Run the script on each computer that is to be able to export invoices to Spiris by right-clicking on spiris-cert.ps1 and selecting Run with PowerShell.
Save the script in a shared folder that you can access from all the computers on which you intend to run it.
Step 6: Exporting the accounting records
The invoice information can be exported from Opter when closing an invoice period, or subsequently when choosing whether to export entire invoice periods or individual invoices. When you run an export, a login page opens in a web browser. Enter the login credentials and the accounting entries are transferred. Once login has been completed, the web page can be closed.
The invoice imported into Spiris cannot be deleted, but the accounting entries it has generated can be edited.
-
(fönster)

