Add new suppliers
Last updated: 5 March 2026
In this article
In the supplier register, you can add new suppliers, update the details of suppliers who are already registered, and deactivate suppliers who are no longer in use.
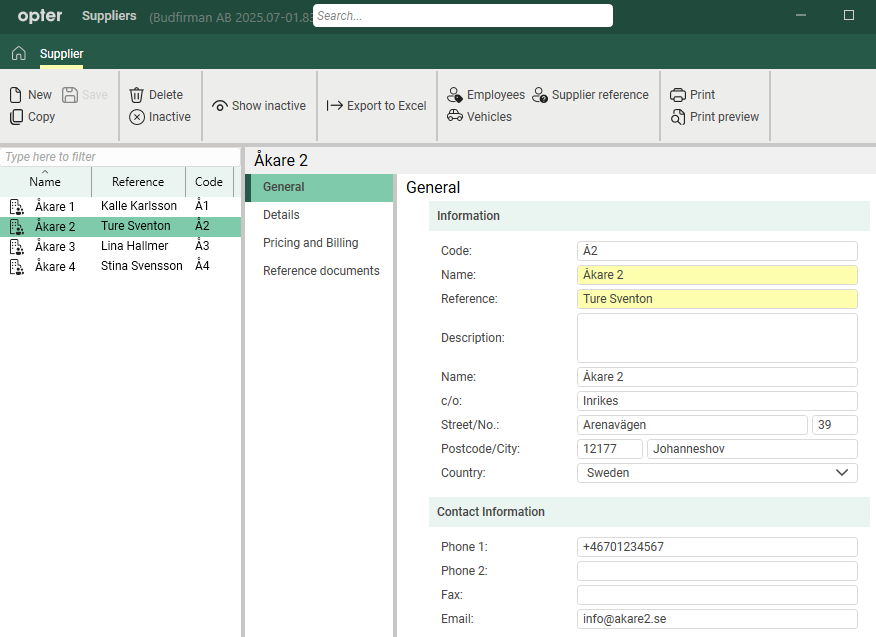
The fields in the driver register are described in Suppliers (window).
The terms ‘supplier’ and ‘subcontractor’ are defined in Carriers and subcontractors, overview.
Proceed as follows
To add a new supplier:
-
Click on Register > Suppliers.
-
Select one of the following:
-
Click
 or
or  to add a new supplier.
 -
Copy a supplier who is already in the register.
In the list on the left, select the supplier you wish to copy and click
 or
or  at the top of the menu.
 (Give the supplier a Name, a Code and a Reference (contact person), and make any changes you wish.) You can follow the instructions below to check that the details are correct on all the tabs in the register.)
-
-
Enter a code for the supplier in field Code, for example “3”.
-
In the Name field, enter the supplier’s name as you would like it to appear in Opter.
-
In the Reference field, enter the name of your contact at the supplier.
-
In the remaining fields on the General tab, enter contact details, such as the supplier’s postal address and telephone number. The fields are described in Suppliers (window).
Some of the information you enter for the supplier on tabs General, Details and Pricing and Billing is included in the settlement export from Opter to accounting systems such as Fortnox, provided the systems have been linked (integrated). For more information, see Supplier bill export to Fortnox.
-
On the Details tab, you can do the following:
-
Enter the supplier’s Corporate ID number and VAT registration number.
-
Select whether the supplier should be able to see prices. See drop-down list Price information. For more information, see Suppliers (window).
-
Enter Starting date to indicate when the supplier will start working for you.
-
Choose which Internet order setting the supplier should have on the supplier web. For more information, see Introduction to the supplier web and Internet order settings (window).
-
Enter your login details (Username and Password) for the supplier web. For more information, see User accounts for the supplier web and Suppliers (window). See also Supplier references below.
-
For Opter version 2025.12.00 and later:
Enter Username and then click
 Save. You can then enter your password by clicking the Change password button (1) and typing the same password into the New password (2) and Verify password (3) fields. Then click on Ok (4) to save the password.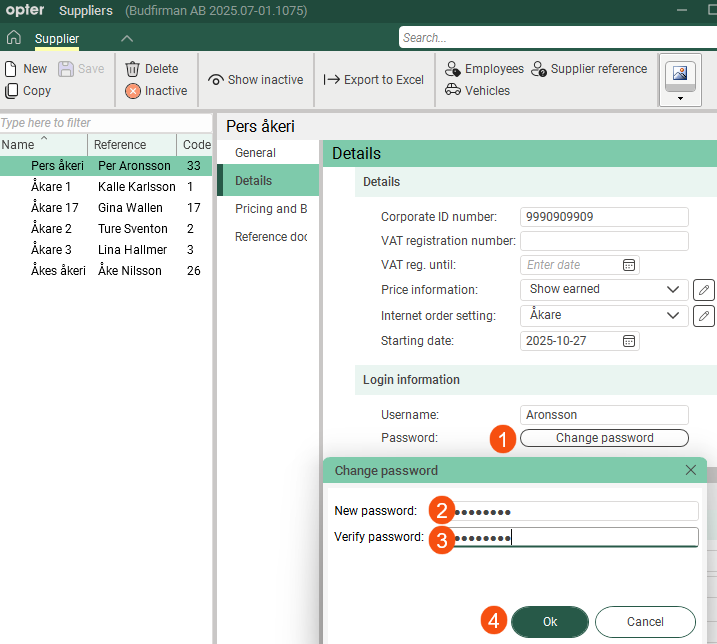
Passwords are case-sensitive; in other words, Opter distinguishes between upper- and lower-case letters. For example, Opter treats “PASSword&!999” and “Password&!999” as two different passwords.
Passwords are not displayed in the register. If someone has forgotten their password, you can create a new one by clicking the Change password button and entering the new password.
-
For Opter version 2025.06.00 and earlier, enter Username and Password in the fields and then click Save.
-
The fields are described in Suppliers (window).
-
-
On the Pricing and Billing tab, you can, for example, do the following:
-
Select Resource Pricing for the supplier.
[None] means that no cost is generated, even if a manual cost is entered. For more information, see Suppliers (window).
-
Set Fuel extra and Currency extra.
-
Select whether cost price items should be created automatically or not, using the tick box Create cost price items automatically.
For more information, see Receiving invoices from subcontractors and suppliers, Settings for receiving invoices and tracking costs and Adding new cost price items to cost check.
-
Please specify whether the supplier sends invoices to you or whether you send supplier bills to the supplier. See box Sends invoice. For more information, see Suppliers (window).
-
If you send supplier bills to the supplier, you can:
-
Enter Crediting interval, Supplier bill export (e.g. Netvisor or Visma e-conomics), Ledger number and Supplier bill design.
-
Enter the supplier’s bank account details and Payment Condition.
-
Enter the skier’s supplier Currency.
If you have suppliers in other countries, you can make things easier for them by crediting them in their own currency.
-
-
Enter Payment Condition for invoicing or supplier bill. For more information, see Payment Condition (window).
-
-
On the Reference documents tab, files that can be opened on other computers can be added. The files that are added are not attached to orders, instead the function works as a file server and is intended for exchanging information. The files are saved in the database.
-
Click on Save to save all changes.
Assign staff to suppliers
Suppliers’ employed drivers can be managed in exactly the same way as your own employees in Opter.
To assign staff to a supplier, do one of the following:
-
Add the drivers to the register Employees. In the drop-down list Supplier (on the General tab), select the haulage company to which the driver belongs. For more information, see Employees (window).
-
If you wish to add drivers who are already in the register Employees, you can click on Supplier > Employees in the register Suppliers, or simply click on
 Employees in the toolbar.
 The Employees for supplier window opens. For more information, see Employees for supplier (window).
See also Carriers and subcontractors, overview.
User account for the driver web and Opter Driver
Follow the instructions in User accounts for The driver web and User accounts for Opter Driver.
Assign vehicles to suppliers
Suppliers’ vehicles can be managed in exactly the same way as your own vehicles in Opter.
To assign a vehicle to a supplier, do one of the following:
-
Add the vehicles to the register Vehicles. In the drop-down list Supplier (on the General tab), select the haulage company to which the vehicle belongs. For more information, see Vehicles (window).
-
If you wish to add vehicles that are already in the register Vehicles, you can click on Supplier > Vehicles in the register Suppliers, or simply click on
 Vehicles in the toolbar.
 Find the vehicle on the left-hand side of the window. If you want to view a list of all vehicles, leave the search field blank and click Search straight away. Double-click on a vehicle in the search results to link it to the supplier from whose window you opened the window. To remove a vehicle from that supplier and make it a standard vehicle within your organisation, double-click on the name in the list on the right (Associated Vehicles).
See also Carriers and subcontractors, overview.
User account for the vehicle web and Opter Driver
Follow the instructions in User accounts for The vehicle web and User accounts for Opter Driver.
Supplier references
Supplier references are used to create personal accounts for individual users with the supplier. This would be useful if certain users require specific views or functions, which can be controlled via the internet order settings on the supplier reference. You can create a shared user account that all users within the supplier share (set up in the supplier register), or individual user accounts for each user, if you want full control. For more information, see User accounts for the supplier web.
Change details for registered suppliers
If you want to change the details for one of your suppliers, do the following:
-
Click on Register > Suppliers.
-
Select the supplier from the list on the left and amend the relevant details for that supplier. The fields in the driver register are described in Suppliers (window).
-
Click on Save to save all changes.
Deactivate supplier
You can deactivate suppliers that are no longer in use:
-
Click on Register > Suppliers.
-
Select the supplier from the list on the left.
-
Deactivate the subcontractor by clicking
 or
or  Inactive in the toolbar.
The change will be saved when you close the window. The next time you open the driver register, that supplier will no longer appear in the list. The supplier is now also hidden in other lists in Opter.
The supplier’s history is still stored in Opter and you can reactivate the supplier; see below.
Reactivate deactivated skiers
If you have deactivated a supplier but wish to reactivate them, follow these steps:
-
Click on Register > Suppliers.
-
Click on Show and then Show inactive at the top of the menu, or simply click on
 Show inactive in the toolbar.
All suppliers are now shown in the list, both active and inactive. The inactive ones are indicated by
or . -
Select the supplier from the list on the left.
-
Activate the supplier by clicking
or Inactive on the toolbar.The change will be saved when you close the window.
Changing the supplier for a vehicle or driver
See Changing the supplier for a vehicle or driver.
Export to Excel
You can export the driver log to Excel. To do so, follow these steps:
-
Click on Register > Suppliers.
-
Click on
 or
or  Export to Excel. The Export to Excel dialogue box opens.
 -
Click on Ok. Excel opens and displays information about all skiers in the skier register, with one skier per row.

