Adding a new subcontractor
Last updated: 5 March 2026
In this article
The subcontractor register allows you to add new subcontractors, update the information of already registered subcontractors and deactivate subcontractors that are no longer used.
The fields in the subcontracting register are described in Subcontractors (window).
Some of the information you enter for the subcontractor on the tabs General, Details and Pricing and Billing is sent in the settlement export to Fortnox for example. For more information, see Supplier bill export to Fortnox.
The concepts of haulier and subcontractor are described in Carriers and subcontractors, overview.
Adding new subcontractors
-
Click on Register > Subcontractors.
-
Select one of the following:
-
Click on
 or
or  to add a new subcontractor.
 -
Copy a subcontractor that you already have in the register.
In the list on the left, select the subcontractor you want to copy and click on
 or
or  in the top menu. (GIF the subcontractor a Name and a call number (Code), and make the changes you want to make. You can follow the instructions below to check that the data is correct on all tabs of the register).
-
-
GIF the subcontractor a call number in the field Code, for example "88". The call number is used, among other things, in dispatch.
-
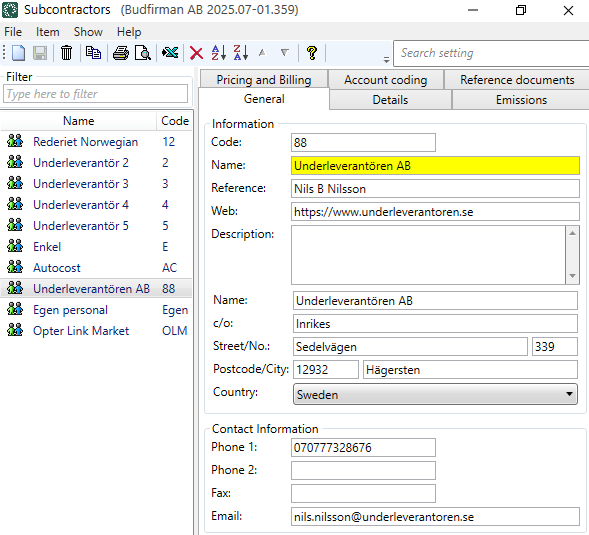
In the Name field, enter the name of the subcontractor as you want it to appear in the dispatch, for example.
-
In the rest of the fields on the General tab, enter contact details, such as the subcontractor's postal address and email address. The fields are described in Subcontractors (window).
-
On the tab Details you can do the following:
-
Enter the subcontractor's Corporate ID number and VAT registration number.
-
Choose whether the subcontractor should be able to see prices. See the listserv Price information. For more information, see Subcontractors (window).
-
In the drop-down list Internet order settings, select which internet order setting the subcontractor should have on the subcontractor web. For more information, see Introduction to the subcontractor web and Internet order settings (window).
-
Choose whether the subcontractor should be able to place orders on the subcontractor web, and if so, enter a Internet order customer.
-
Enter login details (Username and Password) for the subcontractor web. For more information, see Subcontractor web user accounts and Subcontractors (window).
-
For Opter version 2025.12.00 and later:
Enter Username and then click
 Save. You can then enter the password by clicking on the button Change password (1) and entering the password identically in the fields New password (2) and Verify password (3). Then click Ok (4) to save the password.
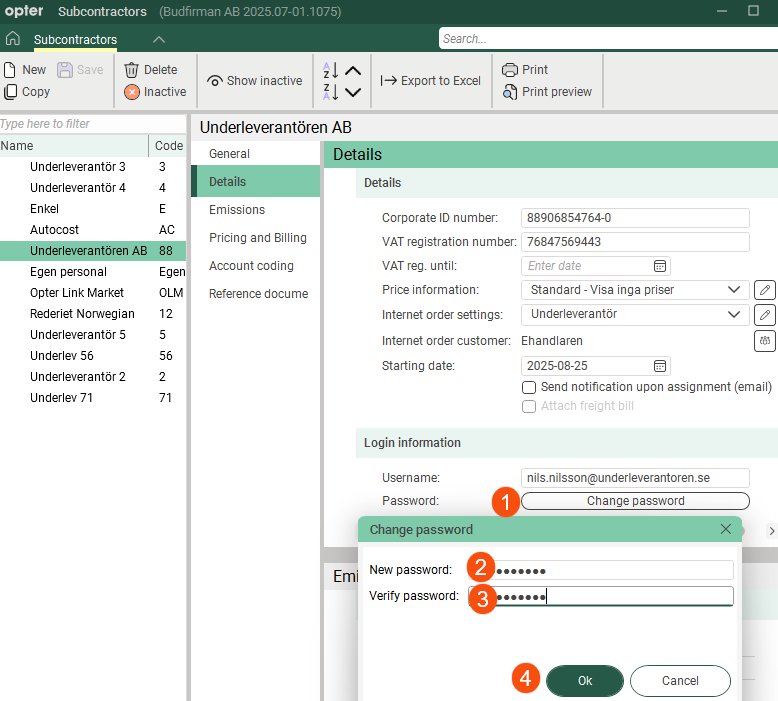
Passwords are case sensitive, i.e. Opter distinguishes between upper and lower case letters. For example, "PASSWORD&!999" and "password&!999" are seen by Opter as two different passwords.
Passwords are not displayed in the registry. If someone has forgotten their password, you can create a new password by clicking on the Change password button and entering the new password.
-
For Opter version 2025.06.00 and earlier, enter Username and Password in the fields and then click Save.
-
-
Enter Starting date for when the subcontractor starts working for you.
-
Choose whether an email should be sent to the subcontractor each time a shipment is allocated to them. See the tick box Send notification upon assignment (email). For more information, see Email notifications of shipments to subcontractors.
The fields are described in Subcontractors (window).
-
-
If you want Opter to be able to calculate CO2 emissions based on e.g. fuel and fuel consumption of the subcontractor's vehicle, click on the tab Emissions and make settings.
The Emissions tab is available in Opter version 2025.12.00 and later.
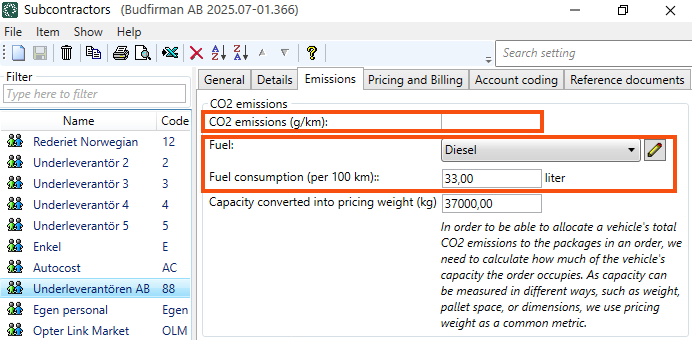
For more information, see Settings for CO2 emission calculations and Subcontractors (window).
-
For example, on the Pricing and Billing tab you can do the following:
-
Select Resource Pricing for the subcontractor.
[None] means that no cost is generated, even if manual cost is entered. For more information, see Subcontractors (window).
-
Enter Fuel extra and Currency extra.
-
Choose whether or not to create cost price items automatically, by using the checkbox Create cost price items automatically.
For more information, see Receiving invoices from subcontractors and suppliers, Settings for receiving invoices and tracking costs and Adding new cost price items to cost check.
-
Indicate whether the subcontractor sends you an invoice or whether you send supplier bills to the subcontractor. See the tick box Sends invoice. For more information, see Subcontractors (window).
-
If you send supplier bills to the subcontractor, you can:
-
Enter Crediting interval, Supplier bill export (e.g. Netvisor or Visma e-conomics), Sales ledger number and Supplier bill design.
-
Enter the subcontractor's bank account details and Payment Condition.
-
Enter the subcontractor's Currency.
If you have subcontractors in other countries, you can make it easier for them by crediting them in their currency.
-
-
Enter Payment Condition for invoicing or supplier bills. For more information, see Payment Condition (window).
-
-
On the Account coding tab, you can set how income and expenses are to be posted for the posting source (i.e. the subcontractor). For more information, see Account coding, overview.
In box Options, tick the options available for the subcontractor’s vehicle, e.g. air conditioning and/or heating. The options you tick will not appear anywhere else except here in the subcontracting register.
The options shown here in the subcontracting register are added in the window Options. For more information, see Options and Options (window). The options displayed in the subcontractor register are those that have the checkbox Available for subcontractors ticked in the window Options.
-
On the Reference documents tab, files that can be opened on other computers can be added. The files that are added are not attached to orders, instead the function works as a file server and is intended for exchanging information. The files are saved in the database.
-
Click on Save to save all changes.
Change details of registered subcontractors
If you want to change the details of one of your subcontractors, do this:
-
Click on Register > Subcontractors.
-
Select the subcontractor in the list on the left and change the details to be modified for the subcontractor. The fields in the subcontracting register are described in Subcontractors (window).
-
Click on Save to save all changes.
Disable subcontractors
You can deactivate subcontractors that are no longer used:
-
Click on Register > Subcontractors.
-
Select the subcontractor in the list on the left.
-
To deactivate the subcontractor, click on
 or
or  Inactive in the toolbar.
The change is saved when you close the window. The next time you open the subcontractor register, the subcontractor will no longer appear in the list. The subcontractor is now also hidden in other lists in Opter.
The history of the subcontractor remains in Opter and you can reactivate the subcontractor, see below.
Activate deactivated subcontractors
If you have deactivated a subcontractor, but want to activate the subcontractor again, do the following
-
Click on Register > Subcontractors.
-
Click on Show and then Show inactive in the top menu or just on
 Show inactive in the toolbar.
Now all subcontractors are displayed in the list, both active and inactive. The inactive ones are indicated by
or . -
Select the subcontractor in the list on the left.
-
Activate the subcontractor by clicking on
or Inactive in the toolbar.The change is saved when you close the window.
Export to Excel
You can export the subcontractor register to Excel, do this:
-
Click on Register > Subcontractors.
-
Click on
 or
or  Export to Excel. The Export to Excel dialogue box opens.
 -
Click on Ok. Excel opens and displays information on all subcontractors in the subcontractor register, one subcontractor per row.