Account coding, overview
Last updated: 4 November 2025
In this article
Opter is not an accounting programme, but it does make bookkeeping easier by allowing you to post expenses and income. You can make many settings to have Opter automatically post the transactions to the accounts you want. This allows you to monitor your business, for example through a sales ledger, where you can export what you need for accounting and monitoring purposes.
Account coding takes place when an invoice or supplier bill period is closed, and when a payment is recorded. Opter then goes through all the booked items. For each record, Opter checks which settings and rules exist and decides which of them to use.
During commissioning, you will be helped to set up the account coding so that it is as you want it. You start by adjusting the chart of accounts in the window Accounts. In Opter, account coding is controlled by the VAT rate of the order. The basic settings for account coding are therefore made on the VAT website (Economy > VAT rates), where account coding is mandatory. These settings are then complemented by settings in, for example, the vehicle register or price lists to fine-tune how different types of income and expenses are recorded. If you select [Default] or [None] for all other account coding sources, the account coding falls back on the VAT rate settings.
We recommend that you make the settings during commissioning, and then let Opter post the items on invoices and supplier bills automatically. However, you can post an order manually if you are working on account coding projects.
How Opter selects accounts for income and expenses
Opter selects accounts according to the VAT rate on the order. The account coding for that VAT rate can in turn be set at different levels according to the following order of priority If an account has been specified for an option below, it is used. If the setting is [Default] or [None], Opter moves to the next option in the list. So, firstly, advanced account coding rules are used, then the accounts specified for the Price items in the price list, then different registers in the order you choose, and finally the accounts set to the VAT rate applied to the order.
-
Advanced rules in account coding charts. Click on Economy > Account coding charts > Account coding rules (bottom right of the window). There you can set rules for different parameters and that apply to that particular account coding chart.
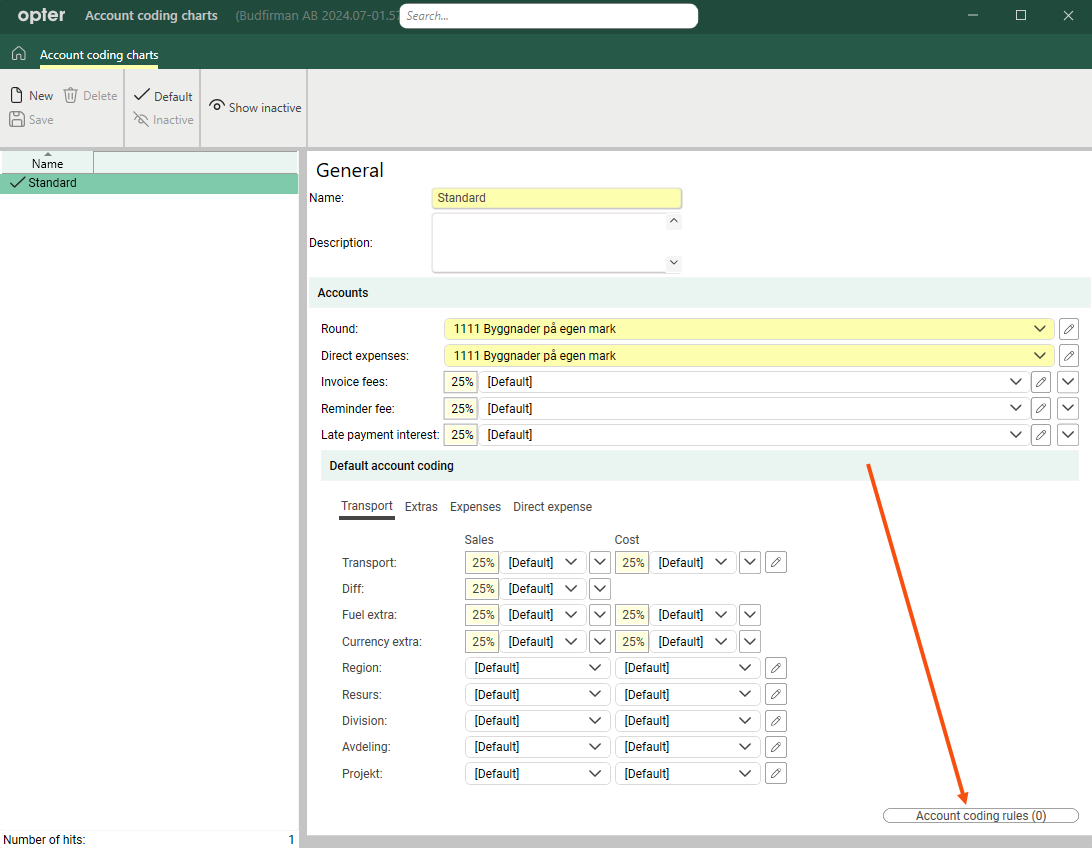
The window that opens is called Rules, but it is not the same account coding rules that are set in the window Account coding rules (Economy > Account coding rules).
-
The selection of the account coding rule in the column Accounting on the item row in the Order reception. The account coding rules that can be selected are created in the Account coding rules window (Economy > Account coding rules).
-
The account settings on the Price item ( Account coding tab in the item register).
-
Register according to the setting in the Account coding priority order window (Economy > Account coding priority order).
-
The account coding specified for the VAT rate in question (Economy > VAT rates).
The operator may have made settings that change the order above. Test that the settings you make work as you intend (see below).
Setting up accounts
In most accounting software, a VAT rate is linked to each sales account. Opter works the other way round and selects the account based on the VAT rate of the order.
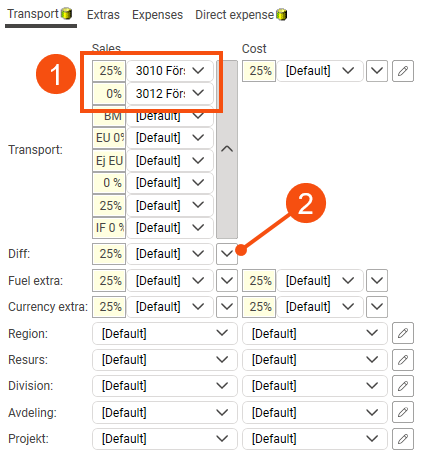
In your accounting software, account 3012 might give 0% VAT and account 3010 might give 25% VAT. Instead, in Opter, it is the VAT rate of, for example, the service or the customer on the order (known as the account source), which determines which accounts are used (1).
The basic account coding settings, which are used if you do not make any other account coding settings, are set in Economy > VAT rates and Economy > Accounts receivable account coding charts.
The following accounts are mandatory to enter.
|
VAT rates |
Accounts receivable account coding chart |
|---|---|
|
Output VAT |
Accounts receivable |
|
Input VAT |
Advance payments |
|
Revenue from sales |
Impairment losses |
|
Diff revenue (see Commission and resource value) |
Carriage shoulders |
|
Costs |
Bank charges |
|
|
Foreign exchange losses |
The Account coding tab
The account coding editor looks the same in the customer register, the vehicle register and in all other registers where account coding can be set. Click on ![]() (2) to unfold all VAT rates and see which accounts have been set up for them.
(2) to unfold all VAT rates and see which accounts have been set up for them.
Anywhere in Opter where the Account coding tab is present, you can set how income and expenses should be posted for that posting source.
Transport
On this tab, enter the account coding for the core business itself. The economic unit to which the amounts are allocated can also be entered.
|
Function |
Description |
|---|---|
|
Transport |
Account coding of income and expenditure for transport. |
|
Diff |
Account coding the difference between the customer price and the resource value. Allows the part of the transport income for which the supplier does not receive commission to be coded to one account, and the part of the transport for which the supplier does receive commission to be coded to another account. If percentage prices or resource price lists are used, the same account as the transport income can be specified. For more information, see Commission and resource value. |
|
Fuel extra |
Account coding of income and costs linked to fuel extra. |
|
Currency extra |
Account coding of income and costs related to trading in other currencies. |
|
Economic units (one line for each economic unit from the office settings) |
Select the economic unit to which to allocate the income and costs. Economic units do not affect the account to which the amounts are registered, but are a way of labelling the items in the profit and loss account. [Default]: click on |
Extras
On this tab, enter the account coding for ancillary income and costs.
|
Function |
Description |
|---|---|
|
Transport |
Account coding the income and costs of transport-related surcharges. |
|
Diff |
Account coding the difference between the customer price and the resource value for the surcharge. Allows the income from the surcharge to be coded to one account and the margin to another. If percentage prices or resource price lists are used, the same account as the transport surcharge can be specified. |
|
Fuel extra |
Account coding of income and costs for surcharges linked to fuel extra. |
|
Currency extra |
Account coding of income and costs for surcharges related to trading in other currencies. |
Expenses
|
Function |
Description |
|---|---|
|
Transport |
Account coding for re-invoiced expenditure. Expenses are counted as sales even though they are also linked to a cost. Select a sales account for each VAT rate. |
Direct expense
|
Function |
Description |
|---|---|
|
Direct expense |
Account coding for unplanned expenditure that is re-invoiced and not included in the turnover. Direct expenses are always reported with the inclusion of VAT, so a cost account is chosen directly here, and not a VAT rate. |
Preview the account coding
In Order reception, you can test the settings and see how the income and costs on an order will be posted, and which economic units are selected.
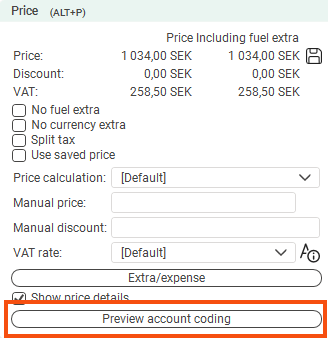
The easiest way to test the account coding is to create a test order in the Order reception, make sure it gets a price and then click on Preview account coding in the Price group in the Order reception. You can then change different things in the order, such as customer and service, and see how it affects the account coding.
There may be differences between the preview and the actual account coding of the invoice, for example if you work with several different account coding charts. The preview always shows the account coding according to the standard coding scheme.
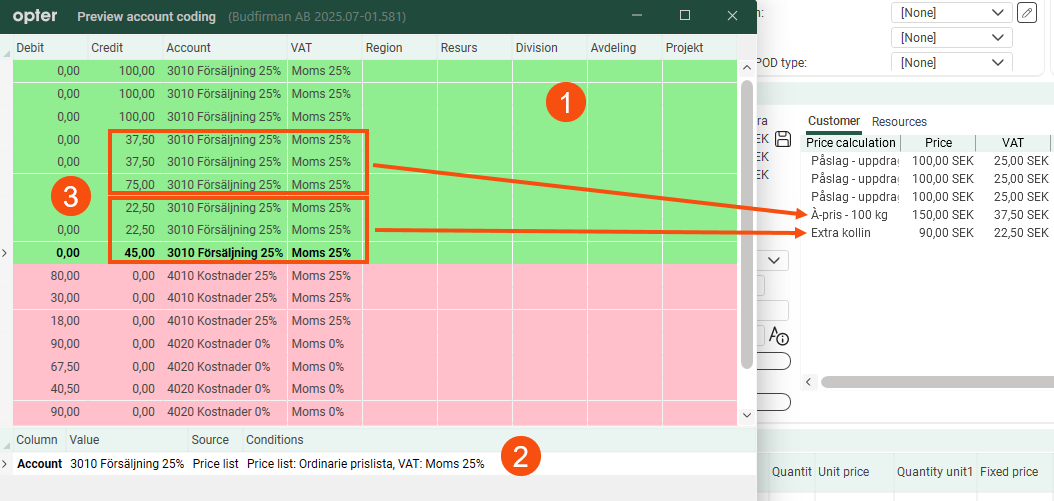
In the window that opens, you can see how the account coding for the price lines will be once the invoice period has closed and the invoice for the order has been sent.
-
The green rows show revenue (to be invoiced) by account and economic units. The red lines show costs (to be credited).
The difference between debit and credit, the result of the order, is posted to another account, but does not appear in the preview.
-
Clicking on a row will display the coding source that matches the price row in the lower part of the window (price list, service, customer and other factors).
-
Sometimes the same price line on the order is split into several coding lines. This happens when the price line is spread over several shipments that could give different accounts, for example if the shipments have different resources with different account assignment settings. Then the price line is divided according to the share of shipments.
In the example below, the order is divided into three shipments with shares of 50%, 25% and 25%. Therefore, the price lines have been split accordingly in the ex ante evaluation. If all amounts are assigned to the same account (as in this example), the price line is merged into one item in the final account coding, which takes place after invoicing.
The account coding preview may differ from the way an order is coded in the sales ledger if the coding settings have changed since the invoice period was closed.