Importing files from a folder automatically
Last updated: 20 April 2023
In this article
Opter has an import service that can monitor a folder on a local computer or a file server and automatically import files from that folder into Opter.
The most common use for this function is importing scanned freight bills. A document scanner reads the freight bills and saves them in a folder that is monitored by the import service. If the scanner can read the order number or freight bill number from the documents, it is also possible to automatically link the scanned documents to the correct orders. For more information, see Linking imported files to orders automatically.
When a file is added to the folder being monitored, it is moved to the storage location selected in the Imported attachments drop-down list in the system settings and then deleted from the monitored folder.
Select how the files being imported are to be saved
-
Click on Settings > System settings.
-
Choose how to save the files from the Imported attachments drop-down list.
-
File: The files are saved in a folder on the Opter server or a file server.
-
Database: The files are saved in the database (SQL Server).
-
Cloud (blob storage): The files are stored in the Microsoft Azure Blob Storage cloud service.
For more information about the different options, see Setting the way attachments are stored.
-
-
If you selected File, specify where to save the imported files in the File storage path field.
If you selected Cloud (blob storage), enter the connection string in the Cload storage (blob storage connection string) field. The connection string consists of a URL and an access key.
-
Click on Save to save all changes.
If you are running Opter Cloud
The file import service is installed by a deployment consultant on the computers on which folders are to be monitored. Contact for more information.
Specify which folder to monitor and how to link the files to orders
Click on Settings > Attachment imports. Enter the path to the folder that is to be monitored in the Path to import files folder field.
Select the Freight bill number first in file name checkbox if the names of the files being imported are freight bill numbers. Then each file that is imported is matched with the order containing the freight bill number. Do not select the checkbox if the names of the files are order numbers. Then each file that is imported is matched with the order with the same order number as the file name. For more information on how files are linked to orders, see Linking imported files to orders automatically.
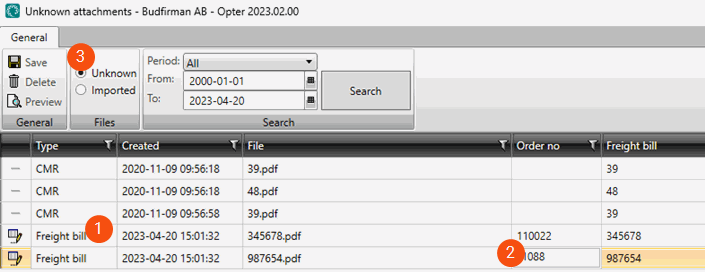
If the file name does not match any order number or freight bill number, the file is moved to the specified storage location but is not linked to any order. Files can be linked to orders manually in the Unknown attachments window. For more information, see Linking imported files to orders manually.
Restart the import service
-
Click on the Start menu in Windows, type “services” and open the Services console.
-
Restart the Fleet101.K2.FileStorage.PollerService service.
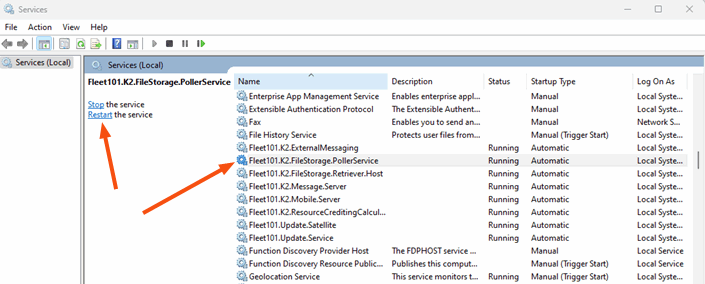
The changes in the Import of attachments window do not take effect until the import service (poller service) has been restarted.
Example
Courier Services scans in freight bills at one of its terminals. The freight bills are saved as PDF files in a special folder on a file server. From there they are picked up by the import function in Opter and automatically linked to orders.
This is how Courier Services has set up the import function for the freight bills in Opter
-
System Settings:
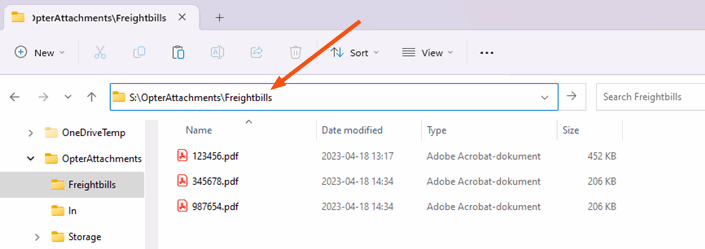
The freight bills are saved in the database when they are imported from S:\OpterAttachments\Freightbills.

-
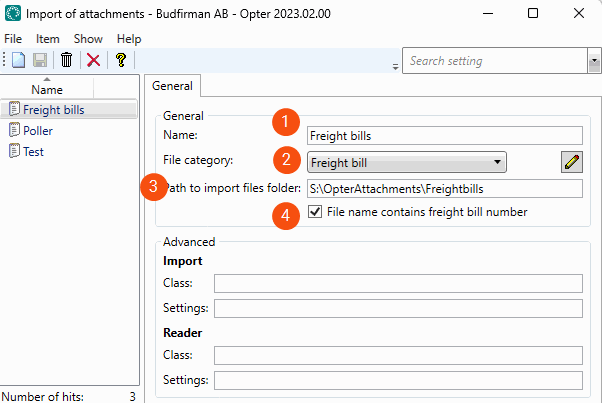
Import of attachments:
-
Name: a descriptive name for the import.
-
File category: specifying the file category makes it clearer in order reception and elsewhere what type of file it is.
-
Path to import files folder: the path to the folder where the freight bills are saved after the scan.
-
Freight bill number first in file name: selected because the files should be linked to orders via the freight bill number.
-
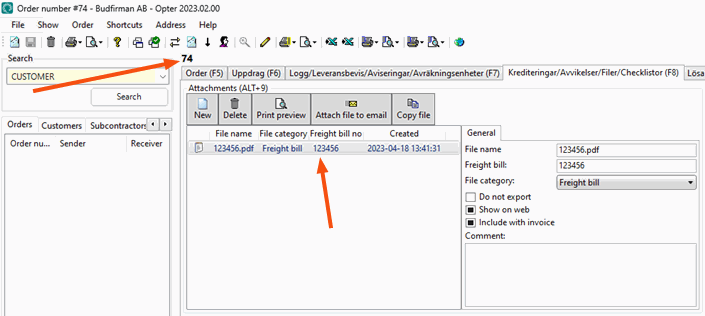
This is what it looks like in order reception when an imported freight bill has been linked to an order
Freight bill 123456 has been linked to order 74.
From time to time the dispatcher checks Order > Attachments to see whether there are any freight bills that have not been automatically linked to an order. The file category is visible in the Type (1) column. The dispatcher can link the freight bill to an order manually by entering the order number in the Order no. (2) column and then clicking on Save (3).