Price items, overview
Last updated: 15 September 2025
In this article
Price items are the building blocks on which the prices of an order are built. Price items are unique to each price list. Although they have the same name, they may have different settings and pricing in different price lists. You must therefore be in the correct price list when you create a Price item. Price items are used to price the services that make up the order. They can also be added manually to the item rows on the order.
Create a Price item
Open the price list you want to create the Price item in and click on ![]() on the tab Price items to open the item register for that price list. Click on New and fill in the name.
on the tab Price items to open the item register for that price list. Click on New and fill in the name.
Start by just giving the Price item a name and then paste the prices from Excel into the matrix before making any other settings. Deleting rows and columns from the price matrix can sometimes be tricky, so if you need to delete the Price item to start again from scratch, all settings are not lost.
For more information on the settings in the trade mark register, see Price items (window).
Copying Price items
Open the price list containing the price item to be copied and go to the Price items tab. Then drag the price item from the list and drop it on the destination price list.
-
It is not possible to copy a price item from a main price list to a subordinate price list in order to make it editable in the subordinate price list. The subordinate price list inherits the main price list items and is already included in the subordinate price list.
-
It is not possible to copy Price items from a subordinate price list inherited from a master price list. Inherited price items have greyed-out checkboxes on the Price items tab. Copy them from the main price list instead.
-
Sub-price items are not copied.
Entering prices in the price matrix
You can set and combine prices almost any way you want. If you are not sure how to obtain the prices you want, contact .
-
Start from your existing price list and create a price matrix in Opter that is as similar as possible with conditions and settings (see Examples of pricing).
-
Filter out what you want to price (see Filter).
-
Fill in the prices, or export the empty matrix with just the conditions to XML and fill the prices in there (see Export prices to Excel).
-
Paste the prices into the price matrix from Excel (see Pasting prices from Excel into the price matrix).
-
Filter out the next combination of terms you want to price and repeat.
Work with small quantities of prices to start with. Check that they work as you intend by creating a test order in Order reception, before writing or pasting all the prices to be applied in the matrix.
All prices in the matrix are "from" prices. If a line reads "20 km", the price is valid from 20 km until the value on the next line, which might be "25 km". This means that the axes of the matrix should always start at "0" because you probably want a price from 0-4.99 km as well.
Register-based conditions and price units
Register-based conditions get their values from registers, such as zones and price vehicle types. Price units get their values from the dimensions of the order, such as weight and distance. As there are no fixed values for the price units, when you add a price unit as a condition, you have to add the ranges to the price matrix yourself. When you add a registry-based condition, the values from the registry are automatically added.
The price matrix can contain a maximum of two price units as conditions.
Pricing of services
When you create an order in Opter, you select a service on the order. The service is priced with one or more Price items. This is how you price the services in a price list:
-
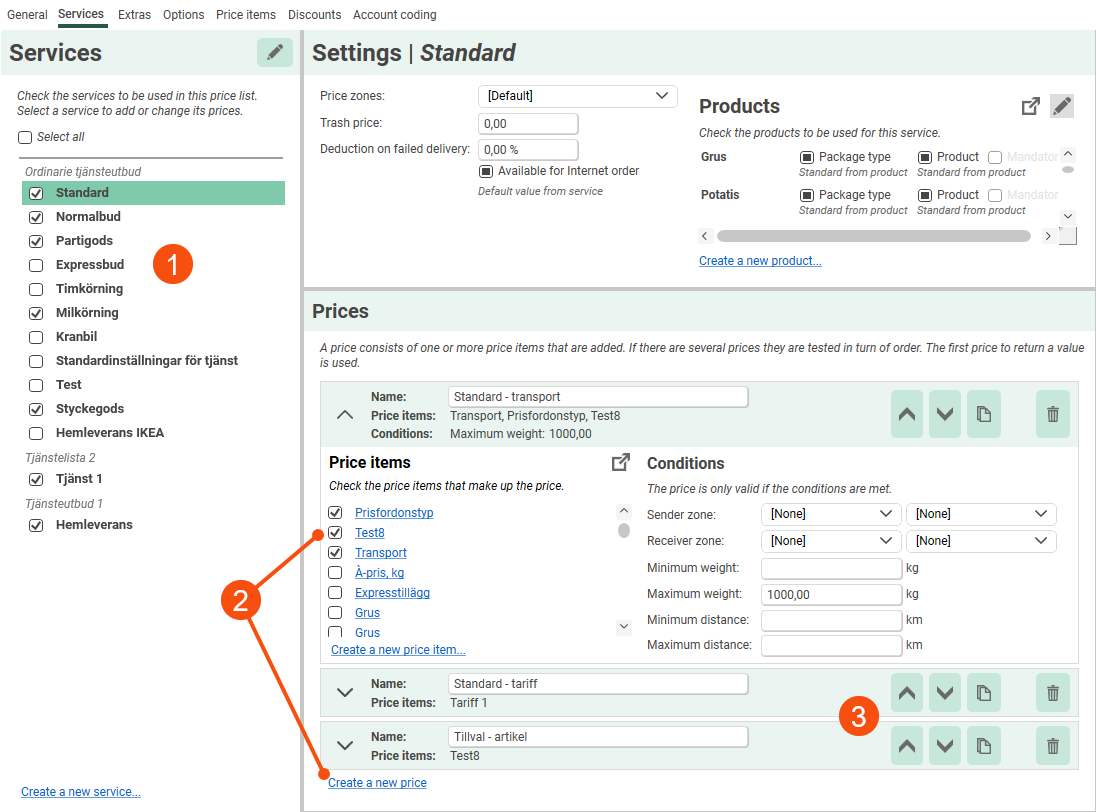
Open the price list, go to the Services tab and select the service from the list.
-
Add a price under Prices, expand and select the services to be used to calculate the price of the order.
-
You can add multiple pricing to the same service. Rank the prices so that Opter selects the prices in the order you want. Prices are tested in turn. The first pricing method that gives a price for the order is used.
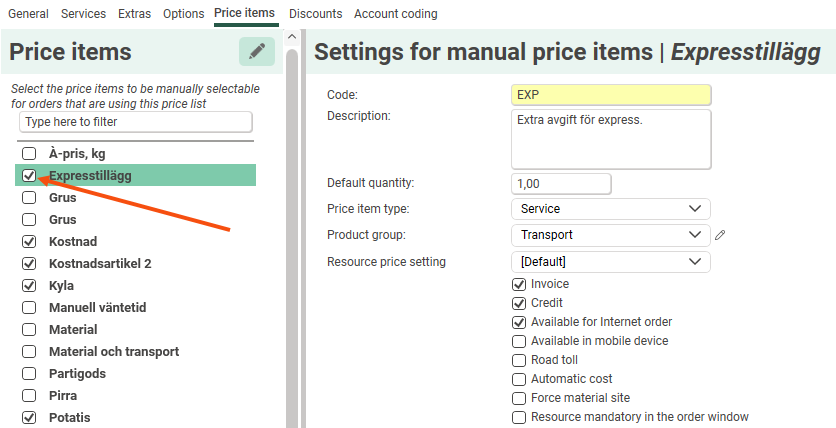
Using Price items manually in Order reception
On the Price items tab of the price list, select the Price items that can be manually added to an order by ticking them in the list. The Price item can then be added to the item rows in Order reception. To make them also available on the web portals and in Opter Driver, select Available for Internet order and Available in mobile device respectively.