Create price lists
Last updated: 27 July 2026
In this article
New price lists can be created by copying an existing price list, by having a new price list inherit settings from a master price list that is referenced, or creating a new one from scratch.
If the prices are in Excel files, these can be pasted in at a later stage, but first a price list has to be created, which is the container for the prices. The actual prices (numbers) themselves can then be pasted into the price matrix for the price items.
Step 1: Create the price list
Copy a price list
A new price list can be created by copying one similar to the one that is to be created, and then making the changes in the copy. This is good because the price items and settings are included instead of them having to be created again.
Select the price list you want to copy from the list and click on Copy in the menu. Then change the following basic settings on the General tab of the copy:
-
Name: It is not possible to save the new price list until it has been given a name.
-
Internet name: If the price list is to be selectable on the web portals, it is good if it has a unique name there.
-
Private: Make the price list private and select it in the customer registry for the customers to which it applies. Then it is automatically selected on orders with those customers.
-
Available for Internet order
-
Valid from and possibly Valid until: Enter the date if the price list replaces another price list.
If you copy a private price list, the new price list will become active for all customers who have the original price list. This is so that, when making price adjustments by copying the price list, you do not have to go into each customer’s records and mark the new price list as authorised. If the new price list is to be specific to a particular customer, you must go to the customer register (tab Pricing) and deselect the new price list (the copy) for all customers for whom the original price list was activated.
New price list based on a master price list
To create a new price list, click on New in the menu. Select the price list to be used as the basis for the new price list from the Main price list drop-down menu on the General tab. The new price list inherits all prices and settings from the main price list except those on the General and Account coding tabs.
Basing it on a main price list can be useful if only small deviations from a general price list are required, such as a few customer-specific changes, and the master price list should still apply to a large extent. The customer-specific price lists can then be based on the general price list and the adjustments required for each customer can be made in the customer price lists. For example, if you change the price of an extra in the main price list, it will also change in the customer price lists, unless you have actively changed the price in one of the customer price lists. In this case, the price in the customer price list is not overwritten, even if the change was made later in the main price list than in the customer price list. This means it is possible to keep the general settings for price lists up to date, while still having individually customised price lists for customers.
Settings inherited from the main price list are shown in grey italic text and filled checkboxes (![]() ).
).
There is no way to distinguish subordinate price lists from other price lists in Opter. Enter the main price list in the price list name to immediately see which price lists belong to which main price lists, for example “Customer price list 1 (Standard price list)”, in other words the customer price list is based on the main price list “Standard price list”.
Creating a new price list from scratch
If a new price list is created from scratch, all the price items with which the prices are to be calculated from scratch must also be created, or copied. Click on New in the toolbar and start by giving the price list a name. For more information about other settings, see Price lists (window).
Step 2: Select services
Go to the Services tab and mark the services that should be selectable on orders with this price list. A basic set of services is included in the installation. To add more, click on Create a new service or ![]() to open the registry of services. For more information, see Services (window).
to open the registry of services. For more information, see Services (window).
Step 3: Ensure that all price items needed for the new price list are available
Prices in a price list are based on price items. If a price list is copied, the new price list contains the same price items as the copied price list, and these can be edited. If a price list is being created from scratch, the price items that are to be used must also be created from scratch, or copied from existing price lists.
Copying price items between price lists
Open the price list containing the price item to be copied and go to the Price items tab. Then drag the price item from the list and drop it on the destination price list.
-
It is not possible to copy a price item from a main price list to a subordinate price list in order to make it editable in the subordinate price list. The subordinate price list inherits the main price list items and is already included in the subordinate price list.
-
It is not possible to copy Price items from a subordinate price list inherited from a master price list. Inherited price items have greyed-out checkboxes on the Price items tab. Copy them from the main price list instead.
-
Sub-price items are not copied.
Subordinate price list
If the new price list is based on a main price list, the price items in the new price list cannot be edited, and this has to be done in the main price list. However, it is possible to add new price items to the subordinate price list or copy items from another price list.
More information about price items
Step 4: Put a price on services
Services are priced by selecting which price items are to make up the price under Prices on the Services tab. The price from the individual price items is totalled to give a price on a price row on the order. There can be several prices for the same service. In such cases, the prices are then tested in turn, and the first price that produces a result is applied to the order.
If you have multiple Price items in a price, you can specify which items must generate a value for that price to be applied to the order by unchecking Allow failure on those items. By default, all items must generate values for the price to be applied to the order.
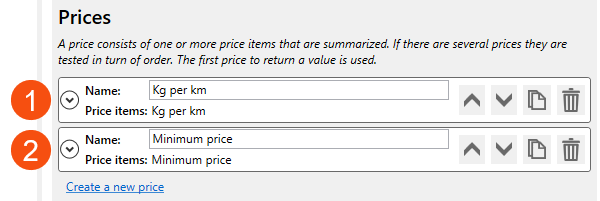
Define that the next price in the price list is used if, for example, there is no weight on an order. State that the first price in the price matrix should apply from "0.01" kg instead of "0". If the weight of the order is 0, that price item does not give a price, "Kg per km" in our example (1), and the next price in the price list is tried (2), which is a minimum price.
In this particular case, it would also be possible to put both price items in the same price and select the Allow failure checkbox on the price item "Kg per km", and deselect it on the price item with the minimum price.
Subordinate price list
Prices of services inherited from a main price list are always lower in the order of priority than the prices created directly in the subordinate price list. To be able to create a new price in a subordinate price list, select service active (![]() instead of
instead of ![]() ).
).