Last updated: 26.07.2024
Valid from: Opter 2024.06.00, Opter Driver for iOS and Opter Driver Labs for Android 2.4.7
Adapting the POD view in Opter Driver for iOS
The proof of delivery (POD view) is displayed in Opter Driver at the following times:
-
When the driver changes the status of a shipment and has to register a proof of delivery.
-
If the driver presses the Proof of delivery menu option or the name of the delivery order type in the detail view, for example Nobody home. For more information, see Setting the POD type as a shortcut on the menu in Opter Driver for iOS.
The fields and buttons that are displayed and those that are mandatory to fill in can be defined. For example, this is what it could look like, see the image below.
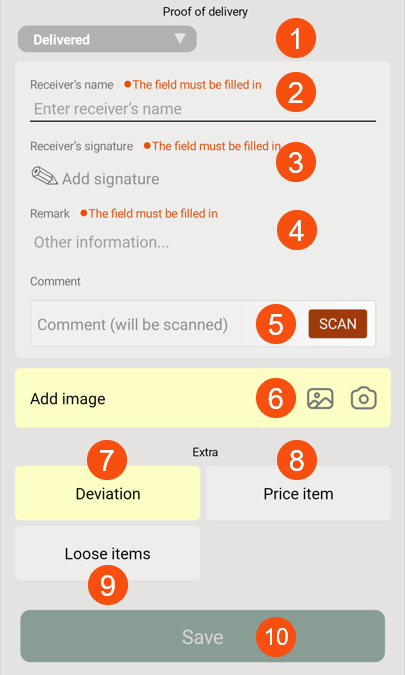
In the image above, the driver selects the type of proof of delivery (1), enters the receiver's name (2), adds the signature (3), remark (4), possible comment (5), image (6), deviation (7), possible price items (8) and loose items (9), and then saves the proof of delivery (10). For more information, see Register proof of delivery (POD) in Opter Driver for iOS.
Preparation
Many of the settings below will be made in the same window in Opter. So you can choose to do in one of the following ways:
-
Follow the instructions below, thereby making the settings for one field at a time (and jumping between the windows).
-
Open one window at a time and make all the settings there, then move on to the next window. Follow the instructions below to find out which settings can be made. The following window contains various settings for the POD view:
-
Settings > Mobile data > Settings mobile data. For more information, see Mobile data settings (window) and below.
-
Settings > Proof of Delivery (POD) > Proof of delivery types. For more information, see Proof of delivery types (window) and below.
-
Register > Customers, Proof of Delivery (POD) tab. (To make exceptions for certain customers).
-
Step 1: Show the Proof of delivery menu option and shortcut
Select whether or not the Proof of delivery menu option and possible shortcuts to certain proof of delivery types should appear on the menu in the details view.. Proceed as follows:
-
If the Proof of delivery menu option should be shown in the detail view, the ProofOfDeliveryPermission mobile data setting should be set to ”True” (default). For more information, see Mobile data settings (window).
-
If the Proof of delivery menu option and possible shortcut to a proof of delivery type that sets the status to Delivered/Unloaded should appear in the detail view menu when the driver changes the status to Delivered/Unloaded, the ManualStatusChangeDeliveryPermission mobile data setting must be set to "True" (default).
For more information, see Setting the POD type as a shortcut on the menu in Opter Driver for iOS and Setting how status can be changed in Opter Driver for iOS.
-
If the Proof of delivery menu option and possible shortcut to a proof of delivery type that sets the status to Pickup/Loaded should appear in the detail view menu when the driver changes the status to Pickup/Loaded, the ManualStatusChangePickUpPermission mobile data setting must be set to "True" (default).
-
Click on
 to save all changes.
Step 2: Set the proof of delivery type’s availability
For example, if the Delivered, Nobody home and New address proof of delivery types should be shown in Opter Driver, proceed as follows:
-
Click on Settings > Proof of Delivery (POD) > Proof of delivery types and the General tab.
-
Select the Available in mobile device checkbox for each proof of delivery type that is to be displayed in Opter Driver.
The types of proof of delivery are shown in the list on the far left. For more information, see Introduction to POD (proof of delivery).
-
If the proof of delivery type should appear directly in the menu in the detail view (as a shortcut), then also select the Display on the menu in Opter Driver checkbox. For more information, see Setting the POD type as a shortcut on the menu in Opter Driver for iOS.
-
Click on
to save all changes.
Step 3 (optional): Set the Checklist field
Follow the instruction Setting whether or not to display checklists in Opter Driver.
Step 4 (optional): Set the Check freight bill number field
Follow the instruction Configuring the freight bill number check in Opter Driver.
Step 5 (optional): Set the Receiver’s name field
The Receiver’s name field is always displayed.
-
To force the driver to enter the receiver’s name, select the Require name checkbox under Settings > Proof of Delivery (POD) > Proof of delivery types > General. For more information, see Proof of delivery types (window).
The setting can be overridden for individual customers by selecting Name always optional on the Proof of Delivery (POD) tab in the customer registry.
-
Click on
to save all changes.
Step 6 (optional): Set the Receiver’s signature field
The Receiver’s signature field is always displayed.
-
To force the driver to get a signature from the receiver, select the Require signature checkbox under Settings > Proof of Delivery (POD) > Proof of delivery types > General. For more information, see Proof of delivery types (window).
The setting can be overridden for individual customers by selecting Signature always optional on the Proof of Delivery (POD) tab in the customer registry.
-
Click on
to save all changes.
Setting which fields are to be displayed on the signature page for proof of delivery is done in the Design field for mobile window or in the App.OpterDriver.Design XML file, depending on which is used. For more information, see Design field for mobile (window), App.OpterDriver.Design and Configuring which fields are displayed in Opter Driver for iOS.
Step 7 (optional): Set the Remark field
It can be set so that the driver can or must enter a remark. Proceed as follows:
-
To show the Remark menu option in the POD view, the PodRemarkEnabled mobile data setting has to be set to ”True” (default). For more information, see Mobile data settings (window).
-
To force the driver to write a remark, select the Require remark checkbox under Settings > Proof of Delivery (POD) > Proof of delivery types > General. For more information, see Proof of delivery types (window).
The setting can be overridden for individual customers by selecting Remark always optional on the Proof of Delivery (POD) tab in the customer registry.
-
Click on
to save all changes.
Step 8 (optional): Set the Comment field
In the Comment field, the driver can enter a comment manually or scan a barcode, for example. It can be set so that the driver can or must provide a comment. It is also possible to specify whether the driver should enter a comment manually or scan in a comment.
Proceed as follows:
-
To show the Comment menu option in the POD view, the PodCommentEnabled mobile data setting has to be set to ”True”. (The default setting is “False”). For more information, see Mobile data settings (window).
-
Choose whether the driver should enter a comment manually or scan. If you want the driver to scan the comment (for example, scan a barcode), select the Scan comment checkbox under Settings > Proof of Delivery (POD) > Proof of delivery types. For more information, see Proof of delivery types (window).
-
It can be made mandatory to enter a comment for a certain type of proof of delivery by selecting the Require comment checkbox under Settings > Proof of Delivery (POD) > Proof of delivery types. For more information, see Proof of delivery types (window).
The setting can be overridden for individual customers by selecting Remark always optional on the Proof of Delivery (POD) tab in the customer registry.
-
Click on
to save all changes.
Step 9 (optional): Set the Delay and Comment fields
Select whether the driver has to state the reason for the delay and provide a comment in the event of a delivery delay. If the driver has to enter a delay reason and comment, the Select reason for delay drop-down list and a field for the delay comment are displayed.
Follow the instructions in Reason and comment mandatory in Opter Driver in the event of a delay.
Step 10 (optional): Set the Add image field
Choose whether drivers should be able to add an image to the proof of delivery/shipment, and whether or not it should be mandatory for the driver to add an image.
Proceed as follows:
-
Choose whether or not to show the Add image field in the POD view by setting the PodPictureEnabled mobile data setting to "True" or "False":
-
”True” = the Add image field is displayed in the POD view and the driver can add an image.
-
”False” (default) = The Add image field is not displayed in the POD view and the driver can thus not add an image.
For more information, see Mobile data settings (window).
-
-
If PodPictureEnabled is set to "True", it is possible to choose whether or not adding an image is mandatory.
To force the driver to add an image, select the Require image checkbox under Settings > Proof of Delivery (POD) > Proof of delivery types > General. For more information, see Proof of delivery types (window).
The setting can be overridden for individual customers by selecting Image always optional on the Proof of Delivery (POD) tab in the customer registry.
-
Click on
to save all changes.
For more information, see Adding images in Opter Driver for iOS.
Step 11 (optional): Set the Loose items button
Choose whether drivers should be able to enter the number of loose items, and whether that should be mandatory if loose items are registered on the order. Proceed as follows:
-
If the Loose items field should appear in the POD view (and in the menu in the detail view), set the LooseItemsPermission mobile data setting to "True". (The default setting is “False”).
The drivers can then state loose objects. For more information, see Mobile data settings (window).
-
If LooseItemsPermission is set to "True", it is possible to use LooseItemForceSetValue to choose whether or not it is mandatory:
-
“True” = If there are loose items registered on the order, the driver must enter the number of loose items as follows:
-
When loading the first shipment on the order, the driver must specify Starting quantity, if it is not already there.
-
When unloading the last shipment on the order, the driver must specify Ending quantity, if it is not already there.
-
-
“False” (default) = the driver does not have to indicate the number of loose items, but there is an option to do so.
-
-
Click on
to save all changes.
For more information, see Register proof of delivery (POD) in Opter Driver for iOS.
Step 12 (optional): Set the Deviation button
Follow the instructions in Require deviation for POD registration in Opter Driver for iOS.
Step 13 (optional): Set the Price item button
Choose whether the drivers should be able to add new price items in the POD view, and whether it should be optional or mandatory.
Proceed as follows:
-
If drivers should be able to add new price items in the POD view, the AddNewPriceItemPermission mobile data setting has to be set to ”True” (default). The Price item button will then appear in the POD view. For more information, see Mobile data settings (window) and Customising the price item view in Opter Driver.
If drivers should also be able to add new price items via the menu in the detail view, set ArticlesPermission to “True” (default). For more information, see Customising the price item view in Opter Driver.
-
To force the driver to add a price item, select the Price item mandatory checkbox under Settings > Proof of Delivery (POD) > Proof of delivery types > General. For more information, see Proof of delivery types (window).
This setting cannot be overridden for individual customers.
-
Click on
to save all changes.
To configure the fields that are displayed in the price item view, see Customising the price item view in Opter Driver.
Step 14 (optional): Set the Changes button
Choose whether or not drivers should be able to make changes to shipments in Opter Driver. If the Changes button is displayed, drivers can make changes. The changes are saved when the driver taps Save at the bottom of the POD view.
The ChangesPermissionmobile data setting determines whether or not the Changes button is displayed in the POD view and on the menu in the detail view. Follow the instructions in Changes to orders in Opter Driver.
By default, changes made in Opter Driver must be manually approved in dispatch for the change to be saved, but it can be set so that no changes at all need to be approved, or only certain changes need to be approved. For more information, see Setting how changes made in Opter Driver are approved.
Step 15: App users have to log out
Users who are logged in to Opter Driver when the changes are saved in Opter must log out and then log back in to the app to see the changes.